1. Quick start
1.1. On Kubernetes
You can install Ontrack using its Helm chart:
helm repo add ontrack https://nemerosa.github.io/ontrack-chartTo install the ontrack chart:
helm install ontrack ontrack/ontrackTo uninstall the chart:
helm delete ontrackThis installs 4 services:
-
Ontrack itself
-
a Postgres 15 database
-
an Elasticsearch 7 single node
-
a RabbitMQ message broker
|
To connect to Ontrack, enable the ingress or activate a port forward. |
See https://github.com/nemerosa/ontrack-chart for more options.
1.2. With Docker Compose
On a local machine, you can start Ontrack using Docker Compose:
curl -fsSLO https://raw.githubusercontent.com/nemerosa/ontrack/master/compose/docker-compose.yml
docker compose up -d
This sets up:
-
a Postgres database
-
an ElasticSearch (single node)
-
a RabbitMQ message broker
-
Ontrack running on port 8080
Go to http://localhost:8080 and start using Ontrack.
The initial administrator credentials are admin / admin.
Where to go from there?
-
learn how to feed information into Ontrack
-
learn how to use the Ontrack UI
-
… or to use its Ontrack API
You can also check the following sections:
2. Installation
There are several ways to install Ontrack.
2.1. Docker Compose installation
The fastest way to start Ontrack is to use Docker Compose, but it might not be adapted for a production environment.
The Docker Compose file can be downloaded from:
You can simply run it using:
docker-compose up -dThis starts three services:
-
Ontrack itself at http://localhost:8080
-
a Postgres database
-
an Elasticsearch single node
-
a RabbitMQ message broker
Neither Postgres, Elasticsearch and RabbitMQ are exposed by default, but you can of course edit the Docker Compose file at your convenience.
The version of Ontrack is set by default to 4 (latest 4.x version) but
you can override it using the ONTRACK_VERSION environment variable.
The memory settings and other JVM parameters for Ontrack can be passed
using the JAVA_OPTIONS environment variable, which defaults to
-Xms1024m -Xmx1024m.
Other Ontrack configuration properties must be passed through environment variables.
Three named Docker volumes are created for the data to be persisted:
-
ontrack_postgres -
ontrack_elasticsearch -
ontrack_data
For other volume configuration, please edit the Docker Compose file.
2.2. Docker installation
The Ontrack Docker image is available in the Docker Hub at https://hub.docker.com/r/nemerosa/ontrack.
Each specific version is available and also a "latest" version per major and minor version. For example:
-
4
-
4.0
-
4.0.0
To run Ontrack, you need to make sure that the minimal dependencies are available:
-
Postgres
-
Elasticsearch
-
RabbitMQ
| See Installation dependencies for details. |
You can then run Ontrack using:
docker container run \
    --detach \
    --publish 8080:8080 \
    -e SPRING_DATASOURCE_URL=<Postgres Ontrack DB JDBC URL> \
    -e SPRING_DATASOURCE_USERNAME=<Postgres Ontrack DB Username> \
    -e SPRING_DATASOURCE_PASSWORD=<Postgres Ontrack DB Password> \
    -e SPRING_ELASTICSEARCH_URIS=<Elasticsearch URL> \
    -e SPRING_RABBITMQ_HOST=<RabbitMQ Host>
    -e SPRING_RABBITMQ_USERNAME=<RabbitMQ Username>
    -e SPRING_RABBITMQ_PASSWORD=<RabbitMQ Password>
    nemerosa/ontrack:4
The memory settings and other JVM parameters for Ontrack can be passed using the JAVA_OPTIONS environment variable.
Other Ontrack configuration properties must be passed through environment variables.
Optionally, a volume can be mapped to the Ontrack /var/ontrack/data Docker volume. This is particularly needed when using a secret storage based on the file system (see Setup).
2.3. Helm installation
You can install Ontrack into a Kubernetes cluster using Helm:
helm repo add ontrack https://nemerosa.github.io/ontrack-chart
helm install my-ontrack-release ontrack/ontrack
This installs 4 services:
-
Ontrack itself
-
a Postgres 11 database
-
an Elasticsearch 7 single node
-
a RabbitMQ message broker
To connect to Ontrack, enable the ingress or activate a port forward.
For more options and documentation, please check the chart repository at https://github.com/nemerosa/ontrack-chart
2.4. Package installation
Ontrack provides installation packages for Debian & CentOS. Both packages can be downloaded in the release page in GitHub: https://github.com/nemerosa/ontrack/releases.
To run Ontrack, you need to make sure that the minimal dependencies are available:
-
Postgres
-
Elasticsearch
-
RabbitMQ
2.4.1. RPM installation
To install Ontrack using RPM:
rpm -i ontrack.rpmThe following directories are created:
| Directory | Description |
|---|---|
|
Binaries and scripts |
|
Working and configuration directory |
|
Logging directory |
You can optionally create an application.yml configuration file in
/usr/lib/ontrack. For example, to customise the port Ontrack is running on:
server:
  port: 9080
Ontrack is installed as a service using /etc/init.d/ontrack.
# Starting Ontrack
sudo service ontrack start
# Status of Ontrack
sudo service ontrack status
# Stopping Ontrack
sudo service ontrack stop
To upgrade Ontrack:
# Stopping Ontrack
sudo service ontrack stop
# Updating
sudo rpm --upgrade ontrack.rpm
# Starting Ontrack
sudo service ontrack start
The optional /etc/default/ontrack file can be used to define
environment variables like
JAVA_OPTIONS or SPRING_DATASOURCE_URL.
For example:
JAVA_OPTIONS=-Xmx2048m
SPRING_DATASOURCE_URL=jdbc:postgres://pg/ontrack
Other Ontrack configuration properties can be passed the same way.
2.4.2. Debian installation
To install Ontrack using Debian:
dpkg -i ontrack.debThe following directories are created:
| Directory | Description |
|---|---|
|
Binaries and scripts |
|
Working and configuration directory |
|
Logging directory |
Ontrack is installed as a service using /etc/init.d/ontrack.
# Starting Ontrack
sudo service ontrack start
# Status of Ontrack
sudo service ontrack status
# Stopping Ontrack
sudo service ontrack stop
The optional /etc/default/ontrack file can be used to define
environment variables like
JAVA_OPTIONS or SPRING_DATASOURCE_URL.
For example:
JAVA_OPTIONS=-Xmx2048m
SPRING_DATASOURCE_URL=jdbc:postgres://pg/ontrack
Other Ontrack configuration properties can be passed the same way.
2.5. JAR installation
Ontrack can be downloaded as a JAR and started as a JVM application.
To run Ontrack, you need to make sure that the minimal dependencies are available:
-
Postgres
-
Elasticsearch
-
RabbitMQ
|
You need a JDK 11 or better to run Ontrack. |
Download the JAR from the Ontrack release page.
Start it using:
java -jar ontrack.jarOptions can be passed on the command line, either:
-
using system properties:
-Dspring.datasource.url=...-
or environment variables:
SPRING_DATASOURCE_URL=...2.6. Installation dependencies
Ontrack relies on the following components to be available:
-
Postgres - for storage of information
-
Elasticsearch - for search indexation
-
RabbitMQ - for asynchronous processing
2.6.1. Postgres
Versions 9.5.+ to version 11.+ of Ontrack have been tested.
By default, Ontrack will use the following configuration properties and their default values to connect to Postgres:
| Property | Env variable | Description | Default value |
|---|---|---|---|
spring.datasource.url |
SPRING_DATASOURCE_URL |
JDBC URL to the Postgres Ontrack DB |
|
spring.datasource.username |
SPRING_DATASOURCE_USERNAME |
Username used to connect to the Postgres Ontrack DB |
|
spring.datasource.password |
SPRING_DATASOURCE_PASSWORD |
Password used to connect to the Postgres Ontrack DB |
|
Other properties are available in Spring Boot.
2.6.2. Elasticsearch
Version 7.5.+ has been tested.
By default, Ontrack will use the following configuration properties and their default values to connect to ElasticSearch:
| Property | Env variable | Description | Default value |
|---|---|---|---|
spring.elasticsearch.uris |
SPRING_ELASTICSEARCH_URIS |
REST URI of Elasticsearch |
Other properties are available in Spring Boot.
2.6.3. RabbitMQ
Version 3.8.+ has been tested.
By default, Ontrack will use the following configuration properties and their default values to connect to Postgres:
| Property | Env variable | Description | Default value |
|---|---|---|---|
spring.rabbitmq.host |
SPRING_RABBITMQ_HOST |
RabbitMQ host name |
|
spring.rabbitmq.username |
SPRING_RABBITMQ_USERNAME |
RabbitMQ user name |
|
spring.rabbitmq.password |
SPRING_RABBITMQ_PASSWORD |
RabbitMQ password |
|
Other properties are available in Spring Boot.
3. Setup
While Ontrack can be configured using the UI, it’s recommended to use the Configuration as Code (CasC) feature.
3.1. Configuration as Code
Ontrack supports to be configured as code by default.
It uses a set of YAML resources defined as comma-separated list of locations by the ontrack.config.casc.locations configuration property.
For example, when using the environment variables:
ONTRACK_CONFIG_CASC_LOCATIONS=file:/path/to/file.yaml,https://path.com/fileAll YAML resources defined by those locations are merged together according to the following rules:
-
right-most files take precedence for single values
-
arrays are always concatenated to each other
The list of locations can contain path to folders on a file system. In this case, Ontrack will use all the files in this folder.
3.1.1. [experimental] Casc secrets
Secrets can be injected into Casc file using this syntax:
{{ secret.<base>.<name> }}For example:
some-secret-field: {{ secret.my-secret.my-property }}By default, this is interpolated and evaluated using the SECRET_<BASE>_<NAME> environment variable, SECRET_MY_SECRET_MY_PROPERTY for the example above.
If this environment variable value is my-password, the final Casc file will be:
some-secret-field: my-passwordAlternatively, the secrets can be mapped to files by settings the ontrack.config.casc.secrets.type configuration property to file and the ontrack.config.casc.secrets.directory one to a valid directory.
Ontrack will then look for the secrets in files called <base>/<name>.
In the example above, the value of the {{ secret.my-secret.my-property }} expression will be looked for in the <directory>/my-secret/my-property file.
|
The |
3.1.2. Casc schema
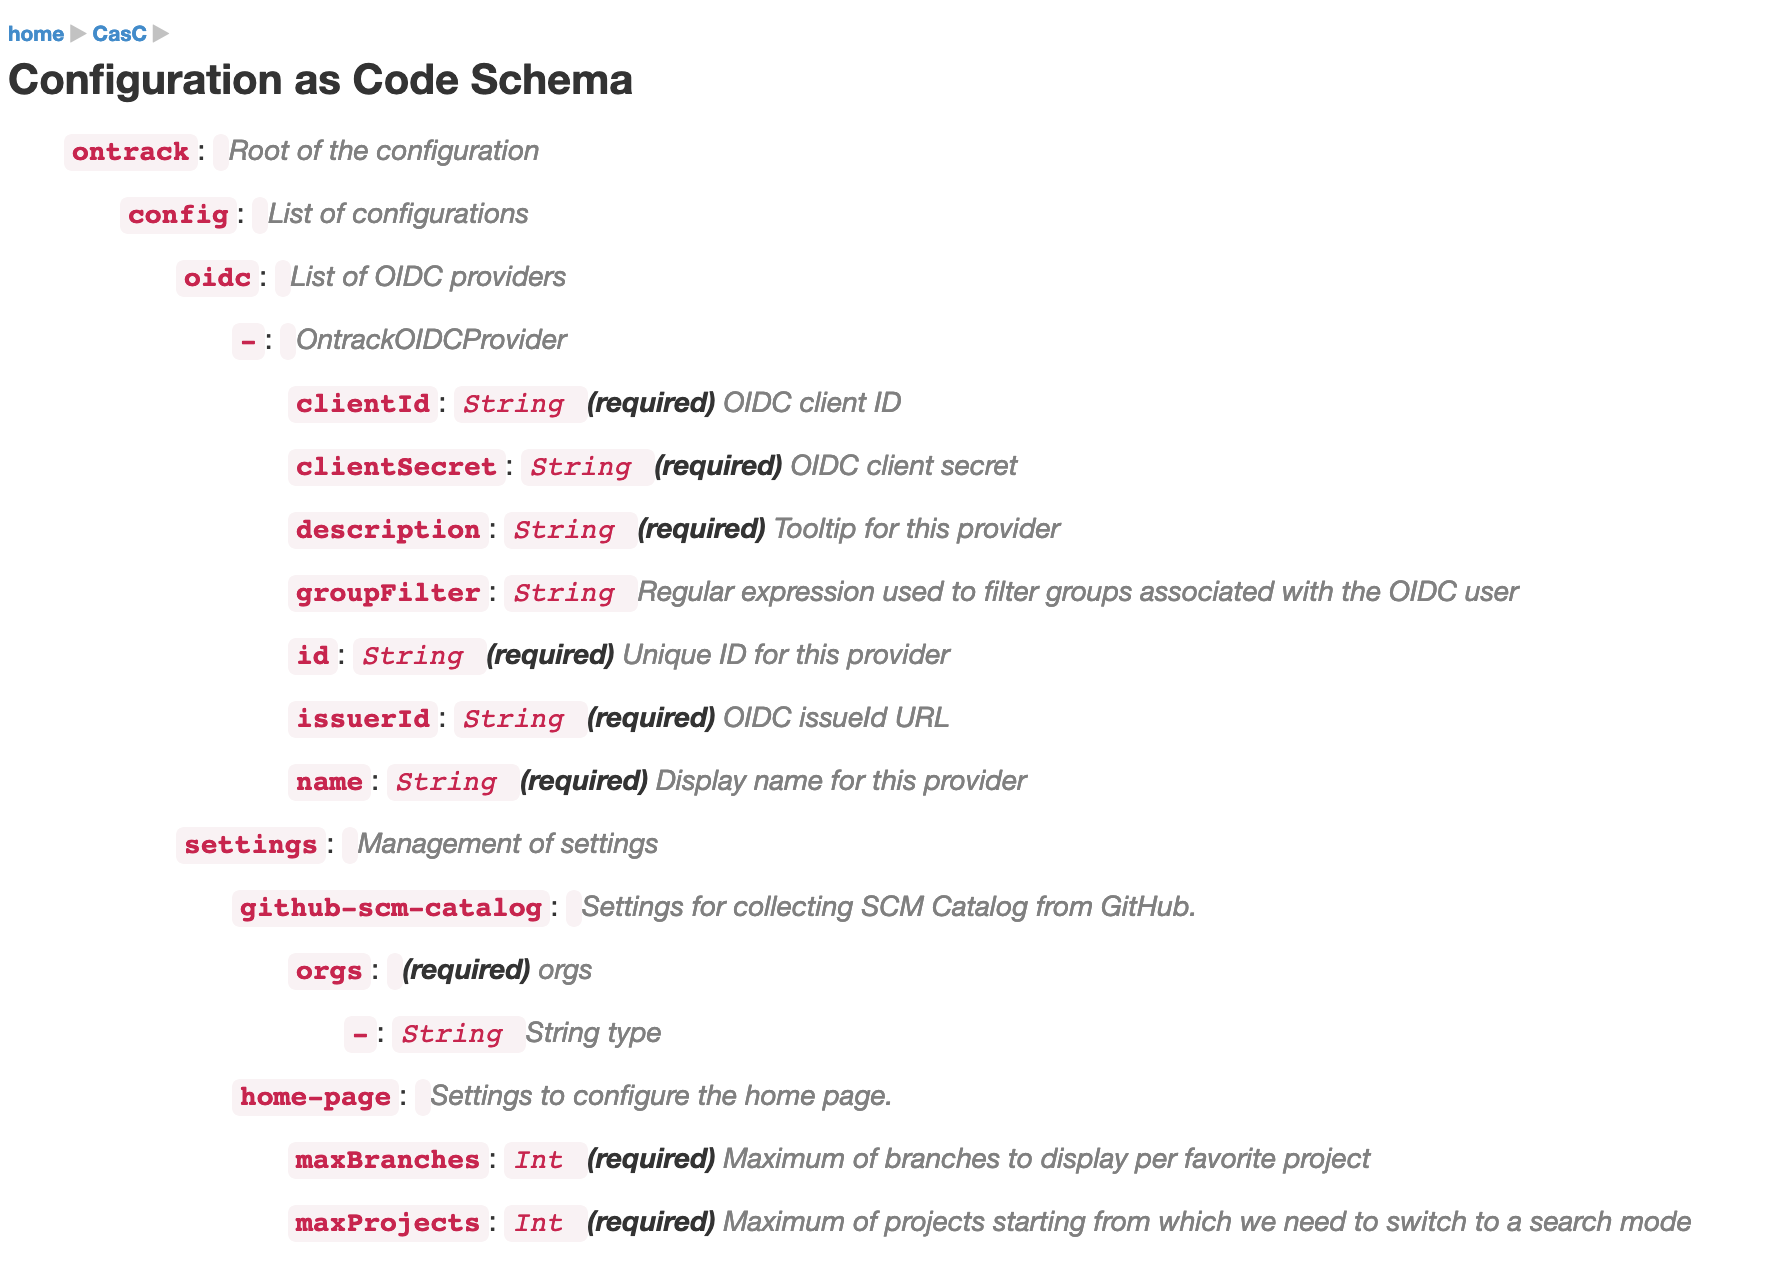
All those files must comply with the Ontrack CasC format. This schema is available in the UI in the user menu at Configuration as code, and by clicking on the Show button right of the CasC schema section:
This goes to the page at http://localhost:8080/#/extension/casc/casc-schema :
3.1.3. Examples
To configure the security settings so that all authenticated users have access to all the projects and can participate in all of them:
ontrack:
  config:
    settings:
      security:
        grantProjectViewToAll: true
        grantProjectParticipationToAll: true
To add an OIDC provider (Okta for example):
ontrack:
  config:
    oidc:
      - id: okta
        name: My Okta
        description: The Okta account used by my company
        issueId: https://<okta domain>.okta.com/oauth2/default
        clientId: <Client ID of the application in Okta>
        clientSecret: <Client secret of the application in Okta>
        groupFilter: ontrack-.*
To add a GitHub configuration based on an OAuth2 token:
ontrack:
  config:
    github:
      - name: GitHub
        token: <your secret token>
3.1.4. Controls
The Configuration as code configuration page is available at:
-
user menu > Configuration as code
-
directly at http://localhost:8080/#/extension/casc/casc-schema
On this page, you can:
-
display the schema
-
see the list of locations where Ontrack fetches its CasC YAML resources
-
reload the configuration as code
-
display the current configuration as YAML (handy when migrating an existing installation to CasC)
Reloading the configuration as code can be done from the UI as mentioned above but also:
-
through a
PUTREST call at/extension/casc/reload:
curl -X PUT --user admin <ontrack>/extension/casc/reload-
through the following GraphQL mutation:
mutation {
    reloadCasc {
        errors {
            message
        }
    }
}
3.1.5. Upload
The default Casc setup relies on files (or URL) available from the Ontrack application and in a SaaS context, these may not be available or even configurable.
A CasC upload endpoint can be enabled to allow users to upload their own Casc configuration, by using the ontrack.config.casc.upload.enabled configuration property or ONTRACK_CONFIG_CASC_UPLOAD_ENABLED environment property.
When done, it becomes possible to upload a YAML file, which is will be picked up next time the Casc is reloaded.
For example, given a casc.yaml file:
curl --user $USER:$TOKEN \
  $URL/extension/casc/upload \
-F "[email protected];type=application/yaml"|
The user must have the Global settings user rights (typically an administrator). |
3.1.6. Using a JSON schema to edit Casc YAML files
You can download a [JSON Schema](https://json-schema.org/) that can be used to edit Casc YAML files.
First, download this schema locally by navigating to System > Configuration as Code. Select Schema and click on JSON Schema.
This offers to download an ontrack-casc-schema.json file: save it locally.
|
The Ontrack Casc JSON schema is versioned using the Ontrack version you download it from. |
To use it for the edition of a Casc YAML file, you can do the following in Intellij IDEA:
-
in the Settings, select Languages & Frameworks > Schema & DTDs > JSON Schema Mappings
-
in Schema file or URL, click on the folder icon and select the downloaded
ontrack-casc-schema.jsonfile -
apply and save the settings
Open a YAML file.
To associate it with the Ontrack Casc schema, click on the Schema component in the bottom right corner of the file and select ontrack-casc.
You should now have auto-completion and validation.
4. Authentication
Ontrack supports the following authentication backends:
|
Ontrack is able to work with multiple sources of authentication. |
4.1. Built-in authentication
Ontrack comes with its own registry to store accounts. In particular, it contains the built-in admin user.
No configuration is needed to enable the built-in authentication.
To create and manage accounts, go to your user menu and select Account management.
When user are connected using the built-in authentication mechanism, they are able to change their password using the Change password user menu.
|
Administrators can lock built-in users so they cannot change their password; this is needed to create fixed guest accounts. |
For the management of built-in accounts, see Accounts management.
4.2. LDAP authentication
It is possible to enable authentication using a LDAP instance and to use the LDAP-defined groups to map them against Ontrack groups.
4.2.1. LDAP general setup
As an administrator, go to the Settings menu. In the LDAP settings section, click on Edit and fill the following parameters:
-
Enable LDAP authentication: Yes
-
URL: URL to your LDAP
-
User and Password: credentials needed to access the LDAP
-
Search base: query to get the user
-
Search filter: filter on the user query
-
Full name attribute: attribute which contains the full name,
cnby default -
Email attribute: attribute which contains the email,
emailby default -
Group attribute: attribute which contains the list of groups a user belongs to,
memberOfby default -
Group filter: optional, name of the OU field used to filter groups a user belongs to
The list of groups (indicated by the memberOf
attribute or any other attribute defined by the Group attribute
property) is not searched recursively and that only the direct groups
are taken into account.
|
For example:
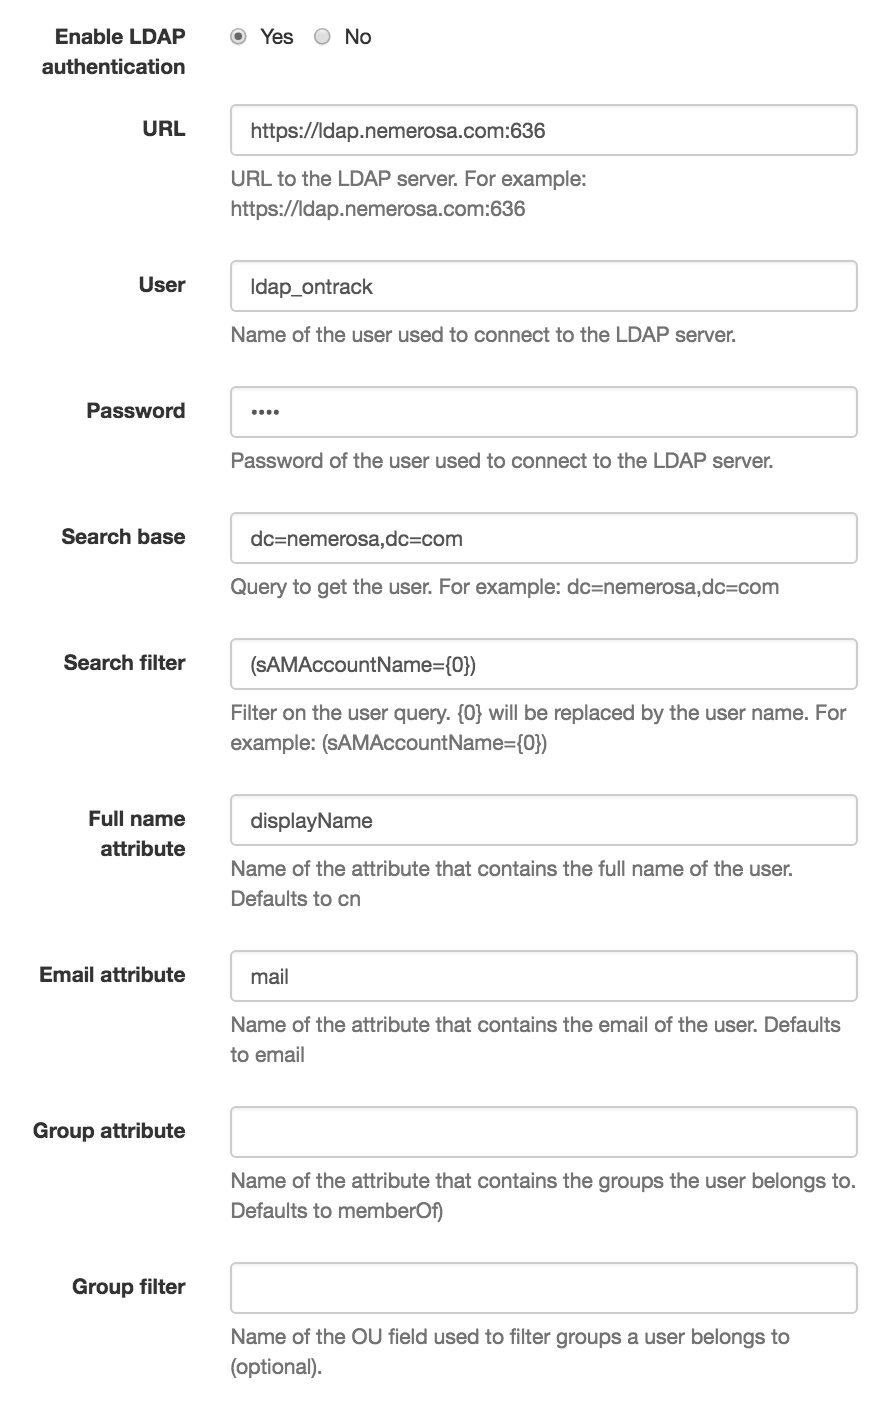
| The settings shown above are suitable to use with an Activate Directory LDAP instance. |
4.2.2. LDAP group mapping
A LDAP group a user belongs to can be used to map onto an Ontrack group.
As an administrator, go to the Account management menu and click on the LDAP mapping command.
| This command is only available if the LDAP authentication has been enabled in the general settings. |
To add a new mapping, click on Create mapping and enter:
-
the name of the LDAP group you want to map
-
the Ontrack group which must be mapped
For example, if you map the ontrack_admin LDAP group to an Administrators group in Ontrack, any user who belongs to ontrack_admin will automatically be assigned to the Administrators group when connecting.
| This assignment based on mapping is dynamic only, and no information is stored about it in Ontrack. |
Note that those LDAP mappings can be generated using configuration as code.
Existing mappings can be updated and deleted.
4.3. OpenID authentication
Ontrack supports OpenId identify providers for authentication and group permissions.
4.3.1. Keycloak setup
| Ontrack has been tested with Keycloak 12.0.4. |
Given a Keycloak realm, the Ontrack client can be configured this way:
-
client protocol:
openid-connect -
valid redirect URLs:
<ontrack url>/* -
base URL:
<ontrack url>/login/oauth2/code/<keycloak realm> -
web origins:
<ontrack url>
If you want to use Keycloak for group mappings in Ontrack, go to Mappers and add the built-in "groups" mapper:

On the Ontrack side, as an administrator:
-
navigate to the OIDC providers menu
-
click on "Create provider"
-
add the following information:
-
ID: unique ID for your provider. It must be aligned with the name of the Keycloak realm (see Keycloak configuration above)
-
Name: a display name, which will be used on the login page
-
Description: used as a tooltip on the login page
-
Issuer ID:
<keycloak url>/auth/realms/<keycloak realm> -
Client ID: ID of the client in Keycloak
-
Client secret: can be left blank for Keycloak
-
Group filter: regular expression to filter the group list sent by Keycloak in the
groupsclaim
-
If Ontrack runs behind a SSL termination proxy and if the HTTP headers are not all forwarded, the "Force HTTPS" option can be set to true in order to force the redirect URI to use HTTPS.
|
In the OIDC provider list, you can optionally set a picture for this configuration. This picture will be used on the login page. For example:
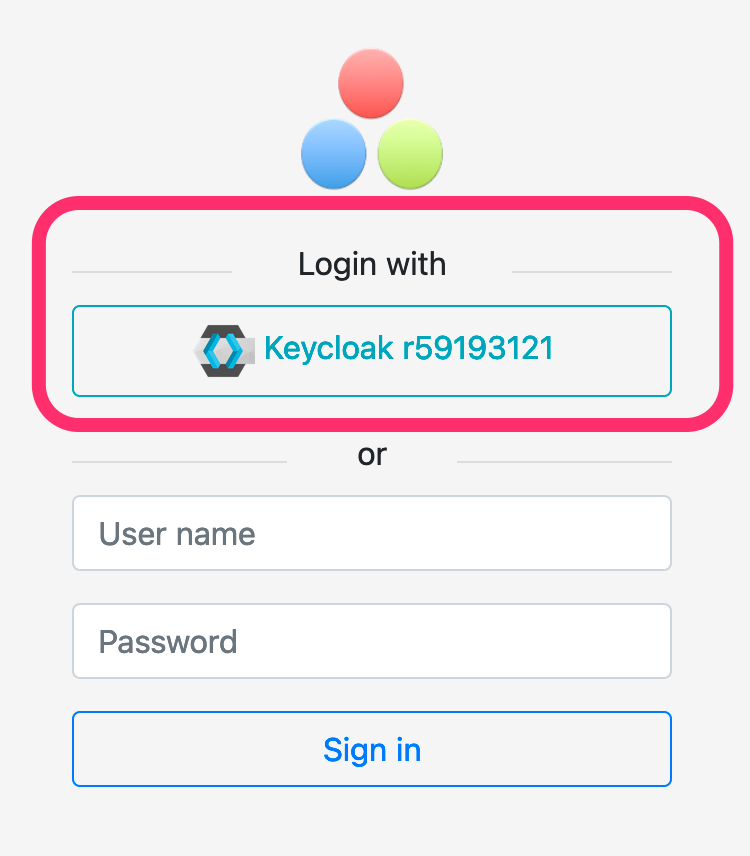
When the users click on the button, they will be redirected to Keycloak for authentication.
Upon a first connection, an account will be created automatically on Ontrack, based on the information returned by Keycloak.
|
Keycloak is better configured using Configuration as Code. See some examples here. |
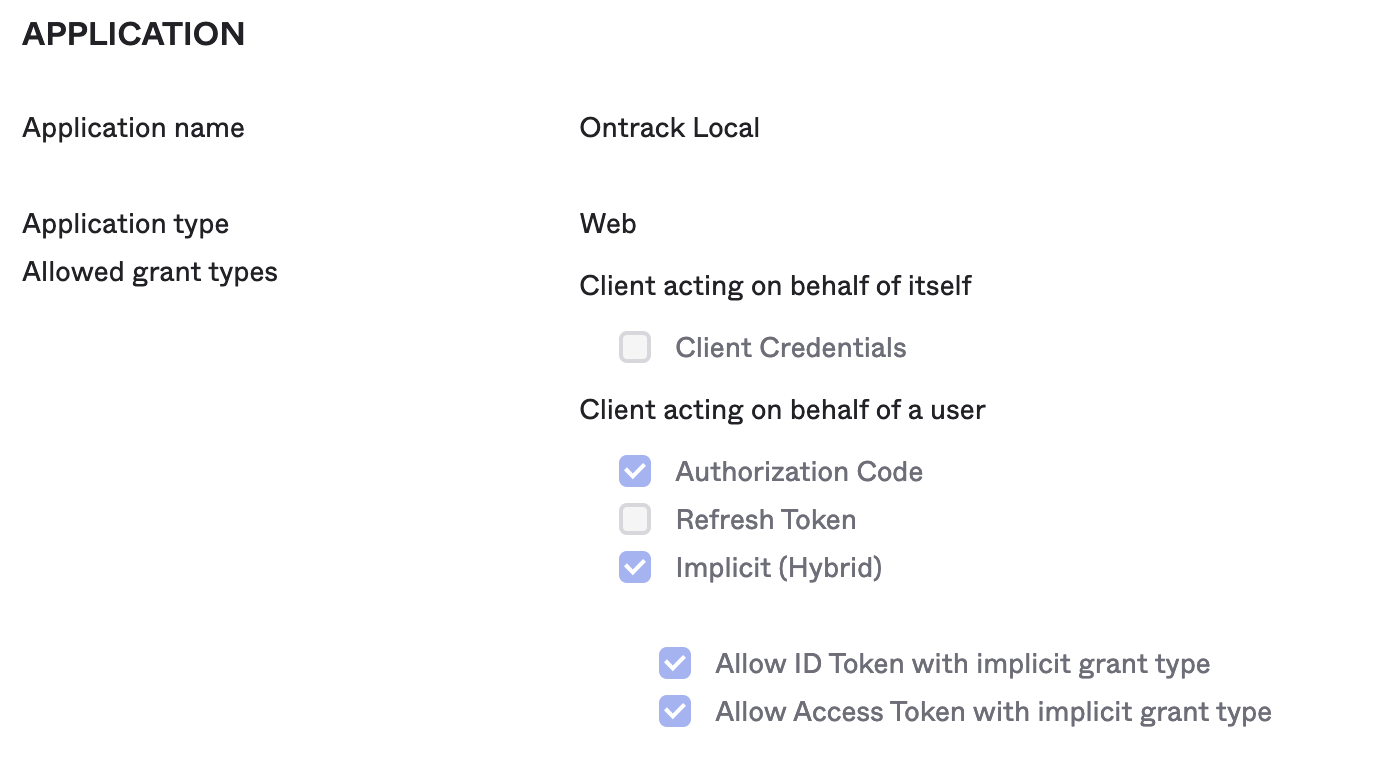
4.3.2. Okta setup
In Okta, an Ontrack application must be configured with the following parameters:
-
application type:
Web -
Allowed grant types:
-
Client acting on behalf of a user:
-
Authorization code
ON -
Implicit (hyprid)
-
Allow ID Token with implicit grant type
ON -
Allow Access Token with implicit grant type
ON
-
-
-
-
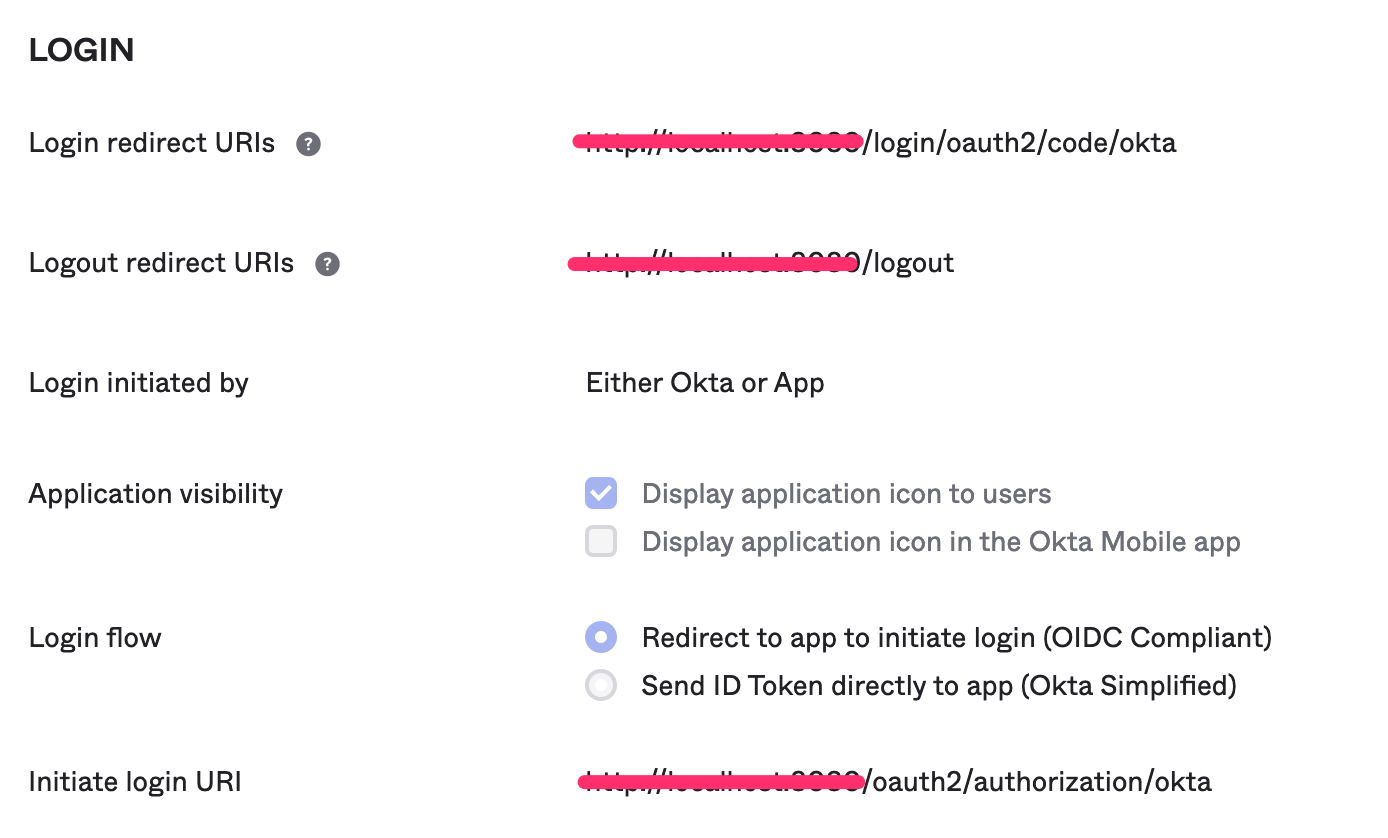
Login redirect URIs:
<ontrack url>/login/oauth2/code/okta -
Logout redirect URIs:
<ontrack url>/logout -
Login initiated by:
Either Okta or App -
Application visibility:
-
Display application icon to users
ON
-
-
Login flow:
-
Redirect to app to initiate login (OIDC Compliant)
ON
-
-
Initiate login URI:
<ontrack url>/oauth2/authorization/okta
If you want to use Okta groups in the group mappings in Ontrack, go to Sign On section of the application and make sure to select a list of groups (using a filter):
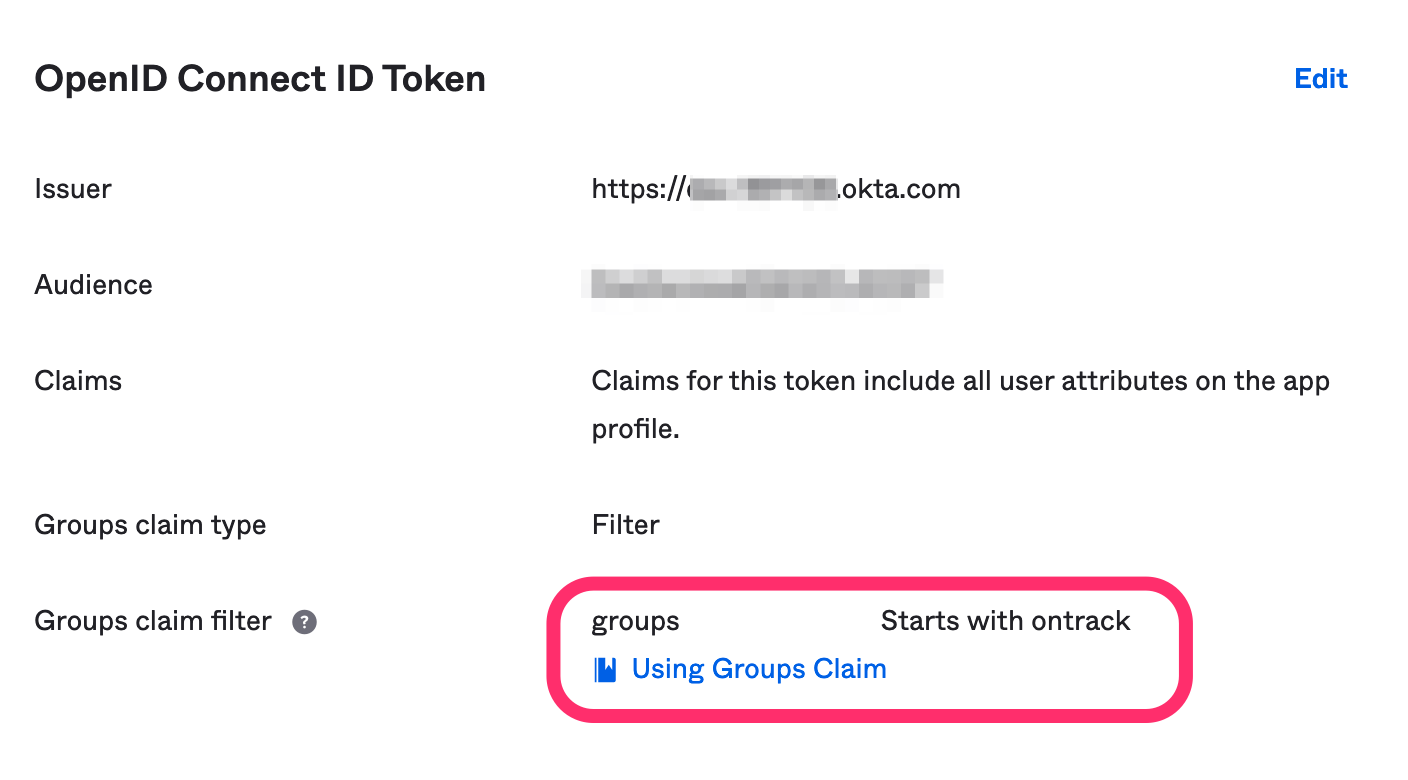
In this example, we select all groups whose name starts with ontrack.
On the Ontrack side, as an administrator:
-
navigate to the OIDC providers menu
-
click on "Create provider"
-
add the following information:
-
ID: unique ID for your provider, typically
okta -
Name: a display name, which will be used on the login page
-
Description: used as a tooltip on the login page
-
Issuer ID:
https://<okta domain>.okta.com/oauth2/default -
Client ID of the application in Okta
-
Client secret of the application in Okta
-
Group filter: regular expression to filter the group list sent by Okta in the
groupsclaim
-
If Ontrack runs behind a SSL termination proxy and if the HTTP headers are not all forwarded, the "Force HTTPS" option can be set to true in order to force the redirect URI to use HTTPS.
|
In the OIDC provider list, you can optionally set a picture for this configuration. This picture will be used on the login page. For example:
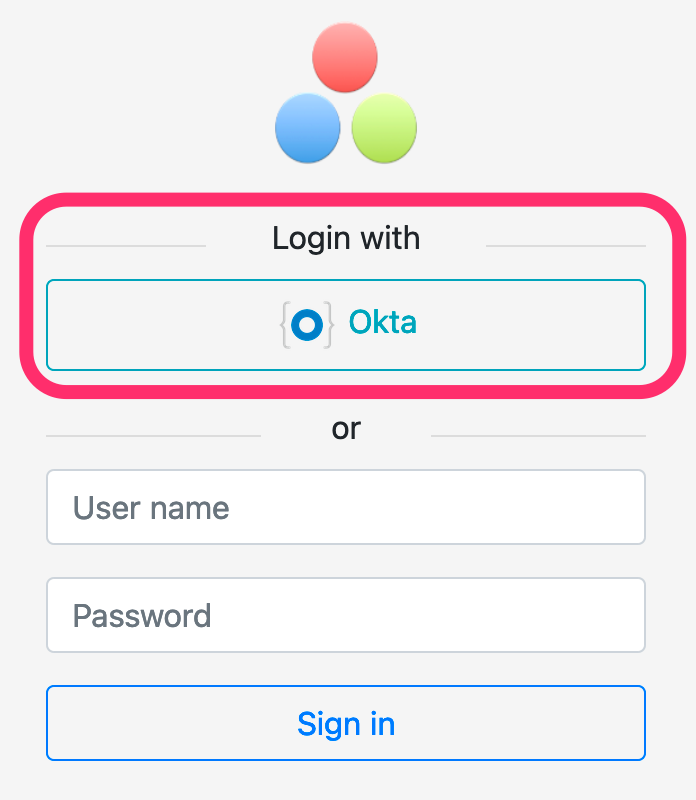
When the users click on the button, they will be redirected to Okta for authentication.
Upon a first connection, an account will be created automatically on Ontrack, based on the information returned by Okta.
|
Okta is better configured using Configuration as Code. See some examples here. |
5. Concepts
The root entity in Ontrack is the project.
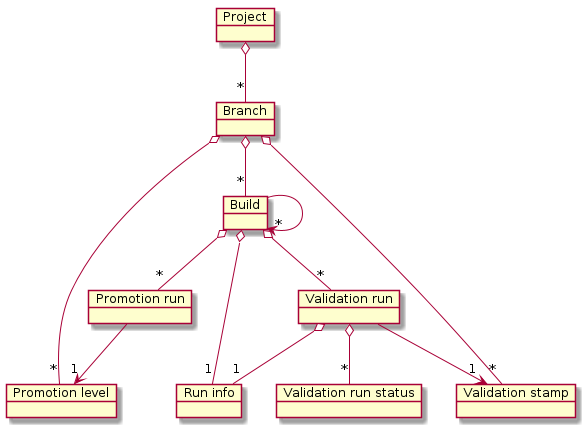
Several branches can be attached to a project. Builds can be created within a branch and linked to other builds (same or other branches).
Promotion levels and validation stamps are attached to a branch:
-
a promotion level is used to define the promotion a given build has reached. A promotion run defines this association.
-
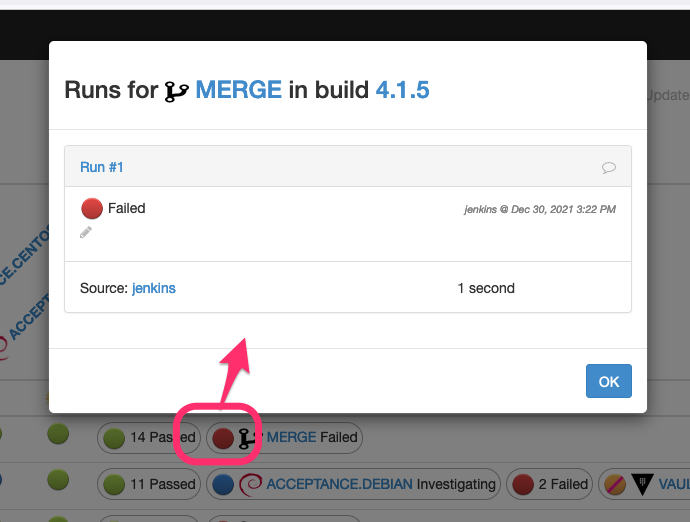
a validation stamp is used to qualify some tests or other validations on a build. A validation run defines this association. There can be several runs per build and per validation stamp. A run itself has a sequence of statuses attached to it: passed, failed, investigated, etc.
Builds and validation runs can be attached to some "run info" which gives additional information like the duration of the build or the validation.
Branches, promotion levels and validation stamps define the static structure of a project.
6. Security
The Ontrack security is based on accounts and account groups, and on authorizations granted to them.
6.1. Concepts
Each action in Ontrack is associated with an authorisation function and those functions are grouped together in roles which are granted to accounts and account groups.
An account can belong to several account groups and his set of final authorisation functions will be the aggregation of the rights given to the account and to the groups.
See Accounts management to manage accounts and groups.
6.1.1. Roles
| As of now, only roles can be assigned to groups and accounts, and the list of roles and their associated functions is defined by Ontrack itself. |
Ontrack distinguishes between global roles and project roles.
Extensions can contribute to built-in roles and functions - see Extending the security for details.
6.1.2. Global roles
An ADMINISTRATOR has access to all the functions of Ontrack, in all projects. At least such a role should be defined.
By default, right after installation, a default admin account is
created with the ADMINISTRATOR role, having admin as password. This
password should be changed as soon as possible.
|
A CREATOR can create any project and can, on all projects, configure them, create branches, create promotion levels and validation stamps. This role should be attributed to service users in charge of automating the definition of projects and branches.
An AUTOMATION user can do the same things than a CREATOR but can, on all projects, additionally edit promotion levels and validation stamps, create builds, promote and validate them, manage account groups and project permissions. This role is suited for build and integration automation (CI).
A CONTROLLER can, on all projects, create builds, promote and validate them. It is suited for a basic CI need when the Ontrack structure already exists and does not need to be created.
A GLOBAL VALIDATION MANAGER can manage validation stamps across all projects.
A PARTICIPANT can view all projects, and can add comments to all validation runs.
A READ_ONLY can view all projects, but cannot perform any action on them.
The global roles can only be assigned by an administrator, in the Account management page, by going to the Global permissions command.
A global permission is created by associating:
-
a permission target (an account or a group)
-
a global role
Creation:
-
type the first letter of the account or the group you want to add a permission for
-
select the account or the group
-
select the role you want to give
-
click on Submit
Global permissions are created or deleted, not updated.
6.1.3. Project roles
A project OWNER can perform all operations on a project but to delete it.
A project PARTICIPANT has the right to see a project and to add comments in the validation runs (comment + status change).
A project VALIDATION_MANAGER can manage the validation stamps and create/edit the validation runs.
A project PROMOTER can create and delete promotion runs, can change the validation runs statuses.
A project PROJECT_MANAGER cumulates the functions of a PROMOTER and of a VALIDATION_MANAGER. He can additionally manage branches (creation / edition / deletion) and the common build filters. He can also assign labels to the project.
A project READ_ONLY user can view this project, but cannot perform any action on it.
Only project owners, automation users and administrators can grant rights in a project.
In the project page, select the Permissions command.
A project permission is created by associating:
-
a permission target (an account or a group)
-
a project role
Creation:
-
type the first letter of the account or the group you want to add a permission for
-
select the account or the group
-
select the role you want to give
-
click on Submit
Project permissions are created or deleted, not updated.
6.1.4. Accounts
Accounts are created:
-
by an administrator in the built-in authentication system, with a password stored and encrypted in Ontrack itself
-
upon login when using external authentication systems like a LDAP or Open ID provider.
6.1.5. Account groups
An administrator can create groups using a name and a description, and assign them a list of global or project roles.
An account can be assigned to several groups.
| If an external authentication system, like a LDAP or Open ID provider, is enabled, the external groups can be mapped to the account groups. |
6.2. General settings
By default, all authenticated users have access to all the projects, in read only mode.
You can disable this global access by going to the Settings and click the Edit button in the General section. There you can set the Grants project view to all option to No.
6.3. Extending the security
Extensions can extend the security model beyond what if defined in the Ontrack core. See Extending the security for more details.
7. Feeding information in Ontrack
Ontrack gathers and structures information which is sent by other tools in a CI/CD ecosystem or collected from them.
Foremost among the tools which will feed information into Ontrack are the CI engines. They can initialize projects and branches, they can create builds, validations and promotions, they can inject meta-information like timings, test results or links between builds.
| Ontrack gathers also information out of ticketing systems, artifact managers or source control systems. This aspect is covered in the Integrations chapter. |
Ontrack provides an API for tools to inject data, but more specialized integrations are provided as well:
-
the Ontrack CLI
-
a set of Ontrack GitHub actions
7.1. Using the API
Ontrack provides a GraphQL API to interact with it:
-
queries to get information from Ontrack
-
mutations to inject information from Ontrack
Example: to create a new build for an existing project & branch:
mutation {
    createBuild(input: {
        projectName: "my-project",
        branchName: "my-branch",
        name: "1234",
        runInfo: {
            runTime: 12
        }
    }) {
        build {
            id
        }
        errors {
            message
        }
    }
}
See Ontrack GraphQL API for a complete information.
7.2. Ontrack CLI
Instead of using the API directly, you can use the Ontrack CLI, a multi-platform client which wraps the API calls into convenient commands.
For example, to create a new build for an existing project & branch:
ontrack-cli build setup \
  --project my-project \
  --branch my-branch \
  --build 1234
See the Ontrack CLI documentation for more information about the installation, configuration & usage of this client.
7.3. Jenkins plug-in
If you’re using Jenkins as a CI engine, you can either use the Ontrack Jenkins plug-in or the Ontrack Jenkins pipeline library.
7.3.1. Jenkins plug-in
The Ontrack Jenkins plug-in relies on API to inject data into Ontrack.
For example, to create a build:
pipeline {
    stages {
        stage('Build') {
            // ...
            // Computes the `version` variable
            // ...
            post {
                success {
                    ontrackBuild(
                        project: 'my-project',
                        branch: 'my-branch',
                        build: version,
                    )
                }
            }
        }
    }
}|
The Ontrack Jenkins plug-in will be deprecated at some point, in favor of using the Ontrack Jenkins pipeline library described below. |
7.3.2. Jenkins pipeline library
The Ontrack Jenkins pipeline library wraps the Ontrack CLI into convenient pipeline steps.
|
To be implemented. As much as possible, the pipeline library will mimic the steps which were provided by the Jenkins plug-in. |
For example, to create a build:
pipeline {
    stages {
        stage('Build') {
            // ...
            // Computes the `version` variable
            // ...
            post {
                success {
                    ontrackBuild(
                        project: 'my-project',
                        branch: 'my-branch',
                        build: version,
                    )
                }
            }
        }
    }
}
7.4. GitHub
There are several ways to integrate GitHub Actions workflows with Ontrack:
-
ingestion of workflow data in Ontrack through a GitHub Webhook
-
direct integration using GitHub Actions or the Ontrack CLI
7.4.1. GitHub Ingestion Hook
Integration of Ontrack inside of GitHub workflows is cumbersome and does not feel very natural.
A more seamless way to get GitHub workflows data into Ontrack is to work by ingesting the data directly from the workflow, without even adapting it.
We can do this by registering a webhook at the repository or organization level.
See GitHub Ingestion for the detailed configuration of the hook and all its options.
As a quick start:
-
Generate a unique token randomly (GitHub suggests using
ruby -rsecurerandom -e 'puts SecureRandom.hex(20)'but any other method would do) -
In the repository or organization, register a Webhook:
-
URL -
<ontrack>/hook/secured/github/ingestion -
Content type -
application/json -
Secret - the secret you generated in step (1)
-
Permissions:
-
Workflow jobs
-
Workflow runs
-
Pushes (for autoconfiguration)
-
-
In Ontrack, create at least one GitHub configuration
-
Still in Ontrack, go to the Settings > GitHub workflow ingestion section and set the token as generated in step (1)
From now on, everytime a working runs in GitHub, data about its steps will be created automatically in Ontrack.
7.4.2. Ontrack CLI & GitHub Actions
You can easily use the Ontrack CLI from your GitHub workflows by using the following actions:
-
nemerosa/ontrack-github-actions-cli-setup- install, configures and use the CLI to setup a project and branch in Ontrack based on GitHub information:
- name: Setup the CLI
  uses: nemerosa/ontrack-github-actions-cli-setup@v2
  with:
    github-token: ${{ github.token }}
    only-for: nemerosa
    url: <ontrack-url>
    token: ${{ secrets.ONTRACK_TOKEN }}
    config: github.com
    indexation: 120
Creating a build
nemerosa/ontrack-github-actions-cli-build - creates a build based on GitHub information:
- name: Ontrack build
  uses: nemerosa/ontrack-github-actions-cli-build@v1
and if you want to add some release information:
- name: Ontrack build
  uses: nemerosa/ontrack-github-actions-cli-build@v1
  with:
    release: ${{ env.VERSION }}
This steps:
-
creates or updates the build
-
sets the commit property
-
sets the release property if provided
-
sets some run info
-
sets a link to the GH workflow
By default, the build name will be the workflow run number, you can change this by using the build input:
- name: Ontrack build
  uses: nemerosa/ontrack-github-actions-cli-build@v1
  with:
    build: <your build name>
Validating a build
-
nemerosa/ontrack-github-actions-cli-validation- creates a validation run for a build based on GitHub information:
- name: Ontrack build validation
  uses: nemerosa/ontrack-github-actions-cli-validation@main
  with:
    step-name: Ontrack build
    validation: BUILD
    build: ${{ github.run_number }}
    token: ${{ github.token }}
Note that when nemerosa/ontrack-github-actions-cli-setup has been called into your workflow job, the Ontrack CLI becomes available in all subsequent steps and be used directly:
- name: Setup the CLI
  uses: nemerosa/ontrack-github-actions-cli-setup@v1
  with:
    # ...
- name: Using the CLI
  run: ontrack-cli ...
Example of GitHub pipeline with actions
In your repository or organization, start by declaring the following elements:
-
a
ONTRACK_URLvariable, having the URL of your Ontrack installation -
a
ONTRACK_TOKENsecret, having an API token defined in Ontrack; the account linked to this token must have the necessary rights (typically administrator or automation)
In Ontrack itself, make sure to define at least one GitHub configuration.
In each job, start by setting up the Ontrack CLI:
- name: Setup the CLI
  uses: nemerosa/ontrack-github-actions-cli-setup@v2
  with:
    github-token: ${{ github.token }}
    url: ${{ vars.ONTRACK_URL }}
    token: ${{ secrets.ONTRACK_TOKEN }}
    config: github.com
indexation: 60| More options are available at https://github.com/nemerosa/ontrack-github-actions-cli-setup |
Once this step has been run, the Ontrack CLI is available in the rest of the workflow.
Typically, you’ll create a build in Ontrack:
  -  name: Ontrack build
     run: |
        ontrack-cli build setup \
          --project ${{ steps.ontrack.outputs.project }} \
          --branch ${{ steps.ontrack.outputs.branch }} \
          --build ${{ github.run_number }}
        ontrack-cli build set-property \
          --project ${{ steps.ontrack.outputs.project }} \
          --branch ${{ steps.ontrack.outputs.branch }} \
          --build ${{ github.run_number }} \
          git-commit \
          --commit ${{ github.sha }}
After the build is created, you can create some validations,
either using the Ontrack CLI
or using the dedicated ontrack-github-actions-cli-validation action.
For example:
  - uses: nemerosa/ontrack-github-actions-cli-validation@v2
    if: ${{ always() }}
the if: ${{ always() }} is there to run this step even if the previous step is failed.
|
Using the CLI, it can look like:
  - name: Validation
    run: |
        ontrack-cli validate \
          --project ${{ steps.ontrack.outputs.project }} \
          --branch ${{ steps.ontrack.outputs.branch }} \
          --build ${{ github.run_number }} \
          --validation my-validation \
          --status PASSED
If you want to record some JUnit XML test results:
  - name: Validation
    if: ${{ always() }}
    run: |
        ontrack-cli validate \
          --project ${{ steps.ontrack.outputs.project }} \
          --branch ${{ steps.ontrack.outputs.branch }} \
          --build ${{ github.run_number }} \
          --validation my-validation \
          junit \
          --pattern "**/results/*.xml"
Setting up validations and promotions
The ontrack-github-actions-cli-setup action allows the setup of validations and promotions:
- name: Setup the CLI
  uses: nemerosa/ontrack-github-actions-cli-setup@v2
  with:
    # ...
    promotions: .github/ontrack/promotions.yaml
where .github/ontrack/promotions.yaml looks like:
BRONZE:
  validations:
    - BUILD
SILVER:
  validations:
    - ACCEPTANCE
  promotions:
    - BRONZE
This setup action does not allow much customization yet, and one needs to rely on the Ontrack CLI for more options (typing of the validations, auto-promotion, etc).
8. Features
8.2. Managing branches
8.2.1. Managing the branches in the project page
If you click on the Show all branches button in the project page, you can display all the branches, including the ones being disabled.
According to your authorizations, the following commands will be displayed as icons just on the right of the branch name, following any other decoration:
-
disabling the branch
-
enabling the branch
-
deleting the branch
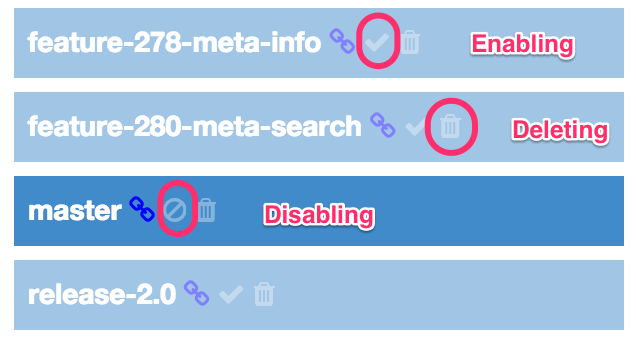
This allows you to have quick access to the management of the branches in a project. Only the deletion of a branch will prompt you about your decision.
8.2.2. Branch favorites
Instead of selectioning a project as a favorite, one might find more convenient to select branches only.
This reduces the clutter on the home page when projects tend to have a lot of branches.
All favorite branches do appear on the home page, together with any favorite project:
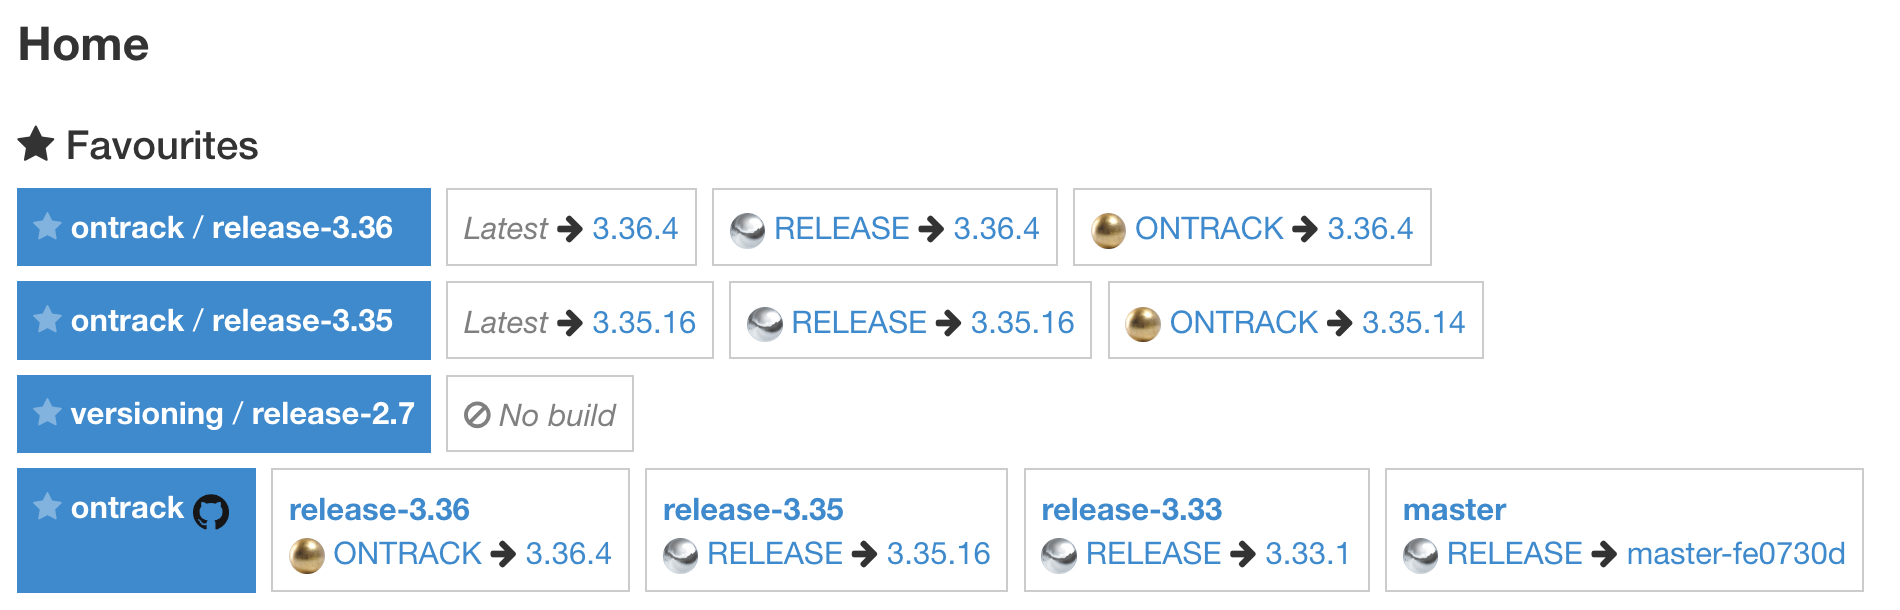
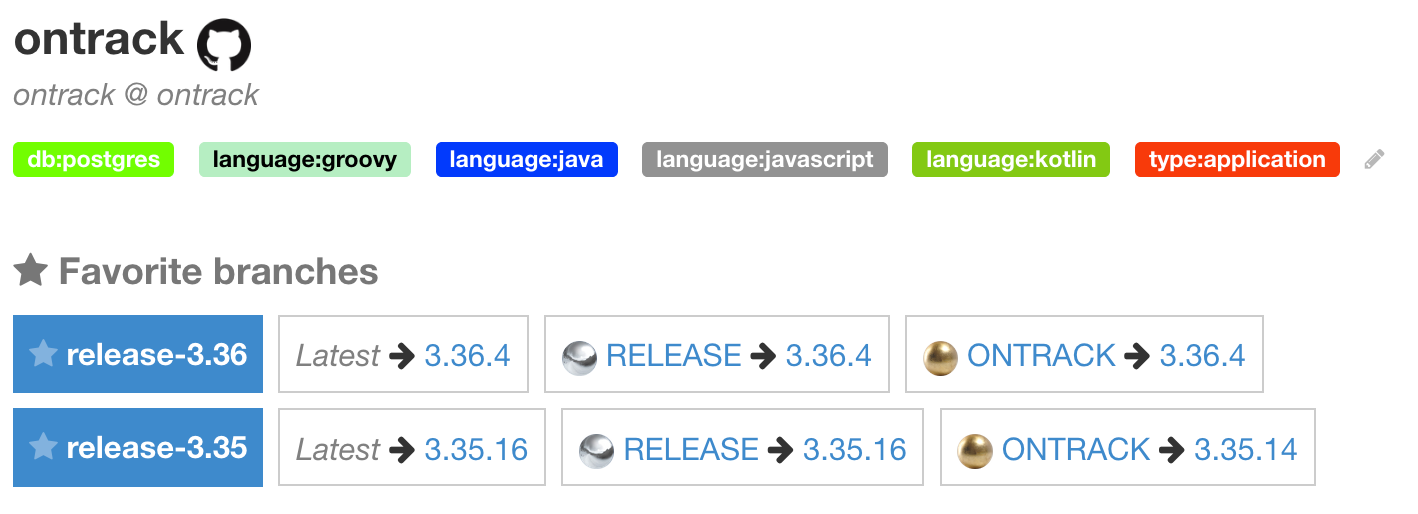
The favorite branches of a given project do also appear on the project page:
In both cases, following information is displayed:
-
latest build
-
latest build per promotion
|
Branches can be unselected as favorite using the star left of their name. |
In order to select a branch as favorite, use the little star left of its name in the branch list in the project page:
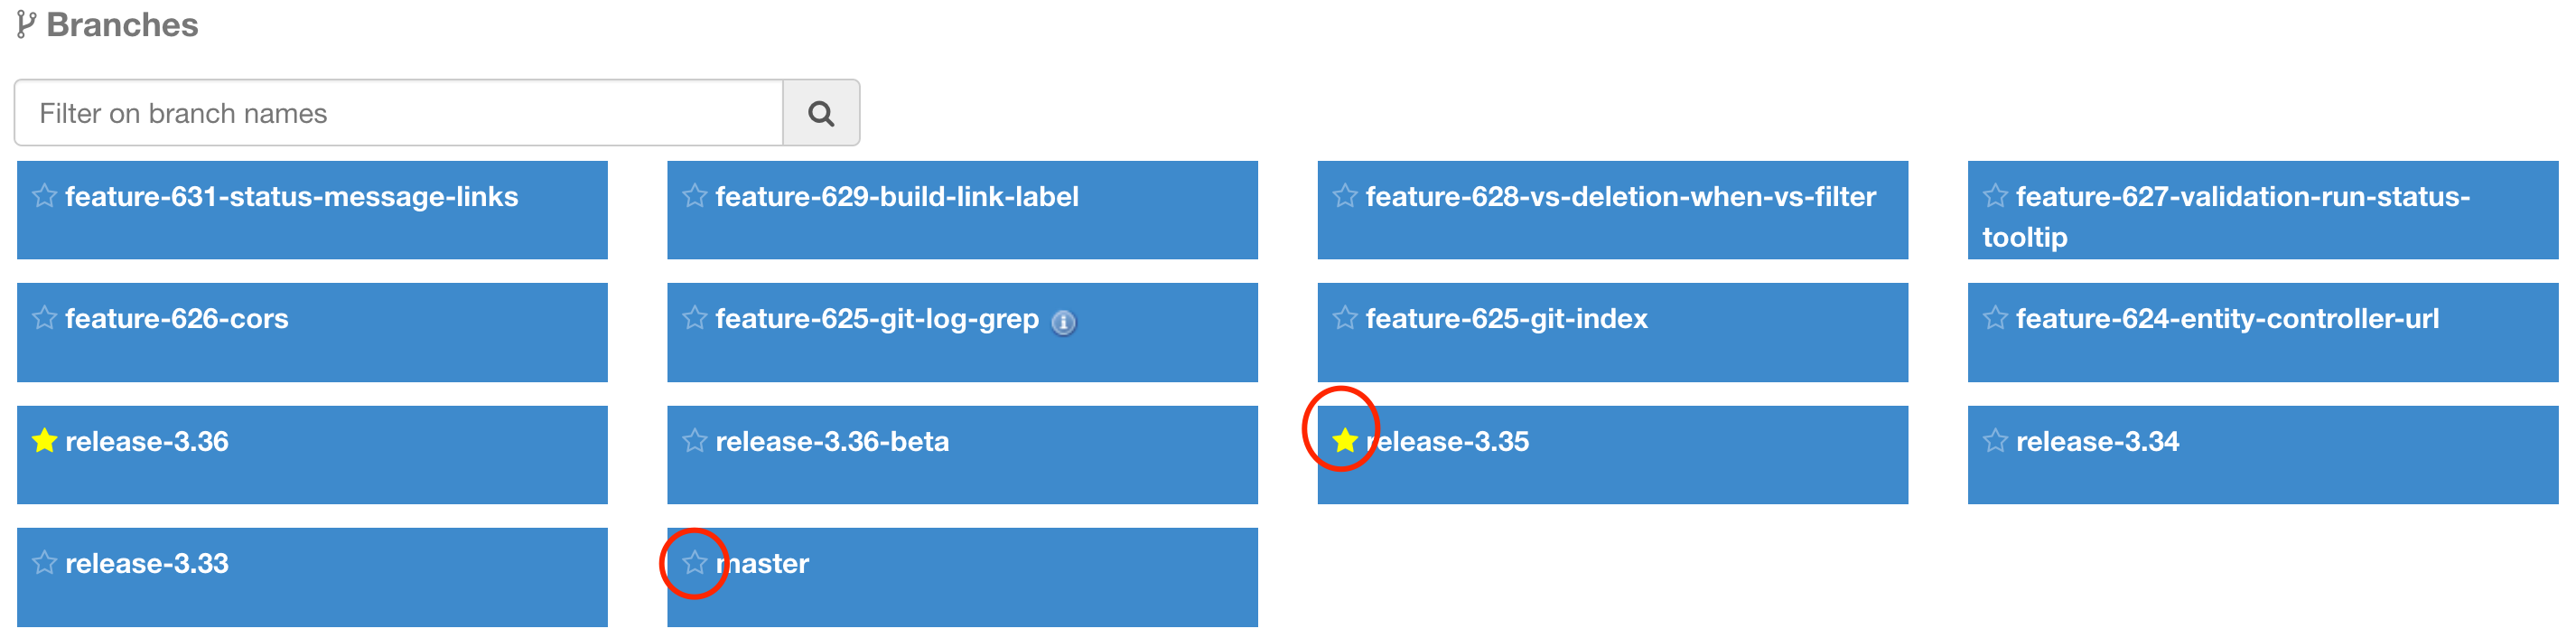
|
You can use this star to unselect it as well. When selected, the star is marked as yellow. |
8.2.3. Pull requests
When Git is enabled for a project, the Ontrack branches can point to either regular Git branches or to pull requests when this feature is enabled.
See [git-pull-requests] for more information.
8.2.4. Managing stale branches
By default, Ontrack will keep all the branches of a project forever. This can lead to a big number of branches to be displayed.
You can configure a project to disable branches after a given number of days has elapsed since the last build, and then to delete them after an additional number of days has elapsed again.
To configure this:
-
go to the project page
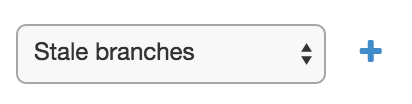
-
select the Stale branches property and add it:
-
set the number of days before disabling and the number of days before deleting
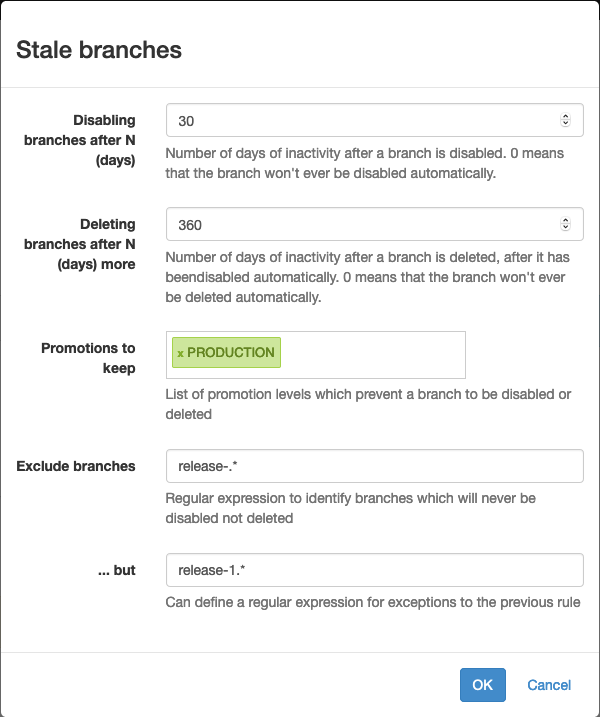
If the disabling days are set to 0, no branch will be ever disabled or deleted.
If the deleting days are set to 0, no branch will ever be deleted.
You can also set a list of promotion levels - a branch which is or has been promoted to such a promotion level will not be eligible for being disabled or deleted.
In the sample above, the stale branches will be disabled after 60 days (not
shown any longer by default), and after again 360 days, they will be deleted
(so after 390 days in total). Branches which have at least one build being promoted to PRODUCTION will not
be deleted or disabled.
Additional, two regular expressions can be used to add further protection against the disabling & deletion of the branches:
-
the first one ("includes") is used to select the branches which are not eligible to disabling and deletion
-
the second expression ("excludes") can be used to refine the first expression, by matching branches which still must be disabled or deleted.
8.2.5. Validation stamp filters
When a branch defines many validation stamps, the view can become cluttered and not really useful any longer, because displaying too much information.
Validation stamp filters can be defined to restrict the view to a set of known validation stamps.
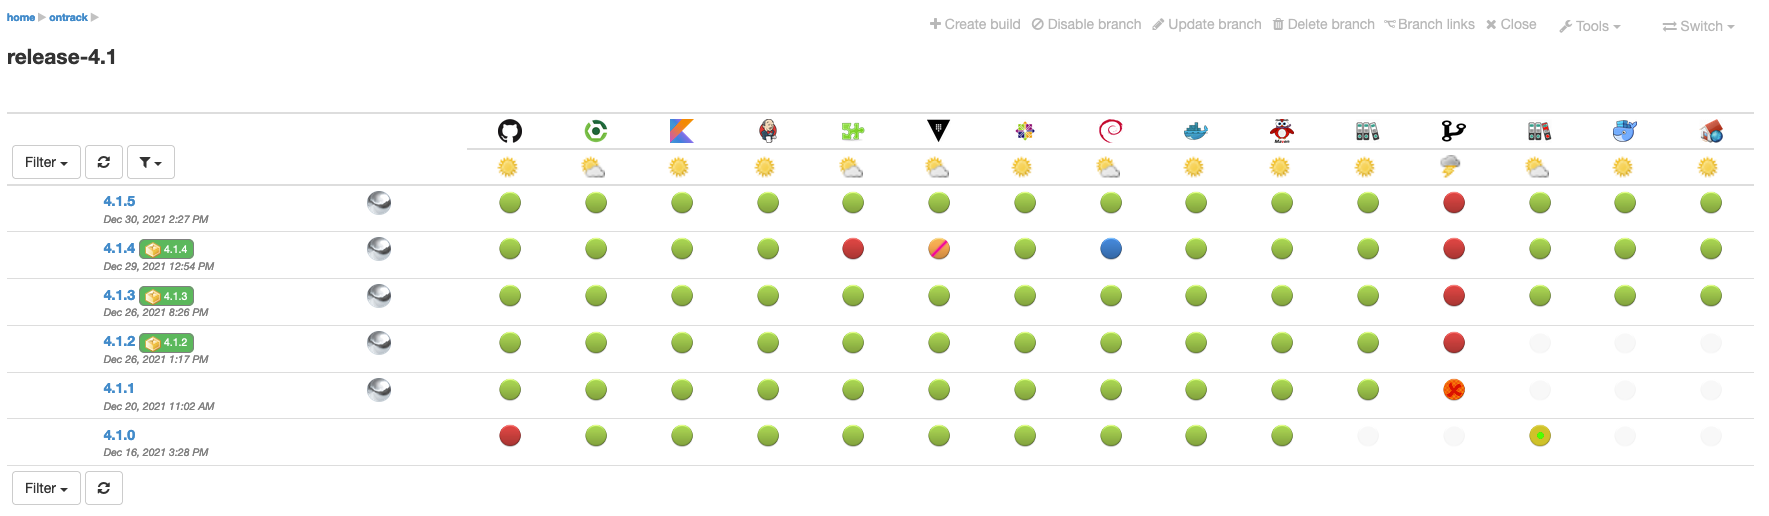
Using filters
Validation stamp filters can be selected in the branch view, just on the left of the list of validation stamp headers:

When a filter is selected, it is marked as such and only associated validation stamp columns are shown in the view:
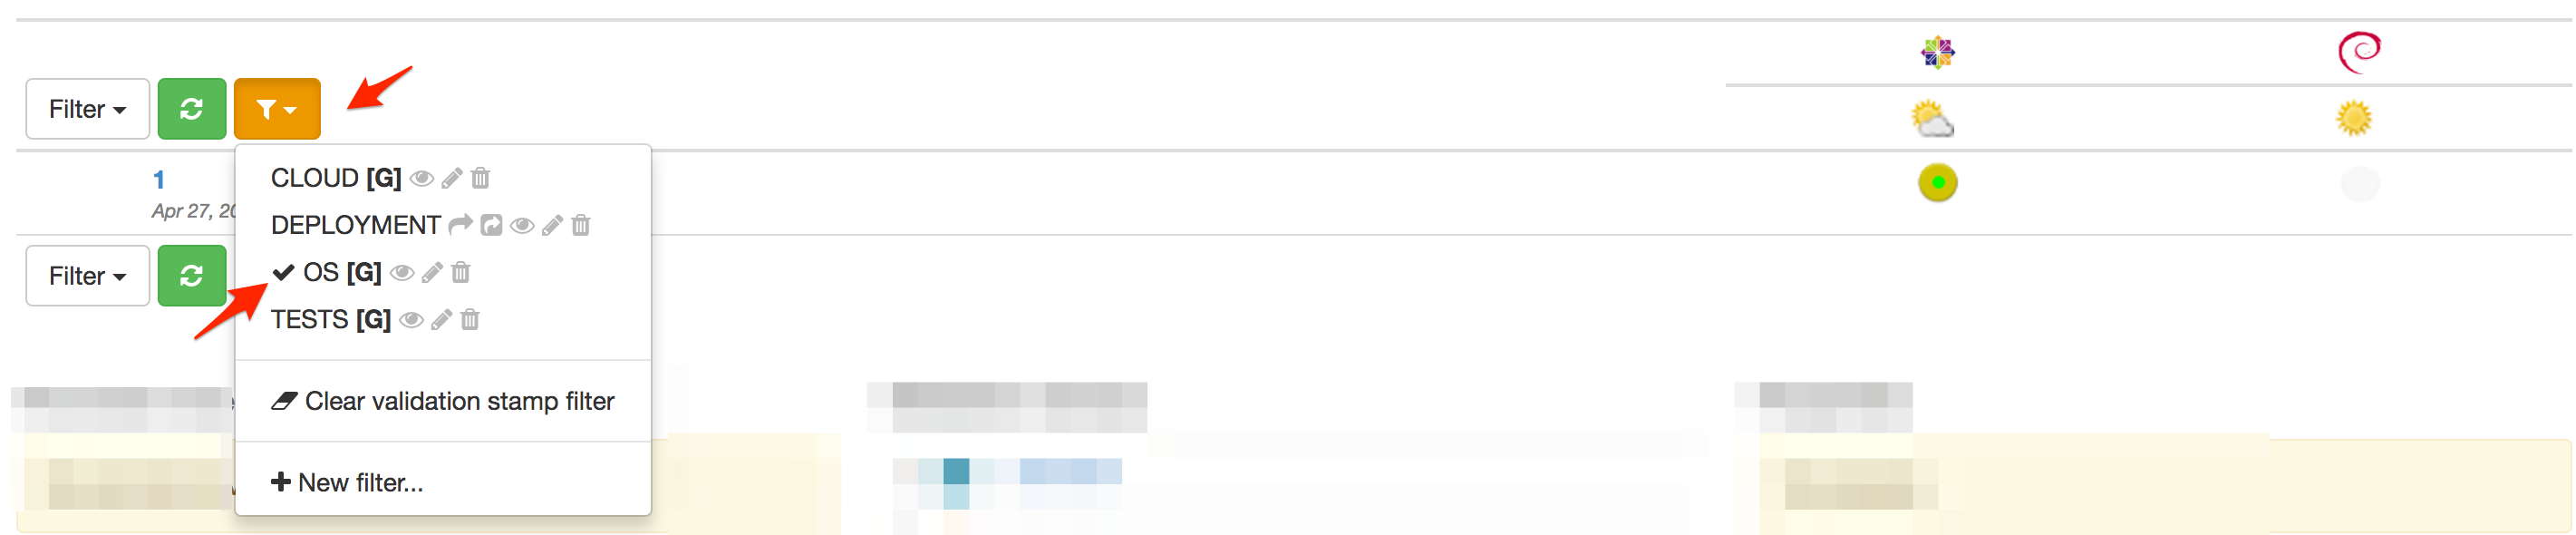
The validation stamp filter menu is also marked in orange to indicate that a filter has been applied.
When the filter is applied, its name appears also in the URL. This can be used as a permalink:

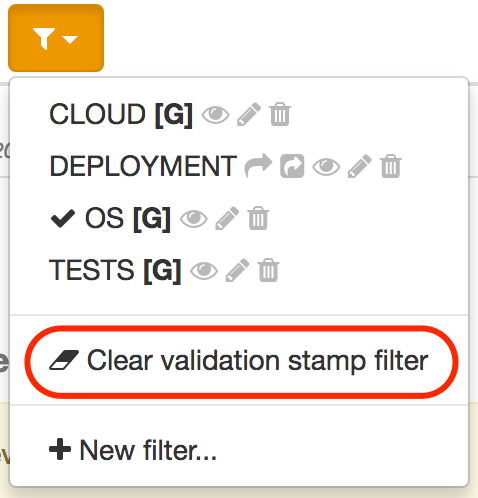
You can remove the filter by selecting Clear validation stamp filter in the filter menu:
Editing filters
|
Only authorized users are allowed to edit the validation stamp filters for a branch. See Authorisations for more details. |
A validation stamp filter is defined by:
-
a name
-
a list of validation stamp names to include
While it is possible to edit a filter using a dialog (see later), it is far easier to use the in-place editor.
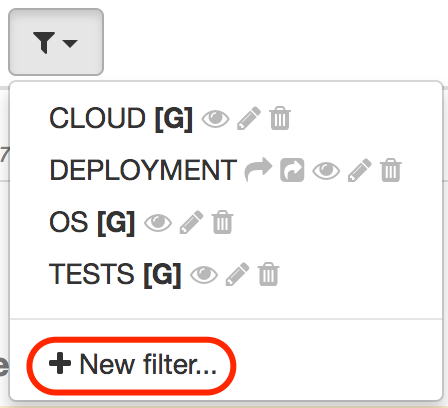
Start by creating a validation stamp filter by selecting the New Filter… entry in the filter menu:
This displays a dialog to create the new filter:
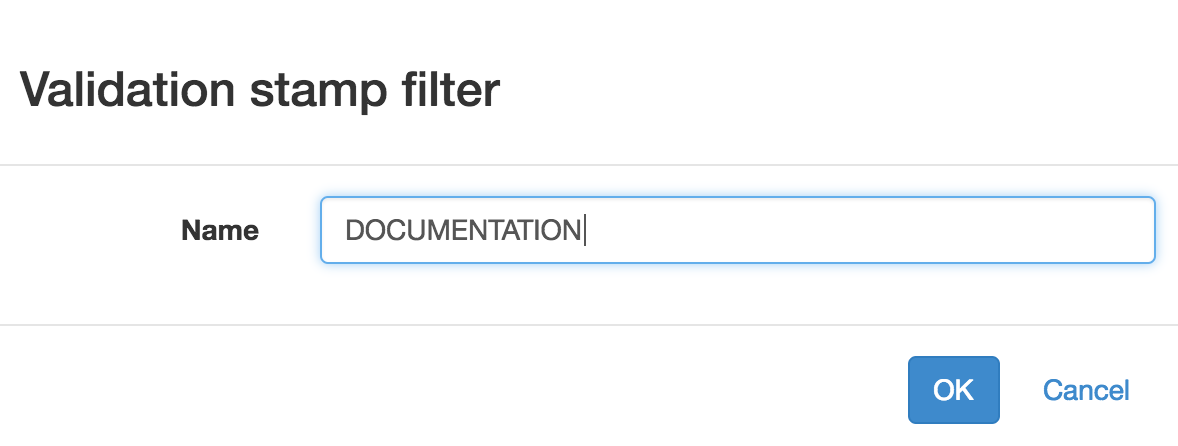
| Only the name is required and all current validation stamps filters are included by default. |
When created, the filter can be directly edited in-place:

The following actions are possible:
-
by clicking on the Select none button, no validation stamps is associated with the filter.
-
by clicking on the Select all button, all validation stamps are associated with the filter.
-
by clicking on the Done with edition button, the in-place edition stops and the normal display is resumed
You can also click on a validation stamp to remove it or to add it to the filter.
In case the validation stamp is associated with the filter, a minus icon appears close to its name. It it is not associated, the icon is dimmed and a plus icon appears:
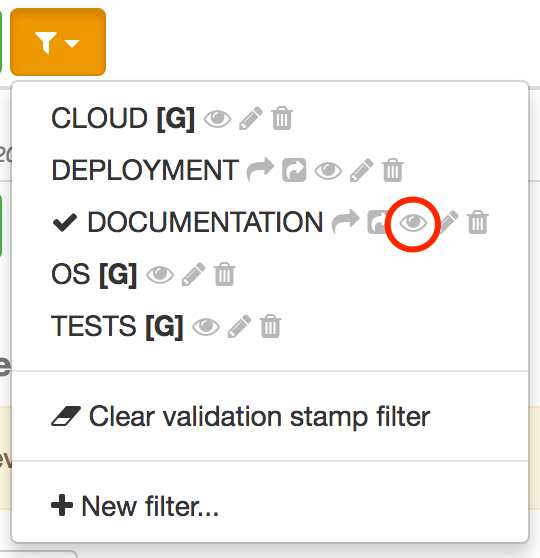
Note that you can also stop the edition by selecting the eye icon in the menu:
To start editing an existing filter, just click also on the eye icon close to its name:
| Select any other filter, or removing the filter, will also stop the in-place edition. |
To edit a filter directly, you can also select the pencil icon and edit the filter using a dialog:
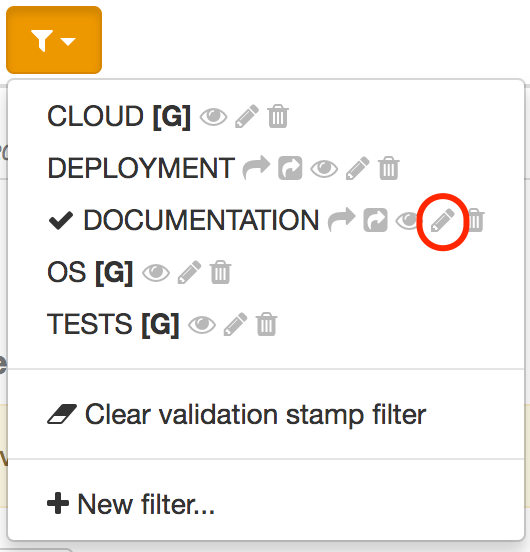
This displays an edition dialog allowing to change the name and the list of validation stamps.
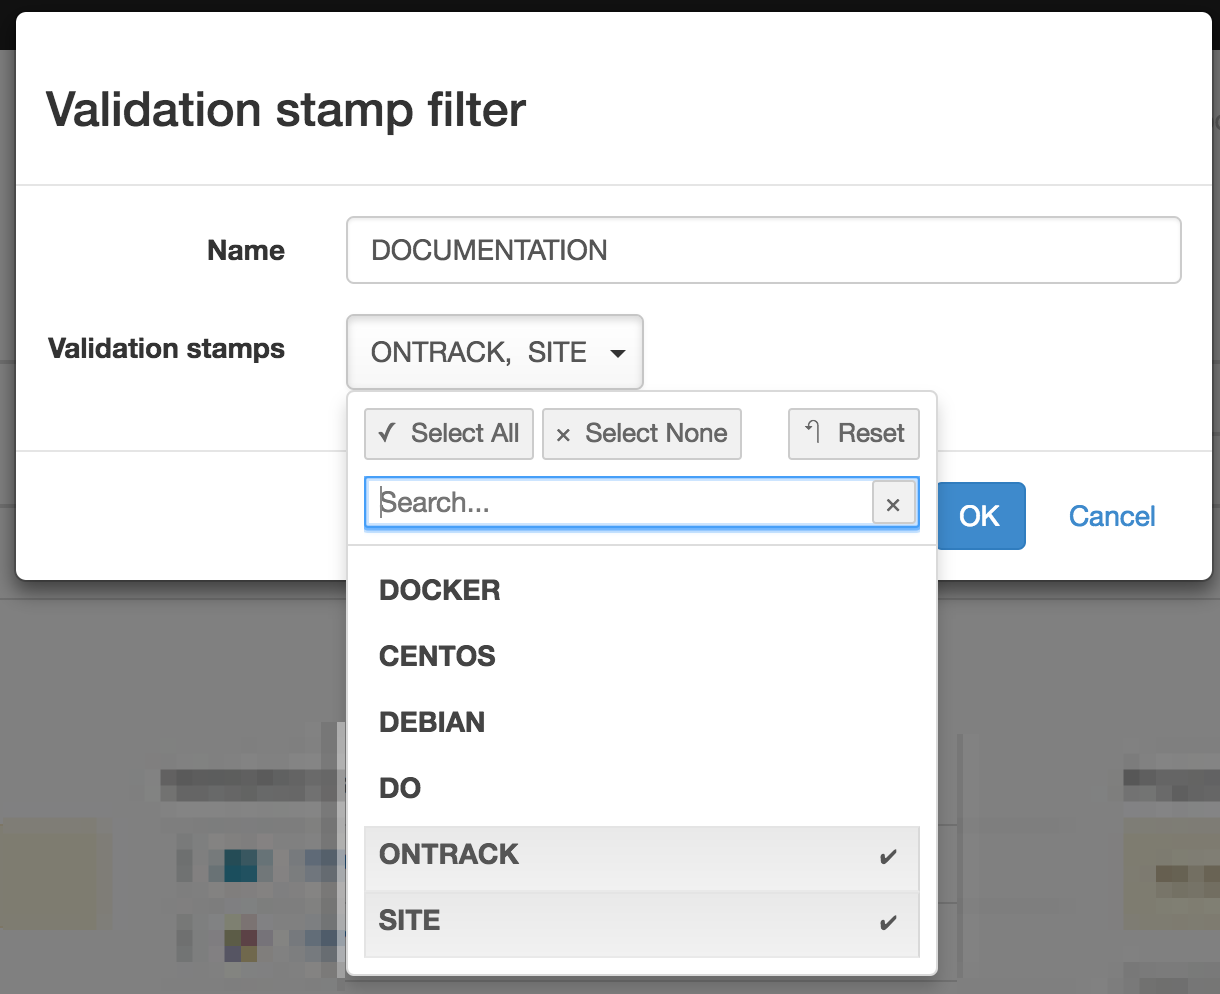
|
For a filter associated with a branch (see below, sharing), names can be selected among the validation stamps of the branch. For a filter associated with a project, the list of validation stamps for all the branches is available. For a global filter, names are no longer selected but must be edited. |
Finally, to delete a filter, click on the trash icon:

| A confirmation will be asked before the deletion actually occurs. |
Sharing
A filter is created by default at branch level and is only visible when the associated branch is displayed.
An authorized user can:
-
share the filter at project level - in this case, the filter is available for all the branches of the project
-
share the filter at global level - in this case, the filter is available for all projects and all branches
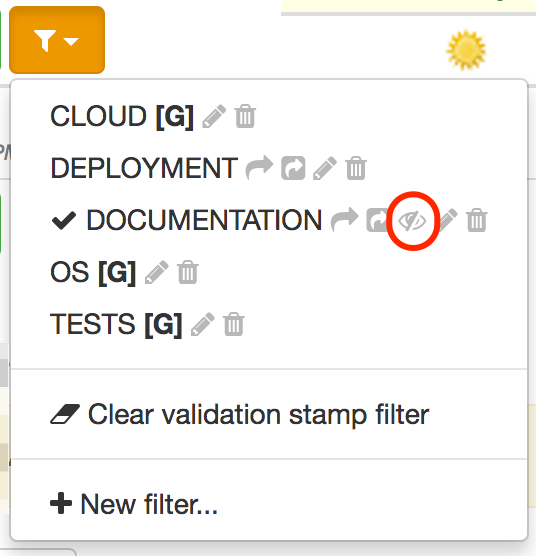
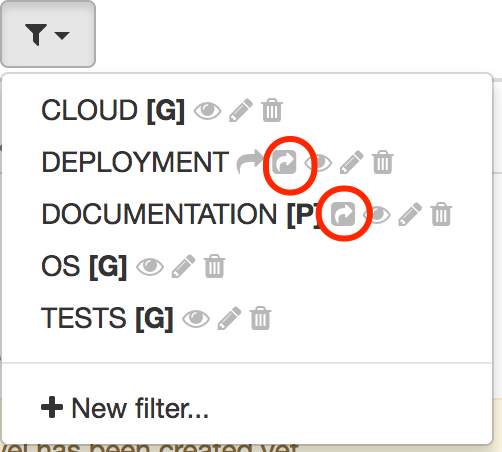
A filter shared at project level is shown with a [P] close to its name
and a global filter with a [G]:
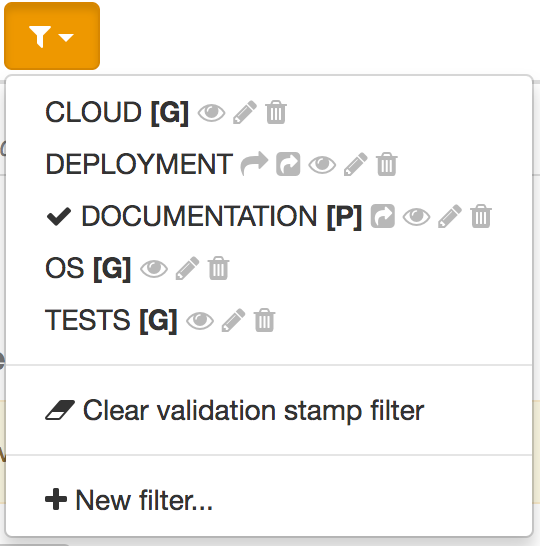
In the screenshot above:
-
DEPLOYMENTis associated with the current branch -
DOCUMENTATIONis associated with the project -
the other filters are global
To share a filter at project level, click on the share icon:

To share a filter at global level, click on the share icon:
Authorisations
According to the role of the authenticated used, following actions are possible:
| Scope | Action | Participant | Validation stamp manager | Project manager/owner | Administrator |
|---|---|---|---|---|---|
Branch |
Create |
Yes |
Yes |
Yes |
Yes |
Branch |
Edit |
Yes |
Yes |
Yes |
Yes |
Branch |
Delete |
Yes |
Yes |
Yes |
Yes |
Branch |
Share to project |
No |
Yes |
Yes |
Yes |
Project |
Edit |
No |
Yes |
Yes |
Yes |
Project |
Delete |
No |
Yes |
Yes |
Yes |
Project |
Share to global |
No |
No |
No |
Yes |
Global |
Edit |
No |
No |
No |
Yes |
Global |
Delete |
No |
No |
No |
Yes |
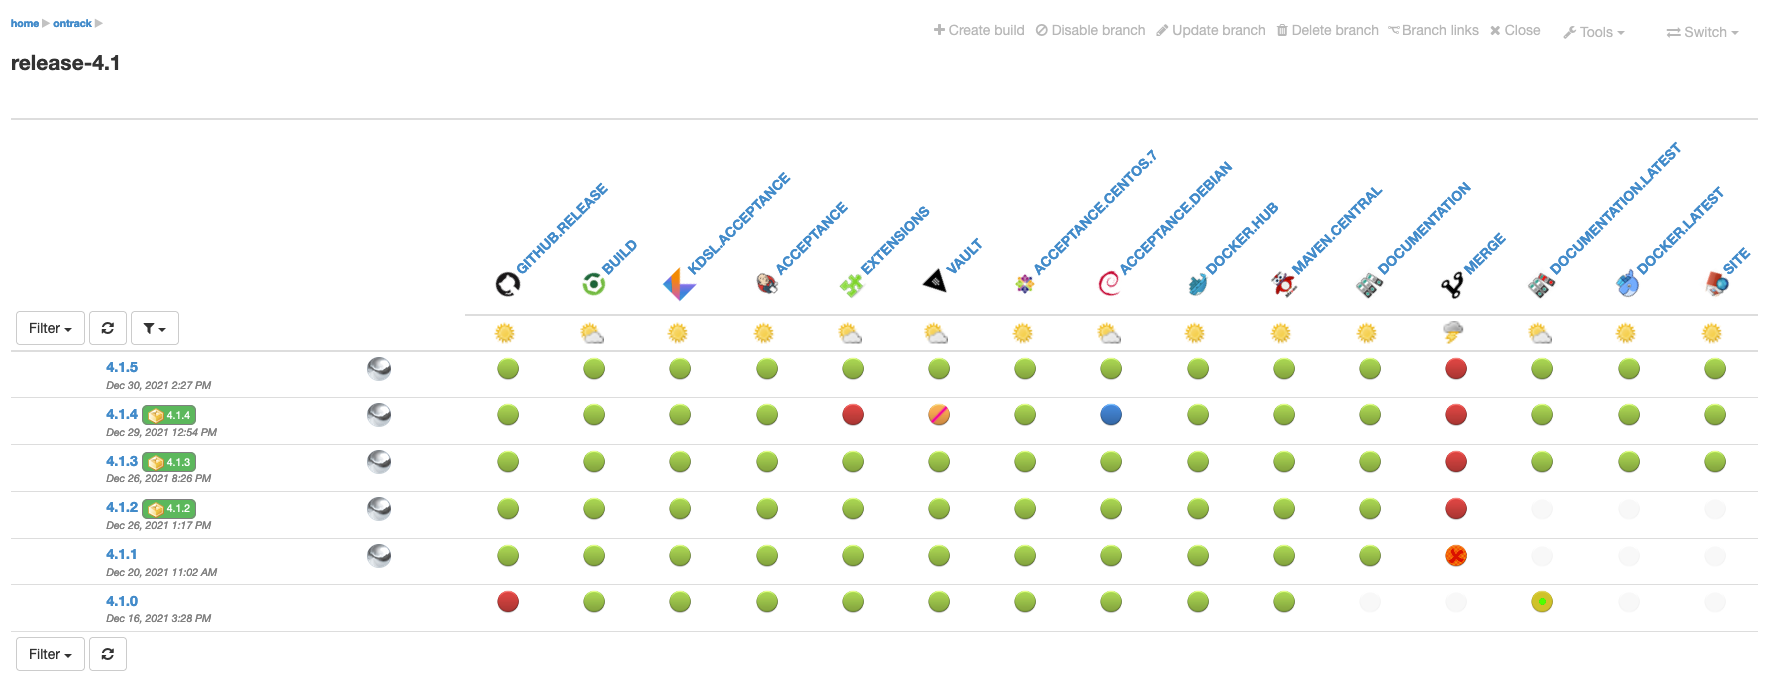
8.2.6. Validation stamp display options
In the branch view, you can tune the display of the validations using different options.
By default, you get all the validation stamps of the branch:
You can restrict the number of validation stamps being displayed by using a validation stamp filter:
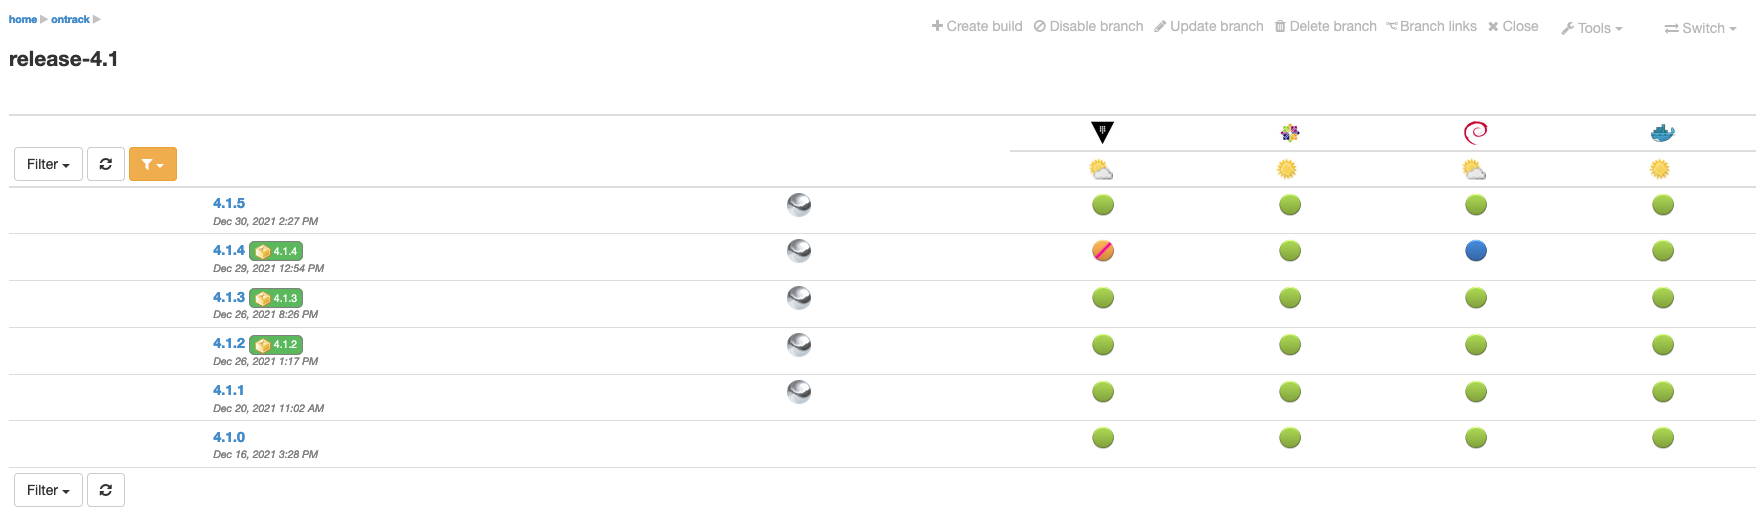
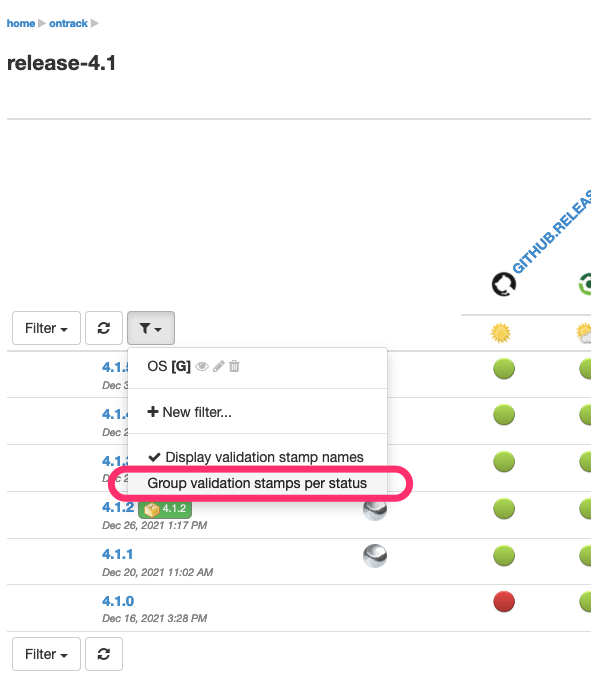
Additionally, you can display the names of the validation stamps by selecting the Display validation stamp names option in the validation stamp filter menu:
This displays:
or with a filter:

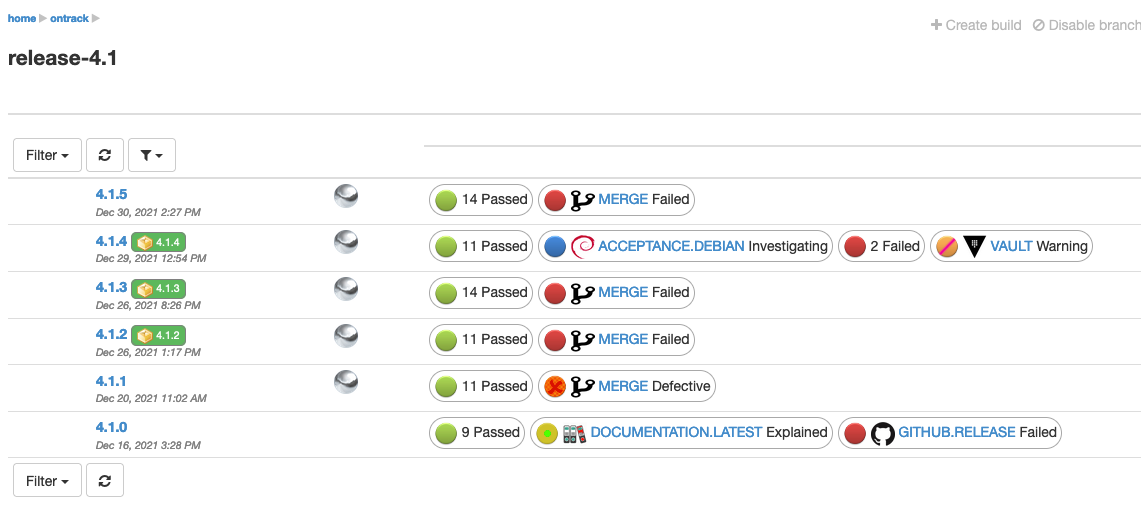
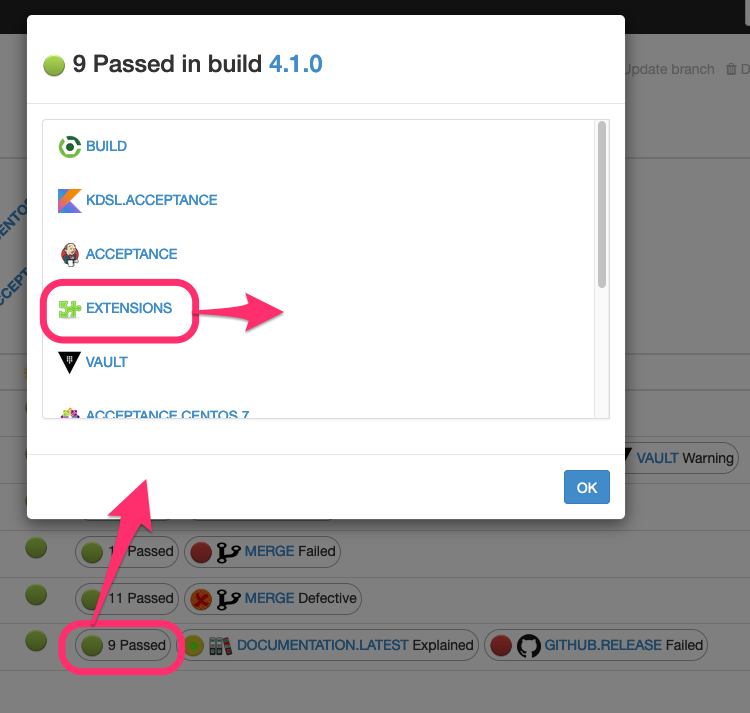
Finally, when dealing with too many validation stamps for the display to be OK, you can choose to group validations per status:
And this displays:
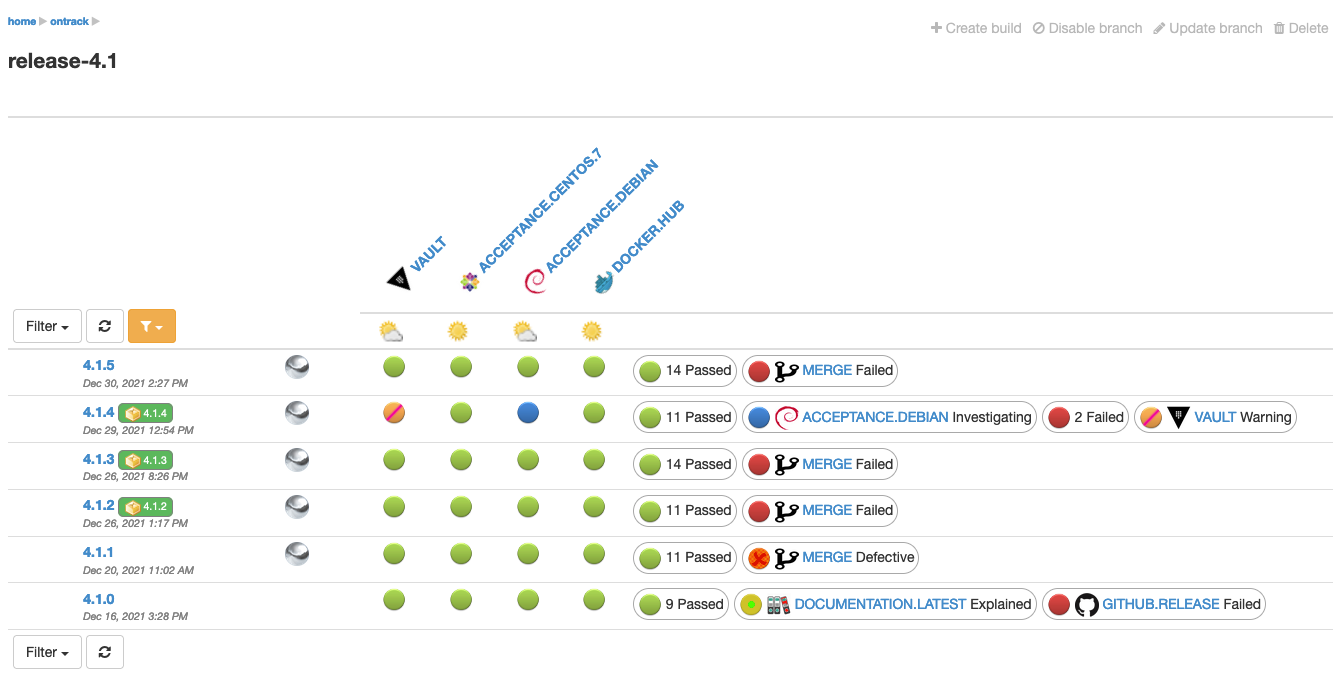
When using a validation stamp filter, the validation stamps matched by the selected filter are always displayed, on the left of the groups:
If one validation has a particular status, clicking on the validation displays the latest validation run, and from there, you can progress its status and/or enter comments:
When several validations have the same status, the dialog will display the list of validations having this status. Clicking on a validation will then display the latest validation run for this validation:
8.3. Working with SCM
Source Control Management (SCM) is at the core of Continuous Integration and Continuous Delivery chains. It’s therefore not a surprise that they play a major role in Ontrack.
8.3.1. SCM Catalog
Ontrack allows to collect information about all registered SCMs and to correlate this information with the Ontrack projects.
Model
A SCM Catalog entry represents a physical SCM repository which is accessible by Ontrack. An entry contains the following information:
-
SCM - type of SCM, like
githuborbitbucket. -
Configuration - associated configuration in Ontrack to access this repository (URL, credentials, etc.).
-
Repository - identifier for this repository. It depends on the type of SCM. For example, for GitHub, it can be name of the repository, like
nemerosa/ontrack.
A SCM catalog entry can be:
-
linked if an Ontrack project exists which is associated to this repository
-
unlinked otherwise
Some Ontrack projects are orphan if they are not associated with any repository accessible by Ontrack or if their associated repository is not accessible.
SCM Catalog list
To access the SCM catalog, you must be logged in. You must select the SCM Catalog item in your user menu.
The list looks like:
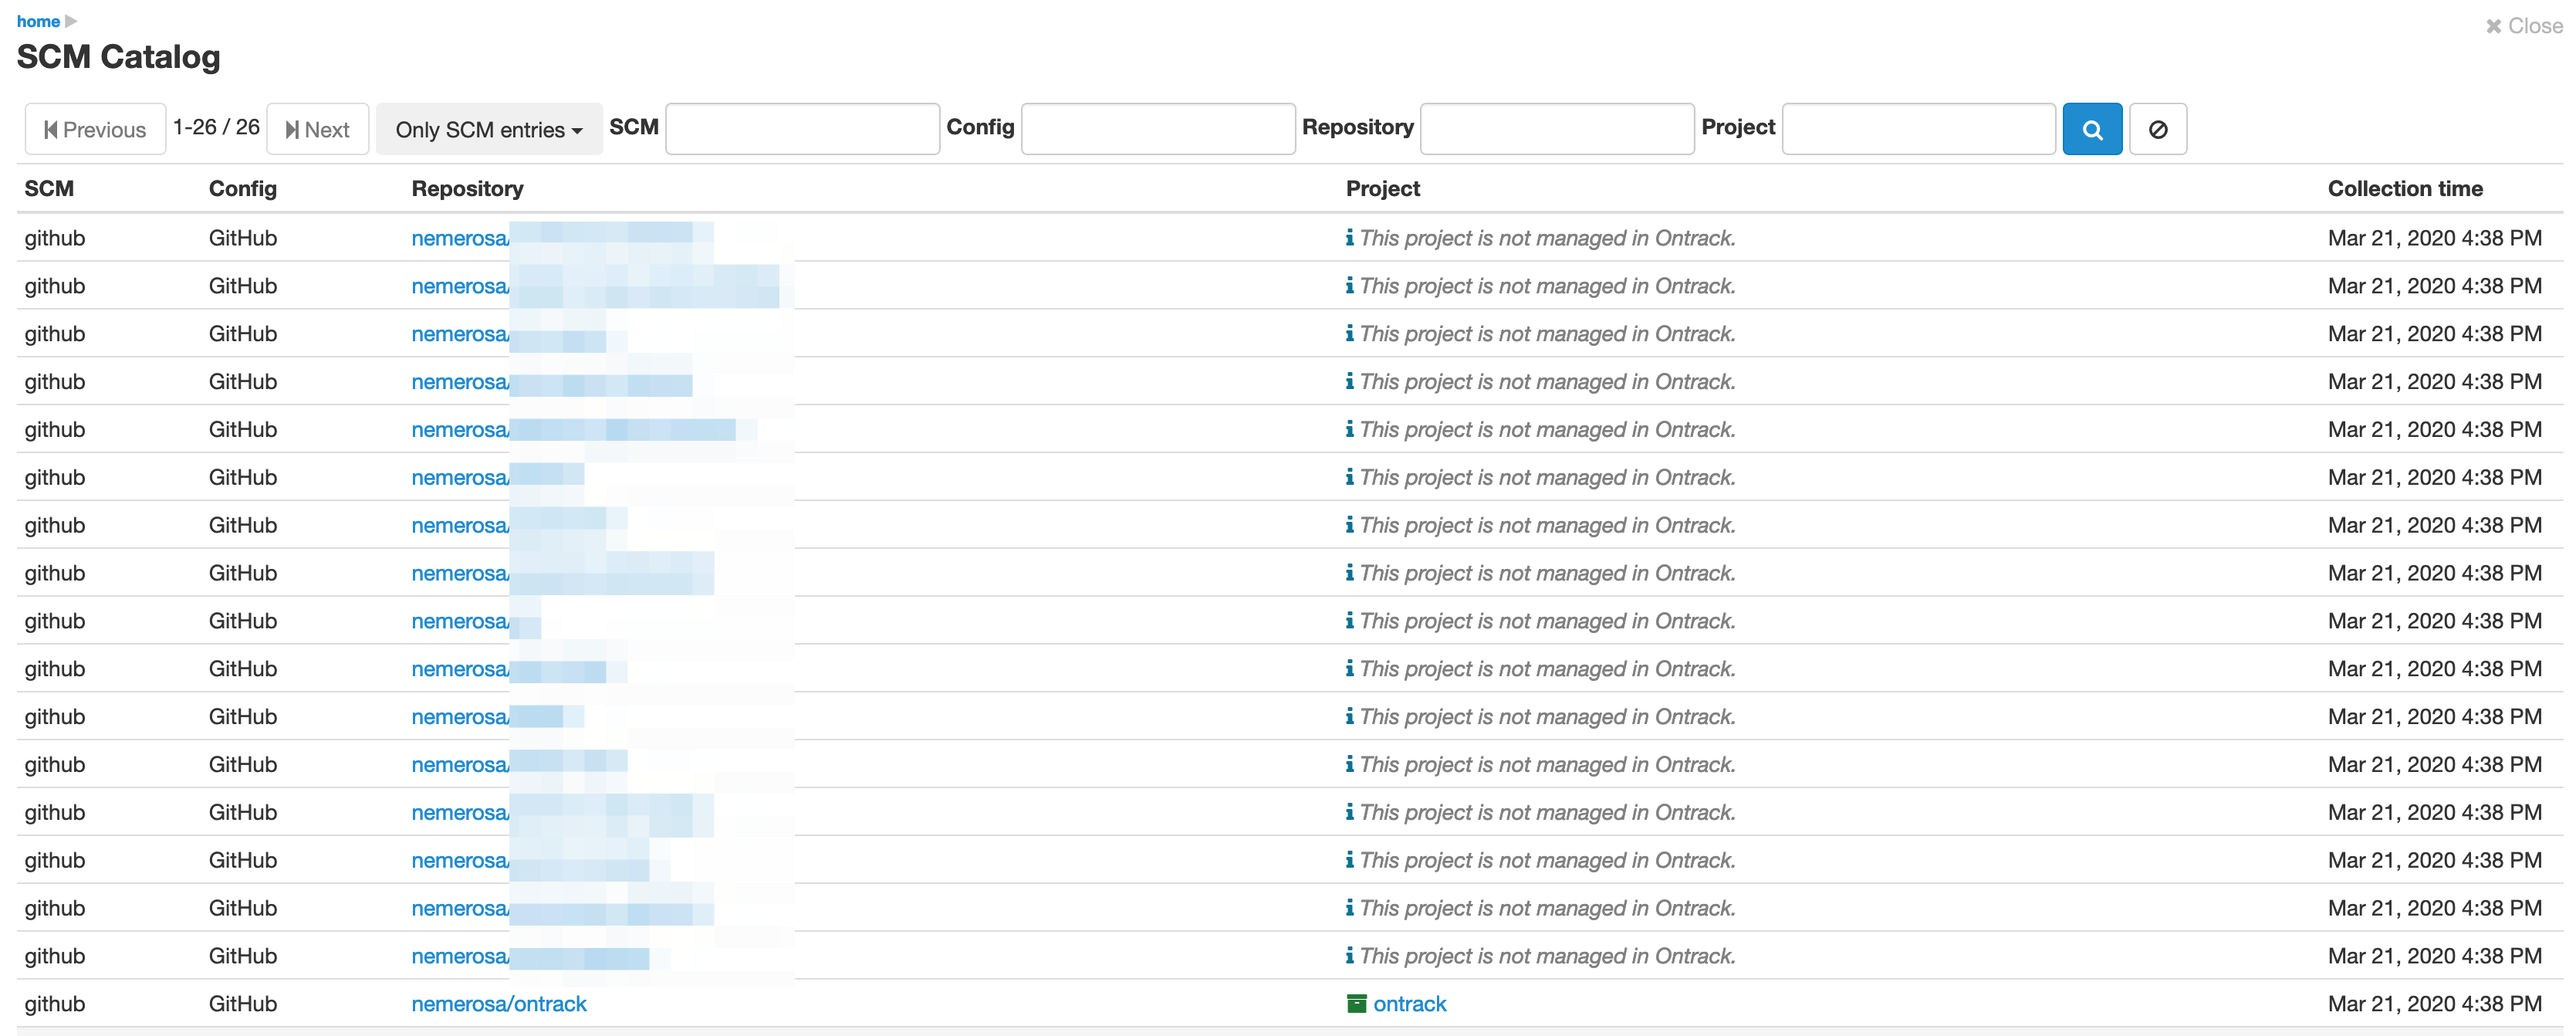
The Project column indicates if the entry is linked or unlinked. In case it is linked, a link to the Ontrack project page is available.
Filtering is possible using text boxes at the top. You can also navigate back and forth in the list using the Previous and Next buttons.
The main filter, labelled Only SCM entries, allows to select the type of entry:
-
Only SCM entries - selected by default, shows all repositories accessible by Ontrack
-
All entries and orphan projects - additionally, shows the orphan projects
-
Linked entries only - shows only the entries which are linked to projects
-
Unlinked entries only - shows only the unlinked entries
-
Orphan projects only - shows only the orphan projects, as shown below:

In this case, only the link to the project is available since no repository information is accessible.
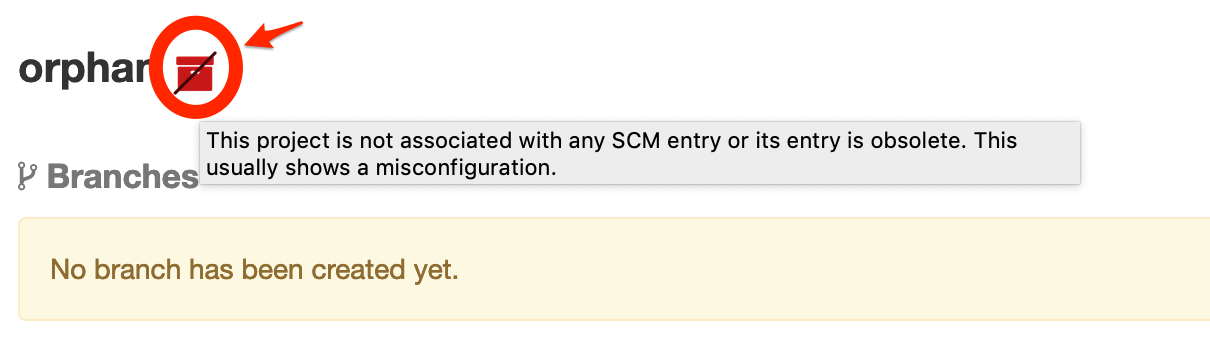
Orphan project decoration
Since orphan projects are an anomaly (because every Ontrack project should be associated with some kind of SCM), they get a special decoration, so that they can easily be identified (and fixed):
Project labels
If the collection of project labels is enabled, the following labels will be set for projects:
-
scm-catalog:entrywhen the project is associated with a SCM Catalog entry -
scm-catalog:no-entrywhen the project is NOT associated with a SCM Catalog entry
Those labels can be used to filter orphan projects on the home page for example, or in GraphQL queries.
Teams
For SCM which allow for this, the SCM catalog collects the list of teams for each repositoy.
|
The teams collection is only enabled for GitHub right now. When trying to get the teams for GitHub, the GitHub token needs to have |
The teams do appear in the SCM catalog list and can be used to filter the SCM catalog entries:
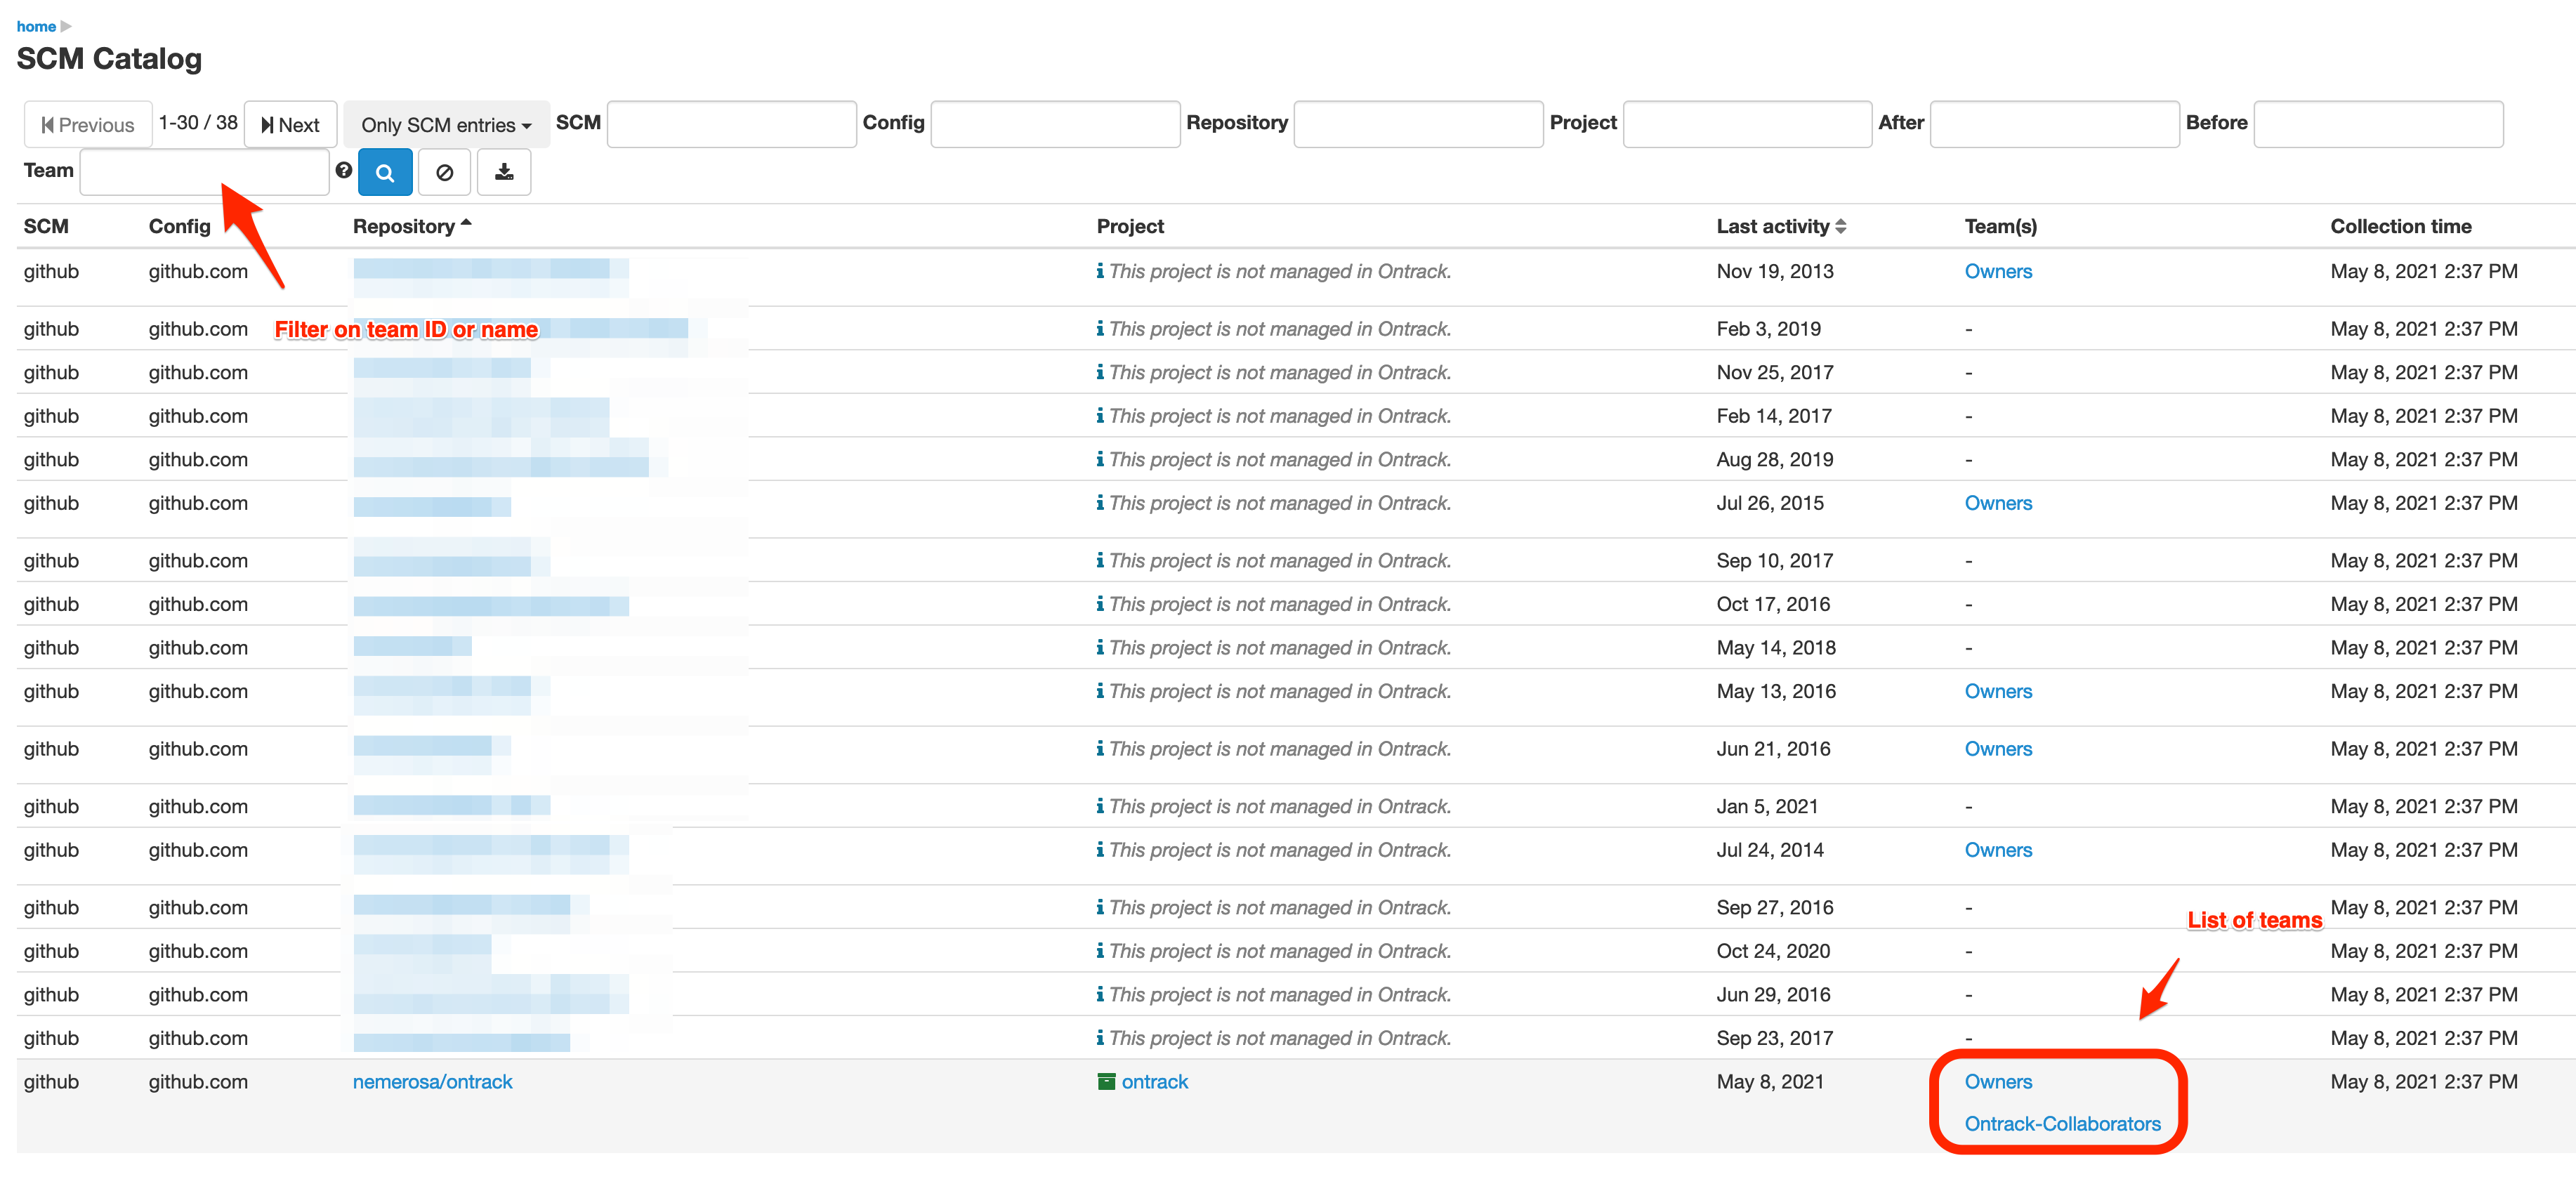
Each team is associated with a link to its page in the SCM.
The teams information is also available in the Ontrack project page:
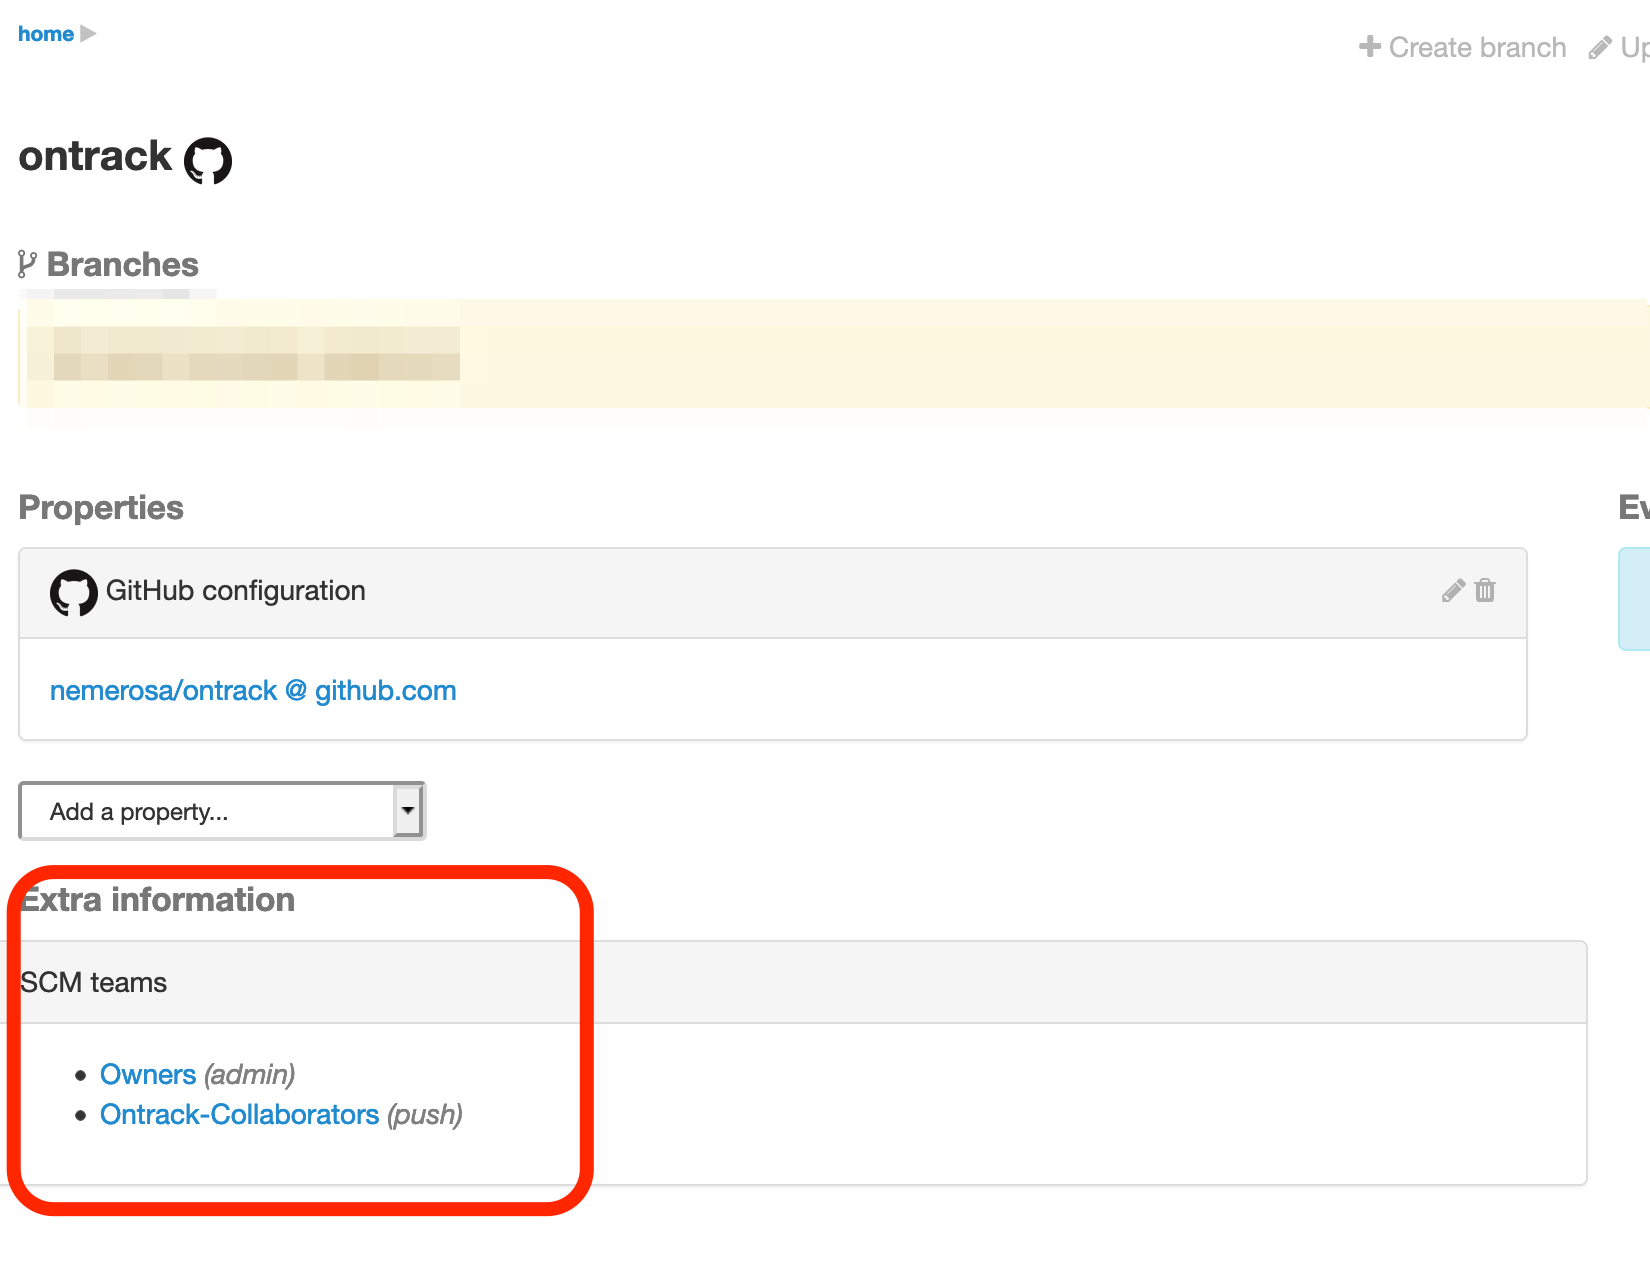
On this page, the role of the team for this project is also displayed, but usually, more details can be accessed by following the link to the SCM team page.
Catalog synchronization
Synchronization between the SCM and Ontrack can be enabled:
-
creating an Ontrack project automatically from an SCM repository
-
disabling Ontrack projects when their repository is no longer present
These two synchronizations are distinct and configured with their own flag in the SCM Catalog Synchronization settings.
GraphQL schema
The SCM Catalog is accessible through the Ontrack GraphQL schema.
At root level, the scmCatalog query allows to query the SCM
Catalog itself and to filter the catalog.
For example, to get the list of orphan projects:
{
  scmCatalog(link: "ORPHAN") {
    pageItems {
      project {
        name
      }
    }
  }
}
or to get the entries which are unlinked:
{
  scmCatalog(link: "UNLINKED") {
    pageItems {
      entry {
        scm
        config
        repository
        repositoryPage
      }
    }
  }
}| See the GraphQL schema documentation for more fields and filters. |
Additionally, the scmCatalogEntry field is available on the Project tpe
to provide information about any associated SCM Catalog entry:
{
  projects(name: "ontrack") {
    scmCatalogEntry {
      scm
      config
      repository
      repositoryPage
    }
  }
}
Metrics
The following metrics are available:
-
ontrack_extension_scm_catalog_total(gauge) - count of SCM catalog entries + orphan projects -
ontrack_extension_scm_catalog_entries(gauge) - count of SCM catalog entries -
ontrack_extension_scm_catalog_linked(gauge) - count of linked SCM catalog entries -
ontrack_extension_scm_catalog_unlinked(gauge) - count of unlinked SCM catalog entries -
ontrack_extension_scm_catalog_orphan(gauge) - count of orphan projects
Administration
This feature is enabled by default but can be controlled using some administrative jobs:

-
Collection of SCM Catalog - gets the list of repositories accessible from Ontrack. Runs once a day.
-
Catalog links collection - gets the links between the projects and associated SCM repositories. Runs once a day.
-
Collection of SCM Catalog metrics - computes some metrics about the SCM catalog
Specific configuration for GitHub
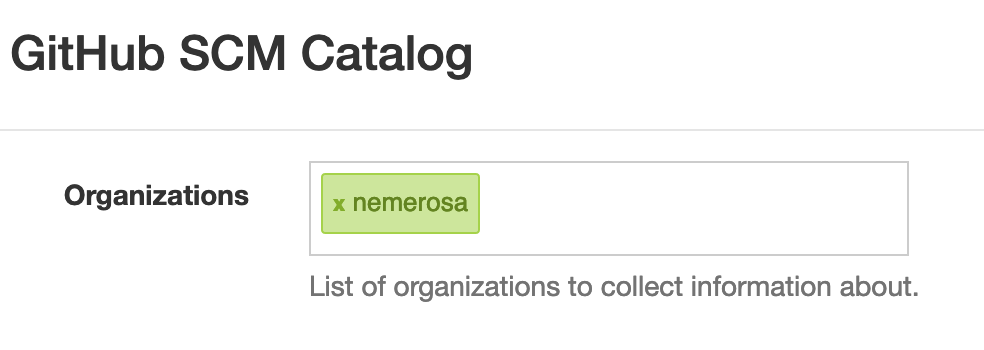
The GitHub repositories are not collected unless their organization is specifically allowed. By default, none are.
In order to enable the scanning of a GitHub organization,
log as administrator, go to the Settings, scroll to the
GitHub SCM Catalog section and enter the names of the
organizations to authorise for collection. For example, below,
only the nemerosa organization is allowed:
8.4. Workflows
Workflows allow the execution of several actions orchestrated in a DAG (directed acyclic graph).
|
As of version 4.8, workflows can only be triggered using the Notifications. There is already some partial and undocumented support through API calls to run some standalone workflows but this is very experimental. |
8.4.1. Workflows definitions
To run a workflow, you can define a notification whose channel is workflow.
This can be done through the UI or as code.
|
Workflows definitions in the UI is only supported in the Next UI of Ontrack and won’t be supported in the legacy UI. |
A workflow:
-
has a name, used for information and display purposes
-
has a list of nodes
Each node:
-
has an ID which must be unique inside the workflow
-
an executor ID that points to a workflow node executor
-
some data for the workflow node executor
-
a list of parent nodes
The list of parent nodes is what defines the workflow DAG.
|
When defining or running workflows, graph cycles are automatically detected. |
Workflows notifications can be defined as code, like all other notifications.
For example:
channel: workflow
channelConfig:
  workflow:
    name: My workflow
    nodes:
      - id: ticket
        executorId: notification
        data:
          channel: jira-creation
          channelConfig:
            # Configuration for the ticket creation
      - id: mail
        executorId: notification
        parents:
          - id: ticket
        data:
          channel: mail
          channelConfig:
            # Configuration for the mail
          template: |
            Link to ticket: ${workflow.ticket?path=url}
8.4.2. Workflows nodes executors
A workflow node executor is a component which is responsible to "run a node".
See Workflow nodes executors for a list of all existing workflow node executors.
8.4.3. Workflow templating
Many elements in the workflow definition are subject to templating.
The workflow name is itself considered as a template when being run as a notification (which is the default in 4.8).
When using notifications as node executors, the configuration elements are templates as usual.
Note that for a workflow notification, the event is passed as a context element and all template functions and sources are available.
Additionally, when a notification is run as part of a workflow, a new templating function is available: workflow.
This function allows the access to the output data of any successful node in the workflow.
For example, let’s take a workflow which:
-
creates a ticket in Jira
-
then send a link to this ticket with an email
channel: workflow
channelConfig:
  workflow:
    name: My workflow
    nodes:
      - id: ticket
        executorId: notification
        data:
          channel: jira-creation
          channelConfig:
            # Configuration for the ticket creation
      - id: mail
        executorId: notification
        parents:
          - id: ticket
        data:
          channel: mail
          channelConfig:
            # Configuration for the mail
          template: |
            Link to ticket: ${workflow.ticket?path=url}
The ticket node runs and set some information in its output (see Jira ticket creation (jira-creation) for the full details), including a url property.
Then, the mail node is run and is using the notification workflow node executor again, with the mail channel being configured to send a mail.
This channel can use the template for the mail’s body and is using the workflow function to get the output of the ticket node and the url property of its output.
8.4.4. Workflows management
The progress of running workflows can be accessed in Information > Workflow audit.
Clicking on a workflow displays more details about its current status, node per node.
When using the workflow notification channel, the workflow status link is also accessible from the Information > Notification recordings, when selecting the notification.
8.4.5. Workflows settings
Workflow statuses are saved by default for 14 days.
To change this value, you can go to System > Settings > Workflows.
This can also be defined as code using CasC:
ontrack:
  config:
    settings:
      workflows:
        retentionDuration: 1209600000 # 14 days in ms
8.5. Delivery metrics
One of the core features of Ontrack is the assignment of promotion levels to some builds, either explicitly from the CI or through auto promotion.
Delivery metrics are about measuring the performance and stability of these promotions on four different axes:
-
lead time to promotion - how long does it take from the moment a build is created to the moment it is promoted to a given level? This gives an indication on the performance of your delivery.
-
frequency - how many promotions do you get over a given period of time? This gives an absolute indicator about how often your delivery process performs.
-
success rate - what is the percentage of builds reaching a given promotion level? While 100% is not a goal (because of the very nature of a delivery pipeline, where failure is expected when finding actual issues), high values indicate a high stability of your delivery process.
-
time to restore - given a build which is not promoted, how long does it take to restore this promotion? The time it takes to fix an issue is a strong indicator of the resilience of your delivery process.
These metrics are valid for:
-
one project
-
one branch
-
one promotion level
Additionally, Ontrack distinguishes between:
-
single project metrics - where we measure the performance of a promotion level within the same project
-
end-to-end project metrics - where we measure the performance of a promotion level across several projects, by following the build links. Single project metrics are a special case of end-to-end project metrics.
8.5.1. Single project delivery metrics
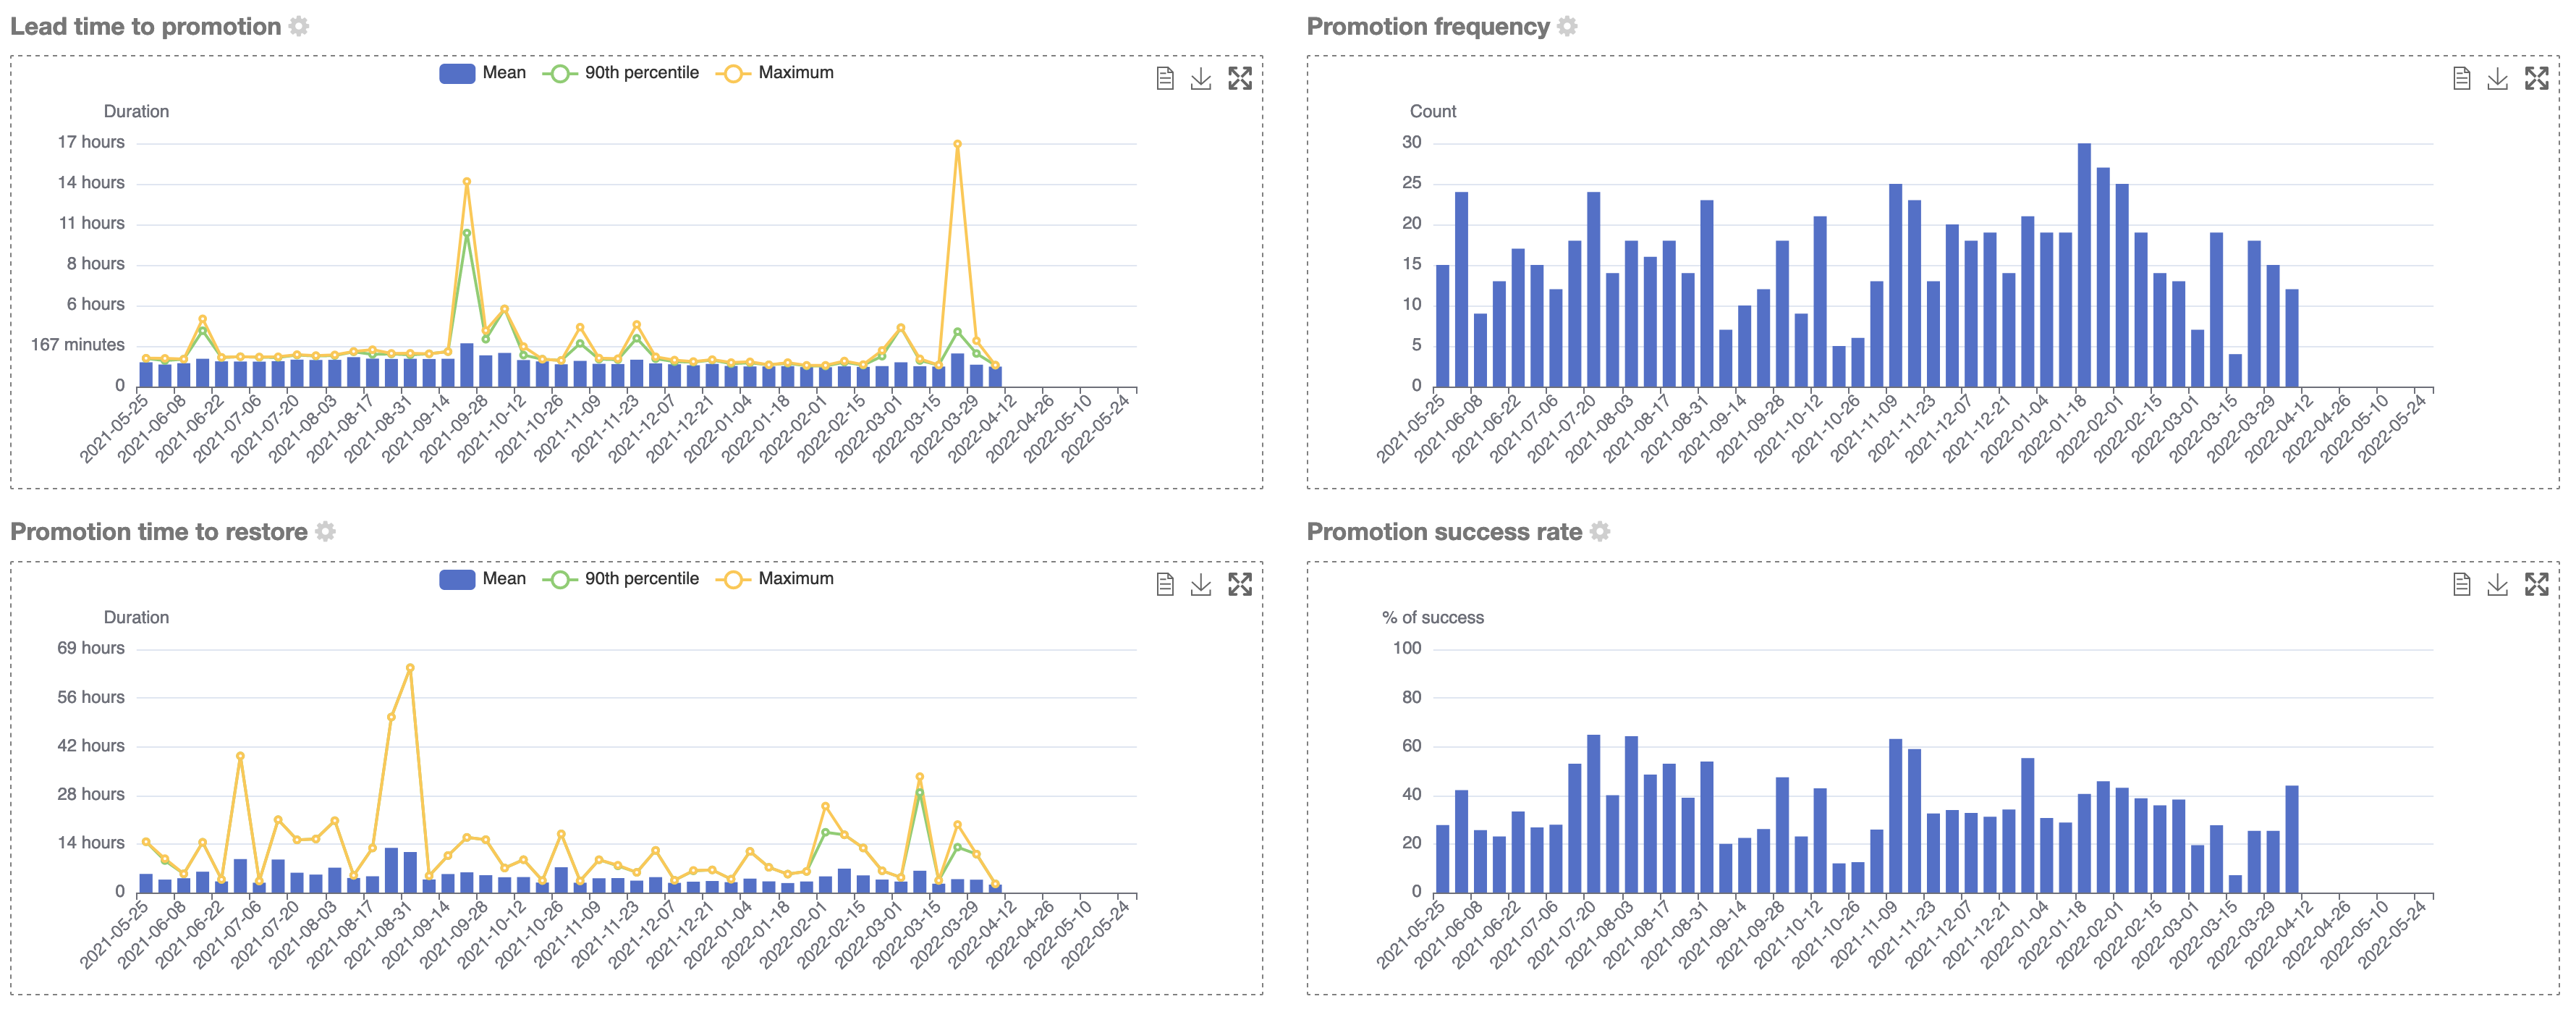
Navigate to any promotion level. Four charts are displayed, one for each of the axes:
-
lead time, with mean, 90th percentile & maximum
-
frequency, count of promotions over the selected period
-
success rate
-
time to restore, with mean, 90th percentile & maximum
For each chart, you can:
-
visualize the data
-
export the chart as an image
-
put the chart fullscreen
You can select the interval and the period (cog icon next to the chart title). These settings are valid for all the charts for all the promotions.
Additionally, you also have two charts a validation stamp level:

-
how long lasts the validation?
-
how stable it is?
|
For API access to the single project delivery metrics, consider using the exported End-to-end project delivery metrics. |
8.5.2. End-to-end project delivery metrics
|
As of now, end-to-end delivery metrics are not available in the UI, only as metrics. You’ll need to use tools like Grafana or Kibana to show them on charts. |
The end-to-end delivery metrics are performance metrics for the promotions across several projects, following the links between the builds.
For example:
-
given a project P depending on a component C which itself depends on a library L
-
given a promotion GOLD valid on all these components
We can measure the performance of this promotion by following the links from L to C to P.
The metric axes exposed at the beginning translate into:
-
lead time - how long does it take from the moment a L build is created to the moment it is available in C and P, with all builds are all levels being GOLD?
-
frequency - how often does it happen that for each L build, all linked L, C and P builds will all be GOLD?
-
success rate - for each L build, how many of them are GOLD and also their linked C and P builds?
-
time to restore - if a chain L → C → P is not GOLD, how long does it take to restore it to full GOLD?
All these metrics are exported for each transitive link, branch & promotion. In our previous example, we’ll have records for the pairs:
-
L:L - same as single project delivery metric
-
L:C, C:P - one level of dependency
-
L:P - two levels of dependency
The following metrics are available:
-
ontrack_dm_promotion_lead_time- in seconds - for the lead time -
ontrack_dm_promotion_success_rate- percentage (from 0.0 to 1.0) - success rate - can be used for the frequency by counting the occurences -
ontrack_dm_promotion_ttr- in seconds - for the time to restore
Each metric is associated with the following tags:
-
sourceProject, sourceBranch
-
targetProject, targetBranch
-
promotion
8.6. Auto versioning on promotion
Beside collecting data about the performance of your delivery, Ontrack can in turn use this information to drive other automation processes.
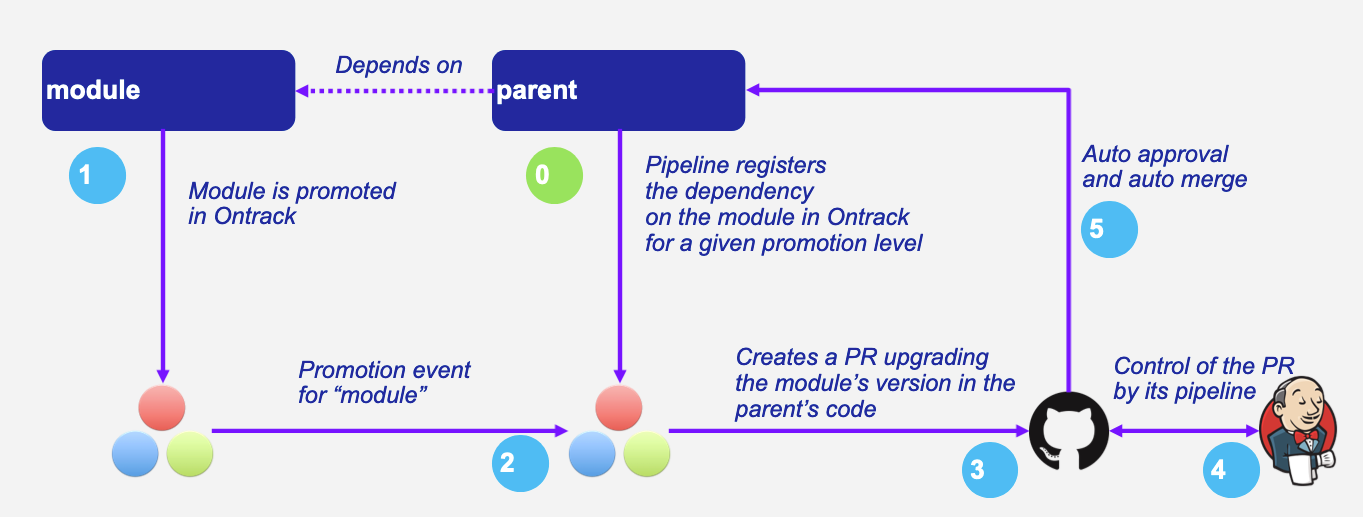
One of these processes that Ontrack can drive is the "auto promotion on promotion", which allows the propagation of versions from one repository to others using quality gates based on Ontrack promotions.
Let’s imagine a project parent which has a dependency on a module expressed through a version property somewhere in a file.
Ideally, whenever the module has a new version is a given range, we want this version to be used automatically by the parent.
Manually, we can do this of course:
-
we update the version in the
parent -
we perform any needed post-processing like a resolution of locks
-
we commit and push the change. Voilà.
If we put extra automation in the mix, you can define a perfectly valid auto versioning process.
This becomes more complex whenever having a new version of the module is not enough of a criteria to have it used.
This may be a release which has not been qualified yet by extra quality processes (long running ones maybe).
That’s where the concept of promotion in Ontrack can play a very important rule:
-
the
moduleis promoted -
this starts the following process:
-
Ontrack creates a pull request for the
parentwhere the version of themodulehas been changed to the one being promoted -
any required post processing is performed on this PR
-
when the PR is ready to be merged (with all its controls), it’s merged automatically
Result:
-
versions are propagated automatically only when "promotion gates" are opened
This is valid from one module to a project, and can be easily extended to a full tree of dependent modules.
The diagram below shows how this works:
8.6.1. When not to use auto versioning
While auto versioning is pretty easy to put in place, it should not be used where traditional dependency management based on locks can be used instead for simple code libraries.
Auto versioning on promotion is however particularly well suited to deal with situations like:
-
modular monoliths
-
GitOps repositories with fixed versions
8.6.2. General configuration
Auto versioning is not enabled by default. This can be done in the Settings > Auto Versioning.
Three parameters are available:
-
Enabled - check to enable auto versioning
-
Audit retention - maximum number of seconds to keep non-running audit entries for auto versioning requests (see Audit logs for more information)
-
Audit cleanup - maximum number of seconds to keep audit entries for auto versioning requests. This time is counted after the retention period for the non-running entries (see Audit logs for more information)
|
These settings can also be configured as code. For example using: |
Queue configuration
Ontrack uses queues in RabbitMQ to schedule and process auto versioning events.
By default, one and only one queue, called auto-versioning.default.1 is available.
When the load becomes too important, you can use two mechanisms to scale the auto versioning:
-
increase the number of default queues. You can set the
ontrack.extension.auto-versioning.queue.scaleconfiguration property to a higher number than 1 -
create dedicated queues for some projects, see below.
Dedicated queues
For a given Ontrack project, you can setup a dedicated queue, which will be used exclusively for this project (whereas the default queues are shared between all projects).
Use the ontrack.extension.auto-versioning.queue.projects configuration property to defined a comma-separated list of projects which must have dedicated queues.
For example, using environment variables:
ONTRACK_EXTENSION_AUTO_VERSIONING_QUEUE_PROJECTS=project-one,project-two8.6.3. Branch configuration
The configuration of a branch for the auto versioning of its dependencies can be done using:
-
the GraphQL
setAutoVersioningConfigorsetAutoVersioningConfigByNamemutation -
Jenkins Ontrack pipeline library for Jenkins pipelines
-
GitHub for the GitHub ingestion
All these integrations rely on setting up a version of the auto versioning model for a branch which contains a list of auto versioning source configurations. This can be represented as YAML using:
# List of configurations
configurations:
    # Project to watch
  - sourceProject: String
    # Name of the branch to take into account for the dependency. Several branches can be selected using
    # a regular expression. If several branches are eligible, only the latest version
    # can be used, based on inverted order of semantic versioning. Branches which
    # do not comply with semantic versioning are discarded.
    #
    # See <Targeting a series of branches> for more information.
    #
    # Alternatively, the sourceBranch parameter can be set to "&<expression>" where `<expression>` is
    # used to detect the valid source branch from the source project.
    #
    # See <Branch expressions> below for more information.
    sourceBranch: String
    # Promotion to watch
    sourcePromotion: String
    # Comma-separated list of file to update with the new version
    targetPath: String
    # Regex to use in the target file to identify the line to replace with the new version.
    # It must have a capturing group in position 1, which will be replaced by the actual version.
    # For example:
    # `coreVersion = (.*)`
    targetRegex: String?
    # Can be used instead of the `regex` when we consider
    # property files. In the sample above, the target property can be set to `coreVersion`
    targetProperty: String?
    # When `property` is used, `propertyRegex` can define a regular expression to extract / update
    # the actual version from/into the property value. The regular expression must contain at least
    # one capturing group, holding the actual version value. This `propertyRegex` is useful for cases
    # when the version is part of a bigger string, for example, for a Docker image qualified name.
    # Example:
    # When targetProperty = "repository/image:tag"
    # to target tag, you can use targetPropertyRegex: "repository\/image\:(.*)"
    targetPropertyRegex: String
    # when `property` is set, defines how the target file
    # must be handled. For example, it could be a dependency notation in a NPM `package.json` file, or
    # a property entry in Java properties file for Gradle. For NPM, use `npm`. For Java properties,
    # use `properties`. When not specified, it defaults to `properties`. Other types are available,
    # see <Target files types>
    targetPropertyType: String?
    # Check if the PR must be approved automatically or not (`true` by default)
    autoApproval: Boolean?,
    # Prefix to use for the upgrade branch in Git, defaults to `feature/auto-upgrade-<project>-<version>-<branch>`.
    # If set manually, the `<project>` and `<version>` tokens can be used to be replaced respectively
    # by the dependency project (the `project` above) and the actual version.
    #
    # The `<branch>` token is replaced by the MD5 digest of the target branch.
    #
    # Only the `<version>` token is required.
    #
    # Starting from 4.7.30 & 4.8.14, the `<branch>` token is not required but will be added (with the `-<branch>` suffix) if not present.
    upgradeBranchPattern: String?
    # Type of post-processing to launch after the version has been updated
    postProcessing: String?
    # Configuration of the post processing
    postProcessingConfig: JsonNode?
    # See "Auto versioning checks"
    validationStamp: String?
    # Auto approval mode
    autoApprovalMode: CLIENT | SCM
    # Build link creation when running the checks. True by default.
    buildLinkCreation: Boolean?
    # Qualifier to use for the build links
    qualifier: String?
    # How must the version to use be computed from the source build?
    # See "Version source" below
    versionSource: String?
    # Additional paths to change.
    # See "Additional paths" below
    additionalPaths:
      - # Comma-separated list of file to update with the new version
        path: String
        # Regex to use in the target file to identify the line to replace with the new version.
        # The first matching group must be the version.")
        regex: String?
        # Optional replacement for the regex, using only a property name
        property: String?
        # Optional regex to use on the property value
        propertyRegex: String?
        # When property is defined, defines the type of property (defaults to Java properties
        # file, but could be NPM, etc.)
        propertyType: String?
        # Source of the version for the build. By default, uses the build label is the source project
        # is configured so, or the build name itself. This allows the customization of this behavior.
versionSource: String?|
The auto versioning model for a branch, if set, is shown on the branch page. |
Targeting a series of branches
In this scenario, the parent wants to be notified of a promotion on a series of branches, and Ontrack triggers the upgrade only if the promotion has occurred on the latest branch.
Setup:
-
set the
branchparameter to a regular expression on the Git branch, for example:release\/.\..*
How does it work?
-
when a promotion occurs on the desired level, Ontrack gets the list of branches for the dependency, orders them by descending version, filter them using the regular version, and triggers an upgrade only if the promoted branch is the first in this list (latest in terms of version)
Pro’s:
-
simple
-
allows auto upgrades fairly easily
Con’s:
-
the dependency must really take care of a strong semantic versioning
Branch expressions
The sourceBranch parameter can be set to &<expression> where <expression> is an expression used to detect the source branch on the source project for a branch eligible for auto versioning.
Supported values are:
®ex
By using:
sourceBranch: "®ex:<regex>"this is equivalent to the default behaviour:
sourceBranch: "<regex>"&same
The source branch must have the exact same name as the target branch.
Example: if you have a branch release-1.24 on a parent project P and you want to get updates from a dependency project only for the same branch, release-1.24, you can use:
sourceBranch: "&same"&most-recent
Two branches (release/1.1 & release/1.2) are available for a project which is dependency of an auto versioned parent project with the following default branch source:
branch: 'release\/1\..*'In this scenario, no promotion has been granted yet in release 1.2 of the dependency.
When 1.1 is promoted, Ontrack identifies a branch on the parent project to be a potential candidate for auto versioning.
This branch is configured to accept only the latest release/1.* branch, which is - now - the release/1.2.
Therefore, a 1.1 promotion is no longer eligible as soon as the 1.2 branch was created (and registered in Ontrack).
What exactly do we want to achieve? In this scenario, we always want the version promoted in 1.1 as long as there is none in 1.2. Let’s imagine we promote a 1.1 while 1.2 was already promoted, what then? How do we protect ourselves?
The idea is to accept a promotion as long as there is no such a promotion in later branches.
-
a 1.1 is promoted and there is no such promotion in more recent branches (1.2, etc.) - we accept it
-
a 1.1 is promoted and there is already such a promotion in a more recent branch (1.2 for example) - we reject it
To implement this strategy, we have to use:
branch: '&most-recent:release\/1\..*'&same-release
On the same model as the "&same" sourceBranch parameter, there is the possibility to get a "&same-release" branch source.
This is to be used in cases where the dependency and its parent follow the same branch policy at release/ branch level, but only for a limited number of levels.
For example, a parent has release branches like release/1.24.10, with a dependency using on release/1.24.15. We want release/1.x.y to always depend on the latest release/1.x.z branch (using 1. as a common prefix).
One way to do this is to use: sourceBranch: "release/1.24.*" but this would force you to always update the source branch parameter for every branch:
-
release/1.24.* in release/1.24.x branch
-
release/1.25.* in release/1.25.x branch
-
etc.
A better way is to use, in this scenario:
sourceBranch: "&same-release:2"This means:
-
if you’re on a release/x.y.z branch, use release/x.y.* for the latest branch
-
for any other branch (main) for example, we use the same branch
|
Note that |
Version source
By default, the version to use in the target project is computed directly from the build which has been promoted.
The default behavior is:
-
if the source project is configured to use the labels for the builds ("Build name display" property), the label (or release, or version) of the build is used. If this label is not present, the auto versioning request will be rejected
-
if the source project is not configured, the build name is taken as the version
This version computation can be adapted using the versionSource configuration parameter.
The different options for this parameter are:
-
default- uses the default behavior described above -
name- uses the name of the build, regardless of the source project configuration -
labelOnly- uses the label attached to the build, regardless of the source project configuration. If there is no label, the auto versioning request is rejected -
metaInfo/<category>/<name>ormetaInfo/<name>- the version is the value of a meta information item of the request category (optional) or name. If so such meta information is found, the auto versioning request is rejected.
Additional paths
The additionalPaths configuration property allows the specification of additional paths to update
instead of just the main one.
|
This can somehow be considered as a form of post-processing but without the need to call an external service. |
Example:
configurations:
  - # ...
    targetPath: "gradle.properties"
    targetProperty: "one-version"
    additionalPaths:
      - path: manifest.toml
        property: global.oneVersion
        propertyType: toml
        versionSource: metaInfo/rpmVersion
In this example, we want the auto-versioning to:
-
update the
one-versionproperty of thegradle.propertiesfile using the version of the build having been promoted -
update the
global.oneVersionproperty of themanifest.tomlfile, but this time using therpmVersionmeta-information of the build having been promoted
Both changes will be part of the same PR.
Post-processing is still possible and would be run after all changes have been applied first (default path & additional paths).
Target files types
Auto versioning, in the end, works by updating a target file, designed in the configuration by the path property.
Typically, it’ll be a gradle.properties or a package.json file but it could be anything else.
A regular expression (regex parameter) can be used to identify the change.
This expression is used to 1) identify the current version 2) replace the current version by a new one.
In order for this to work, the regular expression must:
-
match the whole target line in the target file
-
have a capturing group in position 1 identifying the version to read or replace
It is also possible to use a higher level of file type, by specifying a propertyName and optionally a propertyType.
The propertyName designates a property in the target file and the propertyType designates the type of the file to replace. Two types are currently supported:
-
properties(default) - Java properties file, typically used for agradle.propertiesfile -
npm- NPM package file, typically used forpackage.json -
maven- Maven POM file -
yaml- YAML file, see YAML files -
toml- TOML file, see [auto-versioning-config-type-toml]
See the examples section for their usage.
Maven POM file
For the maven type, the file to transform is a Maven pom.xml file. The property is required to be one of the <properties> elements of the file.
For example, given the following POM:
<project>
    <properties>
        <dep.version>1.10</dep.version>
        <ontrack.version>4.4.10</ontrack.version>
    </properties>
</project>
we can refer to the ontrack.version using the following auto versioning configuration:
configurations:
  # ...
  targetPath: pom.xml
  propertyType: maven
  property: ontrack.version
YAML files
When propertyType is set to yaml, property is expected to define a path inside the YAML file.
This path is expressed using the Spring Expression Language.
For example, given the following YAML file (a deployment fragment in Kubernetes):
---
apiVersion: apps/v1
kind: Deployment
metadata:
  name: my-app
spec:
  template:
    spec:
      containers:
      - name: component
        image: repo/component:0.1.1
In order to get to the repo/component:0.1.1 value, the path to set will be:
#root.^[kind == 'Deployment' and metadata.name == 'my-app'].spec.template.spec.containers.^[name == 'component'].imageSee the Spring Expression Language reference for a complete reference but this expression already illustrates some key points:
-
#rootrefers to the "root object", used to evaluate the expression, in our case, the list of YAML "documents", separated by--- -
.^[<filter>]is an operator for a list, evaluating the given filter for each element until one element is found. Only the found element is returned. -
.namereturns the value of thenameproperty on an object -
literal strings are using single quotes, for example:
'Deployment'
If property is set to the expression mentioned above, the value being returned will be
repo/component:0.1.1.
However, we want to use `0.1.1`only.
For this purpose, you need to specify also the propertyRegex and set it, for this example to:
^repo\/component:(.*)$TOML files
When propertyType is set to yaml, property is expected to define a path inside the YAML file.
For example, given the following TOML file:
[images]
myVersion = "2.0.0"
To update the myVersion property in the images table, one can set the auto versioning property to images.myVersion.
|
The support of TOML in the Ontrack auto versioning uses the 4koma library and this comes with some caveats:
Request for help: if you know of a better TOML Java/Kotlin library which would support comments, updates of the TOML structure, more complex queries, please let me know. |
Integrations
Jenkins pipeline
By using the Jenkins Ontrack pipeline library, you can setup the auto versioning configuration for a branch.
For example:
ontrackCliAutoVersioning {
    branch "main"
    yaml "auto-versioning.yml"
}
where auto-versioning.yml is a file in the repository containing for example:
dependencies:
  - project: my-library
    branch: release-1.3"
    promotion: IRON
    path: gradle.properties
    property: my-version
    postProcessing: jenkins
    postProcessingConfig:
        dockerImage  : openjdk:8
        dockerCommand: ./gradlew clean
GitHub Actions
TBD
ontrack-github-ingestion-auto-versioning GitHub action which sets up auto versioning for the GitHub ingestion
Examples
Gradle update for last release
To automatically update the dependencyVersion in gradle.properties to the latest version
1.* of the project dependency when it is promoted to GOLD:
-
project:
dependency -
branch:
release/1\..* -
promotion:
GOLD -
path:
gradle.properties -
propertyName:
dependencyVersion -
propertyType:
properties(or nothing, it’s a default) -
postProcessing:
… -
postProcessingConfig:
-
dockerImage:openjdk/8 -
dockerCommand:./gradlew resolveAndLockAll --write-locks
-
NPM update for last release
To automatically update the @test/module in package.json to the latest version
1.* of the project dependency when it is promoted to GOLD:
-
project:
dependency -
branch:
release/1\..* -
promotion:
GOLD -
path:
package.json -
propertyName:
@test/module -
propertyType:
npm -
postProcessing:
… -
postProcessingConfig:
-
dockerImage:node:jessie -
dockerCommand:npm -i
-
8.6.4. Post processing
In some cases, it’s not enough to have only a version being updated into one file. Some additional post-processing may be needed.
For example, if using Gradle or NPM dependency locks, after the version is updated, you’d need to resolve and write the new dependency locks.
The Auto Versioning feature allows you to configure this post-processing.
In the branch configuration, you can set two properties for each source configuration:
-
postProcessing- ID of the post-processing mechanism -
postProcessingConfig- configuration for the post-processing mechanism
As of now, only two post-processing mechanisms are supported. See the sections below for their respective configurations.
GitHub post-processing
You can delegate the post-processing to a GitHub workflow.
There is a global configuration and there are a specific configuration at branch level (in the postProcessingConfig property).
For the global configuration, you can go to Settings > GitHub Auto Versioning Post Processing and define the following attributes:
-
Configuration - Default GitHub configuration to use for the connection
-
Repository - Default repository (like
owner/repository) containing the workflow to run -
Workflow - Name of the workflow containing the post-processing (like
post-processing.yml) -
Branch - Branch to launch for the workflow
-
Retries - The amount of times we check for successful scheduling and completion of the post-processing job
-
Retry interval - The time (in seconds) between two checks for successful scheduling and completion of the post-processing job
The postProcessingConfig property at branch level must contain the following parameters:
-
dockerImage- (required) This image defines the environment for the upgrade command to run in -
dockerCommand- (required) Command to run in the Docker container -
commitMessage- (required) Commit message to use to commit and push the result of the post-processing -
version- (required) the version which is upgraded to -
config- GitHub configuration to use for the connection (optional, using defaults if not specified) -
repository- GitHub repository (owner/repo). To be set to override the default settings -
branch- If defined, overrides the default settings for the branch to use when launching the workflow -
workflow- If defined, name of the workflow in this repository containing the post-processing (likepost-processing.yml)
The following parameters are templated:
-
dockerImage -
dockerCommand -
commitMessage -
branch
The workflow branch configuration property can be used to set the post-processing workflow to one in the very branch targeted by the auto versioning process.
This would override the global settings.
Example of a simple configuration relying on the global settings:
postProcessing: github
postProcessingConfig:
  dockerImage: openjdk:11
  dockerCommand: ./gradlew dependencies --write-locks
  commitMessage: "Resolving the dependency locks"
The code below shows an example of a workflow suitable for post-processing:
name: post-processing

on:
  # Manual trigger only
  workflow_dispatch:
    inputs:
      id:
        description: "Unique client ID"
        required: true
        type: string
      repository:
        description: "Repository to process, like 'nemerosa/ontrack'"
        required: true
        type: string
      upgrade_branch:
        description: "Branch containing the changes to process"
        required: true
        type: string
      docker_image:
        description: "This image defines the environment for the upgrade command to run in"
        required: true
        type: string
      docker_command:
        description: "Command to run in the Docker container"
        required: true
        type: string
      commit_message:
        description: "Commit message to use to commit and push the result of the post processing"
        required: true
        type: string

jobs:
  processing:
    runs-on: ubuntu-latest
    container:
      image: ${{ inputs.docker_image }}
    steps:
      - name: logging
        run: |
          touch inputs.properties
      - name: artifact
        uses: actions/upload-artifact@v4
        with:
          name: inputs-${{ inputs.id }}.properties
          path: inputs.properties
          if-no-files-found: error
      - name: checkout
        uses: actions/checkout@v3
        with:
          repository: ${{ inputs.repository }}
          ref: ${{ inputs.upgrade_branch }}
          token: ${{ secrets.ONTRACK_AUTO_VERSIONING_POST_PROCESSING }}
      - name: processing
        run: ${{ inputs.docker_command }}
      - name: publication
        run: |
          git config --local user.email "<some email>"
          git config --local user.name "<some name>"
          git add --all
          git commit -m "${{ inputs.commit_message }}"
          git push origin "${{ inputs.upgrade_branch }}"
The rest of the workflow can be adapted at will. |
Jenkins post-processing
You can delegate the post-processing to a Jenkins job.
There is a global configuration and there are a specific configuration at branch level (in the postProcessingConfig property).
For the global configuration, you can go to Settings > Jenkins Auto Versioning Processing and define the following attributes:
-
Configuration - default Jenkins configuration to use for the connection
-
Job - default path to the job to launch for the post-processing, relative to the Jenkins root URL (note that
/job/separators can be omitted) -
Retries - the amount of times we check for successful scheduling and completion of the post-processing job
-
Retry interval - the time (in seconds) between two checks for successful scheduling and completion of the post-processing job
The postProcessingConfig property at branch level must contain the following parameters:
| Parameter | Default value | Description |
|---|---|---|
|
Required |
Docker image defining the environment |
|
Required |
Command to run in the working copy inside the Docker container |
|
Required |
Commit message for the post processed files. If not defined, a default message will be provided |
|
Optional |
Jenkins configuration to use for the connection (optional, using defaults if not specified) |
|
Optional |
Path to the job to launch for the post processing (optional, using defaults if not specified) |
|
Optional |
List of credentials to inject in the command (see below) |
Example of such a configuration:
postProcessing: jenkins
postProcessingConfig:
  dockerImage: openjdk:11
  dockerCommand: ./gradlew dependencies --write-locks
  commitMessage: "Resolving the dependency locks"
The Jenkins job must accept the following parameters:
| Parameter | Description |
|---|---|
|
Git URI of the repository to upgrade |
|
This image defines the environment for the upgrade command to run in. |
|
Command to perform the upgrade. |
|
Commit message to use to commit and push the upgrade. |
|
Branch containing the code to upgrade. |
|
Pipe (|) separated list of credential entries to pass to the command. |
|
The version which is upgraded to |
The Jenkins job is responsible to:
-
running a Docker container based on the
DOCKER_IMAGEimage -
inject any credentials defined by
CREDENTIALSparameter -
checkout the
UPGRADE_BRANCHbranch of the repository atREPOSITORY_URIinside the container -
run the
DOCKER_COMMANDcommand inside the container -
commit and push any change using the
COMMIT_MESSAGEmessage to theUPGRADE_BRANCHbranch
8.6.5. Pull requests
After a branch is created to hold the new version, after this branch has been optionally post-processed, Ontrack will create a pull request from this branch to the initial target branch.
The autoApproval branch configuration property (set to true by default) is used by Ontrack to check if created pull requests must managed at all.
If set to false, Ontrack will just create a pull request and stop here.
If set to true, the fate of the pull request depends on the auto approval mode which has been set in the branch configuration:
| Auto approval mode | Description | Pro’s | Con’s |
|---|---|---|---|
|
This is the default behaviour. Ontrack takes the ownership of the pull request lifecycle:
|
Full visibility on the PR lifecycle within Ontrack |
This creates additional load on Ontrack |
|
Ontrack relies on the SCM (GitHub for example) for the lifecycle of the pull request, in a "fire and forget" mode:
|
Less load on Ontrack since the PR lifecycle is fully managed by the SCM |
Less visibility on the PR lifecycle from Ontrack |
General configuration
Both modes, CLIENT and SCM, need the SCM configuration used by Ontrack to have additional attributes.
General configuration for GitHub
The GitHub configuration used by the Ontrack project must have its autoMergeToken attribute set to a GitHub Personal Access Token with the following permissions:
-
repo
and the corresponding user must have at least the Triage role on the target repositories.
|
This |
8.6.6. Auto versioning checks
While auto versioning is configured to automatically upgrade branches upon the promotion of some other projects, it’s also possible to use this very configuration to check if a given build is up-to-date or not with the latest dependencies.
By calling the POST /extension/auto-versioning/build/{buildId}/check end point, where buildId is the ID of the build to check, you create a validation run on this build:
-
it’ll be PASSED if the dependencies are up-to-date
-
FAILED otherwise
The name of the validation stamp is defined by the validationStamp parameter in the configuration of the branch:
-
if defined, will use this name
-
if set to
auto, the validation stamp name will beauto-versioning-<project>, with<project>being the name of the source project -
if not set, no validation is created
|
You should seldom call this endpoint directly and rather use one of the existing integrations: |
8.6.7. Audit logs
All auto versioning processes and all their statuses are recorded in an audit log, which can be accessed using dedicated pages (and the GraphQL API).
The auto versioning audit can be accessed:
-
from the Auto versioning audit user menu, for all projects and branches
-
from the Tools > Auto versioning audit (target) from a project page when the project is considered a target of the auto versioning
-
from the Tools > Auto versioning audit (source) from a project page when the project is considered a source of the auto versioning
-
from the Tools > Auto versioning audit from a branch page when the branch is targeted by the auto versioning
All these pages are similar and show:
-
a form to filter the audit log entries
-
a paginated list of audit log entries
Each log entry contains the following information:
-
target project and branch (only available in global & project views)
-
source project
-
version being updated
-
post-processing ID if any
-
auto approval mode if any
-
running flag - is the auto versioning process still running?
-
current state of the auto versioning process
-
link to the PR if any
-
timestamp of the latest state
-
duration of the process until the latest state
-
a button to show more details about the process
When the details are shown, the following information is available:
-
the history of the states of the process
-
a JSON representation of the auto versioning order
Audit cleanup
To avoid accumulating audit log entries forever, a cleanup job is run every day to remove obsolete entries. The behaviour of the cleanup is controlled through the global settings.
8.6.8. Notifications
The auto versioning feature integrates with the Notifications framework by emitting several events you can subscribe to:
-
auto-versioning-success- whenever an auto versioning process completes -
auto-versioning-error- whenever an auto versioning process finishes with an error -
auto-versioning-pr-merge-timeout-error- whenever an auto versioning process cannot merge a pull request because of a timeout on its merge condition (only whenautoApprovalModeis set toCLIENT- see Pull requests)
8.6.9. Cancellations
By default, when auto versioning requests pile up for a given source and target, all the intermediary processing requests are cancelled.
For example, given the following scenario, for a given source project and a given target branch:
-
(1) auto versioning to version 1.0.1
-
auto versioning to version 1.0.2 while (1) is still processed
-
auto versioning to version 1.0.3 while (1) is still processed
-
auto versioning to version 1.0.4 while (1) is finished
In this scenario, the processing of 1.0.1 and 1.0.4 will have been processed and completed while 1.0.2 and 1.0.3 would have been cancelled.
|
The auto cancellation can be disabled by setting the |
8.6.10. Metrics
The following operational metrics are exposed by Ontrack, which allow to track the load of the auto versioning processes:
| Metric | Tags | Description | Type |
|---|---|---|---|
ontrack_extension_auto_versioning_queue_produced_count |
|
Number of processing orders queued |
Count |
ontrack_extension_auto_versioning_queue_consumed_count |
|
Number of processing orders queued |
Count |
ontrack_extension_auto_versioning_processing_completed_count |
|
Number of processing orders queued |
Count |
ontrack_extension_auto_versioning_processing_error_count |
None |
Number of processing orders stopped because of an error |
Count |
ontrack_extension_auto_versioning_processing_time |
|
Time it took to process an order |
Timer |
ontrack_extension_auto_versioning_post_processing_started_count |
|
Number of post-processing having started |
Count |
ontrack_extension_auto_versioning_post_processing_success_count |
|
Number of post-processing having completed with success |
Count |
ontrack_extension_auto_versioning_post_processing_error_count |
|
Number of post-processing having completed with an error |
Count |
ontrack_extension_auto_versioning_post_processing_time |
|
Time it took to complete the post-processing |
Timer |
8.7. Project indicators
Project indicators are set at project level to hold values about different types of information.

Those types of information are grouped into categories and can have a specific value type, like a boolean (yes/no), a percentage, a numeric value, etc. Types can be entered manually, imported or computed.
Every of those indicator values have a level of compliance which computed as a percentage (from 0% - very bad - to 100% - very good) according to the configuration of the type. The compliance is also associated with a rating, from F (very bad) to A (very good).
The indicator values can be entered manually at project level or be computed.
Projects can be grouped together in portfolios which are also associated with a subset of categories. And a global view of all portfolios is associated with a specific subset of categories.
Finally, the history of indicators is retained by Ontrack and can be used to compute trends at the different levels (at project level, at portfolio level or globally).
Indicators functions can be accessed either by:
-
the Indicators menu for the managers, leading to a page listing all the different options
-
the Indicator portfolios menu for the non managers, leading the list of existing portfolios
8.7.1. Indicators authorization model
Having access to a project grants automatically access to viewing the associated indicators.
However, managing indicators, types & portfolios is granted according to the following matrix:
| Function | Administrator | Global indicator manager | Global indicator portfolio manager | Project manager/owner | Project indicator manager | |
|---|---|---|---|---|---|---|
Global indicators |
Yes |
Yes |
No |
No |
No |
|
Type and category management (1) |
Yes |
Yes |
No |
No |
No |
|
Yes |
Yes |
No |
No |
No |
||
Portfolio management |
Yes |
Yes |
Yes |
No |
No |
|
Indicator edition (2) |
Yes |
Yes |
No |
Yes |
Yes |
(1) Imported types & categories are not open to edition. (2) Computed indicators are not open to manual edition.
8.7.2. Indicator types management
Categories & types can be managed manually by an authorized using the following user menus:
-
Indicators > Categories
-
Indicators > Types
A category must have the following attributes:
-
id - unique ID for this category among all the categories
-
name - display name for this category
A type must have the following attributes:
-
id - unique ID for this type among all the type
-
name - display name for this type
-
link - optional URL for more information about this type
-
value type - type of indicator value this type. For example, a percentage or a boolean
-
value config - configuration for the value type, used to compute the indicator compliance and rating
Categories and types can also be imported orcomputed. In such a case, both the category and the type are associated with a source and they cannot be edited.
Value types
The following value types are available in Ontrack:
| Type | Description | Configuration | Example |
|---|---|---|---|
Yes/No |
Value which can be either Yes ( |
|
"Project should be build with Gradle" - because of the "should", the indicator_required_ value is set to |
Percentage |
Integer value between |
|
"Test coverage" is expressed as a percentage and * any value >= 80% has a rating of "Duplicated code" can also be expressed as a percentage, but this time
with * any value ⇐ 10% has a rating of |
Number |
Integer value >= 0 |
|
"Number of blocking issues" is expressed as a number with * any value set to 0 has a rating of A "Number of tests" could be expressed as a number with * any value ⇐ 100 has a rating of |
|
Additional value types can be created by registering an extensionimplementing the |
8.7.3. Indicator edition
An authorized user can edit the indicator for a project by going to the Tools menu and select Project indicators:
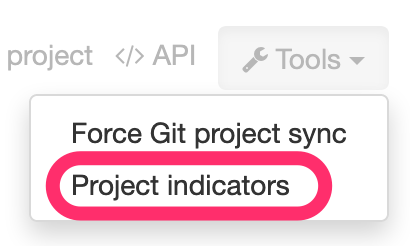
All available types are displayed, grouped by categories, and each indicator value is shown together with its value, its rating:
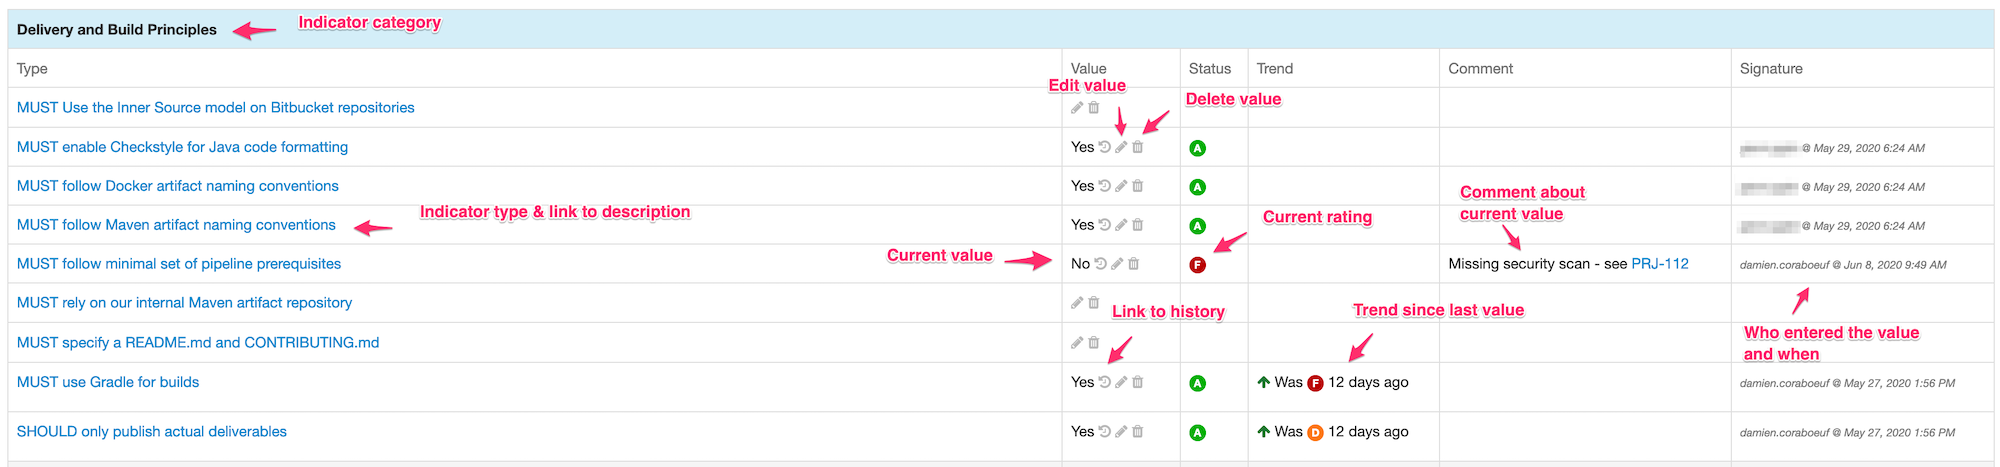
If the indicator has a previous value, its previous rating is displayed.
If the indicator is open to edition, the user can click on the pencil icon to edit the value according to the value type. Upon validation, a new indicator value is stored ; the old value is kept for history and trend computation.
Comments can be associated with an indicator values. Links & issue references will be rendered as links.
An authorized user can also delete the indicator ; this actually register a new null value for the indicator. The historical values are kept.
The history of an indicator can be accessed by clicking on the History icon:

The list of portfolios the project belongs to is displayed at the top of the indicator list:
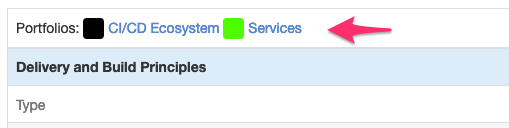
8.7.4. Indicator portfolios
Portfolios are available in the Indicator portfolios user menu (or Indicators > Portfolios for the managers) and the associated page displays the list of already created portfolios.
In this list, each portfolio is associated with the list of categories for the current view and each of these categories is associated with the average rating for all the projects and all the types of this category.
| Only indicators having an actual value are used to compute the average rating. The indicators which are not set are not used for the computation and the ratio "number of indicators being set" to the"number of total indicators" is also displayed. This gives an idea about the trust we can have in this average rating. |
| The minimum ratings are also mentioned if they diverge from the average. |
The trend period allows to display the average value from the past, and to compare it with the current value.
Management of portfolios
Authorized users can create, edit and delete portfolios.
Creating a portfolio is done using the Create portfolio command:

The portfolio creation dialog requires:
-
an ID - must be unique amont all the portfolios and will be used as an identifier. It must therefore comply with the following regular expression:
[a-z0-9:-]+(lowercase letters, digits,:colon or-dashes). The ID cannot be modified later on. -
a display name
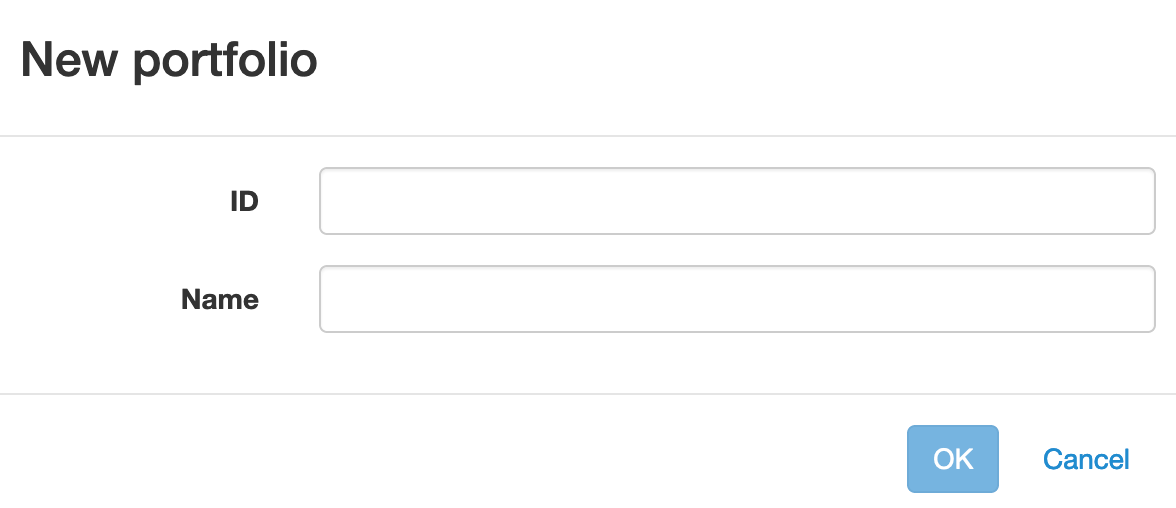
Once created, the portfolio appears on the portfolio overview and can be edited or deleted using the appropriate icons:
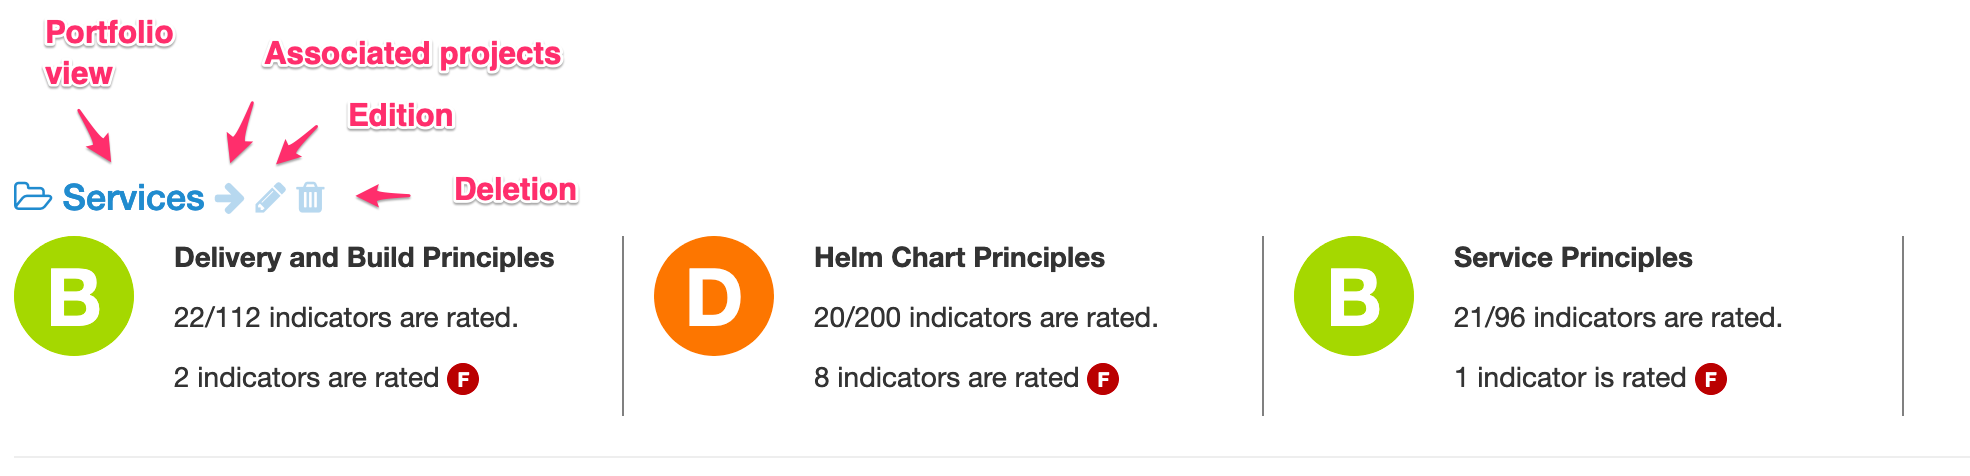
-
the portfolio name is actually a link going to the detailed portfolio view
-
the arrow icon goes to the home page and displays only the projects associated to this portfolio
-
the edition icon goes to the portfolio edition page
-
the deletion icon displays a warning and allows the user to delete the portfolio.
| The deletion of a portfolio does not delete any indicator in any project. |
Portfolio page
By clicking on the portfolio name in the portfolio overview, you get to a page displaying:
-
the list of projects associated with this portfolio
-
the list of categories associated with this portfolio
-
the average indicator rating for project and for each category
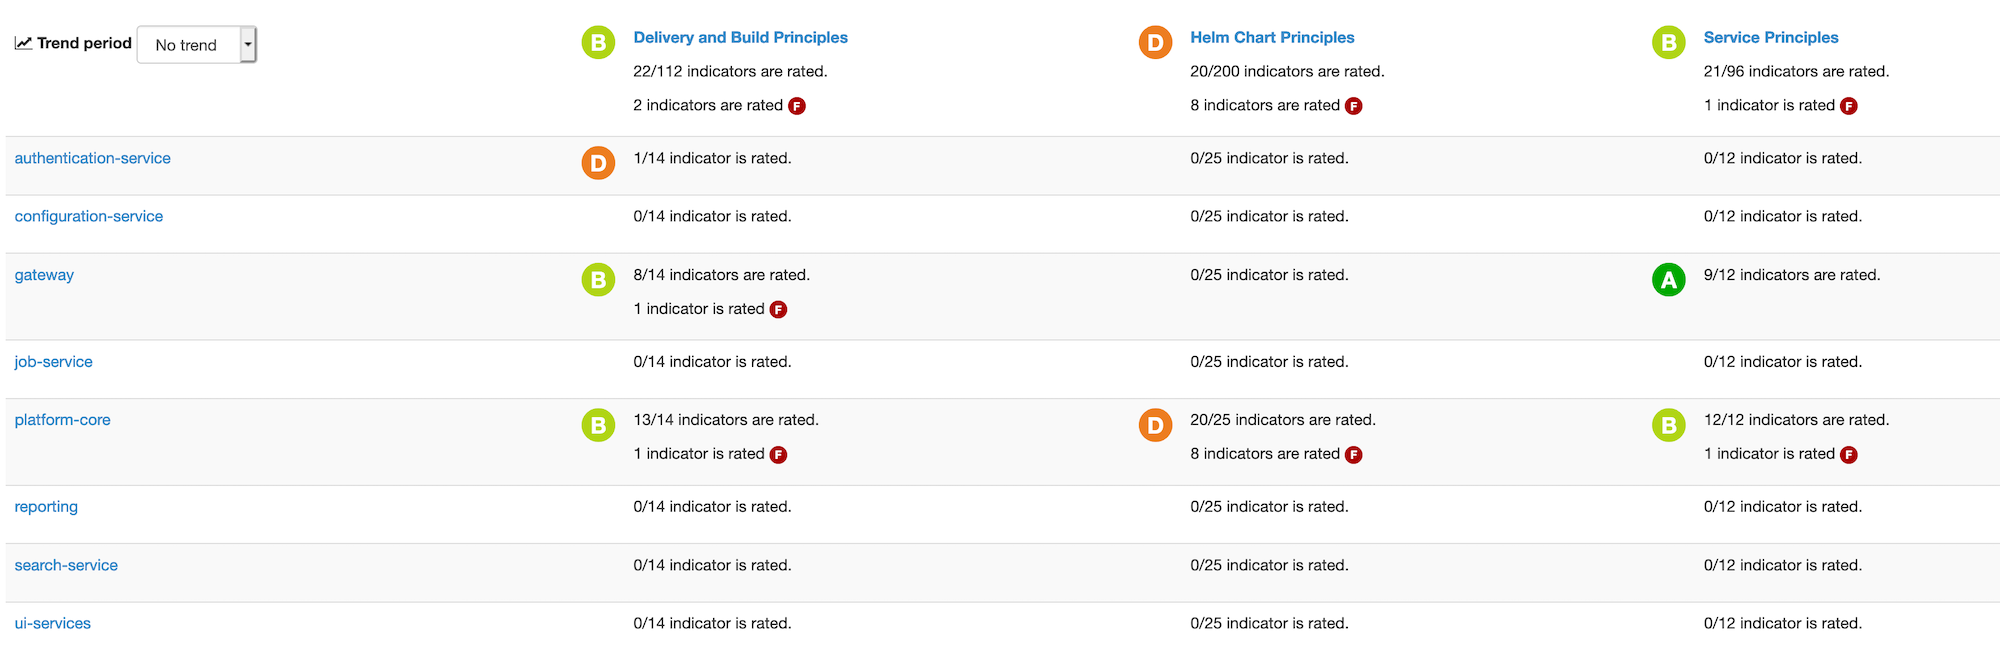
| As for the portfolio overview, the average rating is computed only using the indicators which are actually set, and the ratio filled vs. total is displayed. |
| You can also select a view to change the selected categories. |
The trend period selector allows you to check the past average values and the associated trends.
Clicking on a project name goes to the project indicators page.
Clicking on a category name goes to a page displaying a detailed view of indicators for all the types in this category and for all the projects of this portfolio:

In this view, clicking on the icon right to the type name will bring up a page displaying the indicator values for this type for all the projects of this portfolio:
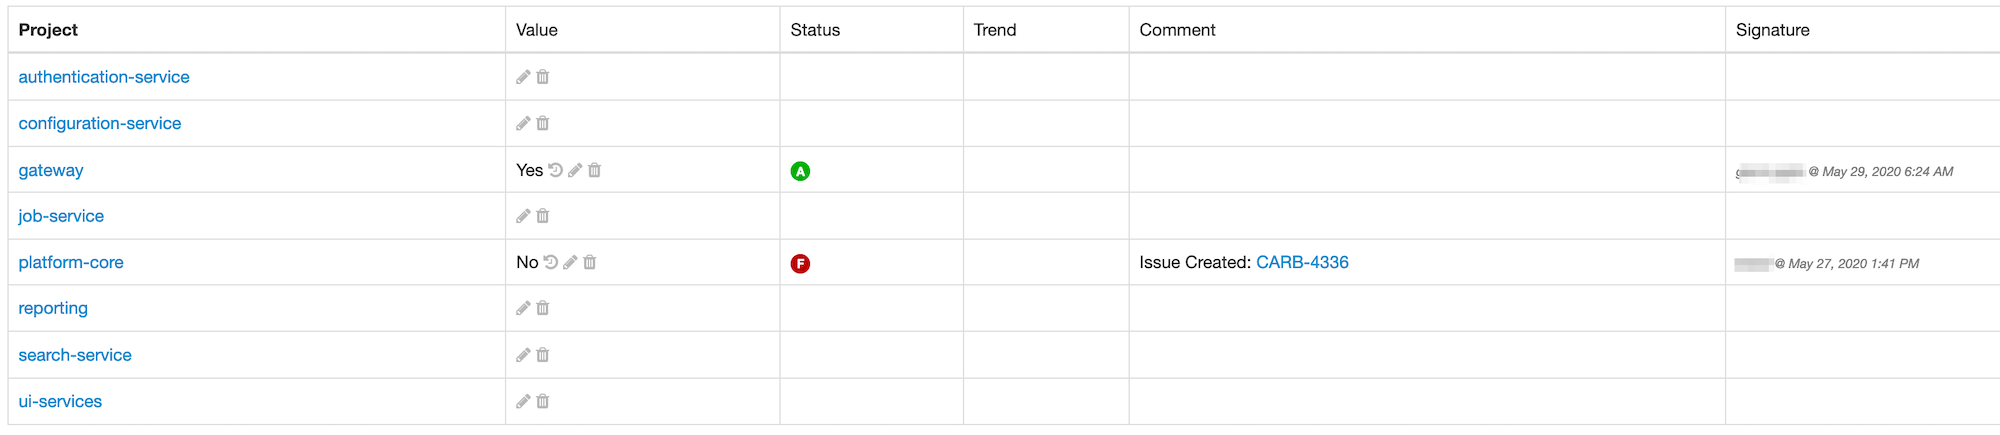
According to your rights, you can edit and delete indicator values from this page.
Portfolio edition
The portfolio edition page allows you to:
-
edit the portfolio display name (not the ID)
-
set a label to select the associated projects
-
select the categories associated with this portfolio
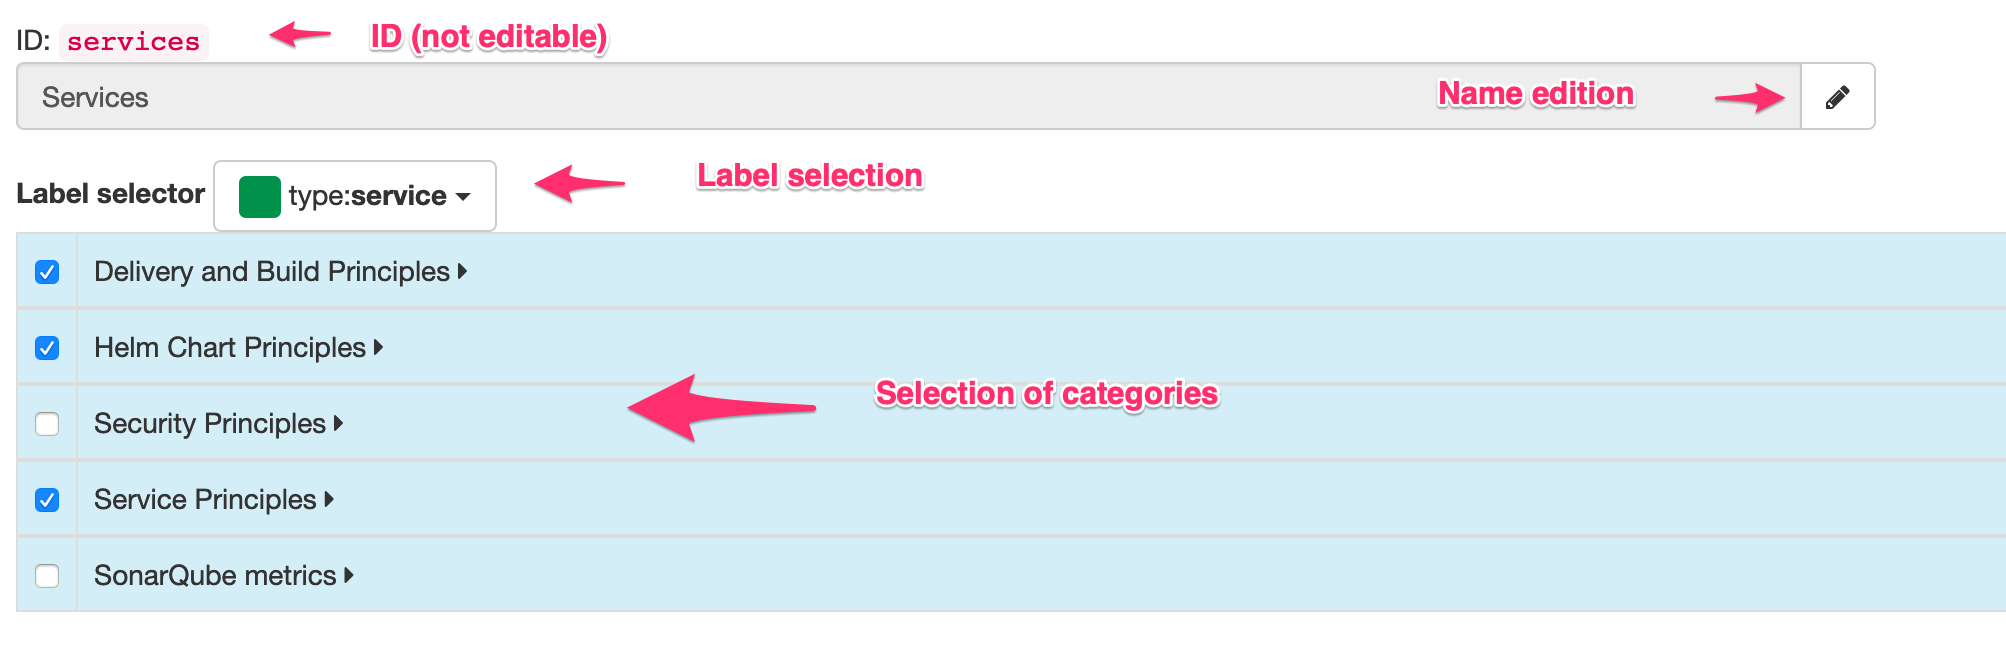
The label allows a portfolio to be associated to all projects which have this label. See [projects-labels] for more information on how to manage labels.
|
"Global indicator portfolio managers" and"Global indicator managers" can associate existing labels to projects but cannot create new labels. |
8.7.5. Indicator views
Indicator views group categories together under a common name. These views can be used in the following pages to restrict the categories which are shown:
-
overview of all portfolios
-
portfolio page
-
project indicators
The list of views can be edited by administrators and global indicator managers, using the Indicators > Views menu.
In the view management page, the user can:
-
create new views
-
edit the list of categories for an existing view
-
delete existing views
8.7.6. Importing categories and types
While indicator categories and types can be entered manually, it is also possible to import lists of categories and their associated types.
To import categories & types in Ontrack, you need a user allowed to manage types and you can use the POST /extension/indicators/imports end point, passing a JSON as payload.
For example, with Curl:
curl --user <user> \
  -H "Content-Type: application/json" \
  -X POST \
  http://ontrack/extension/indicators/imports \
  --data @payload.json
where:
{
  "source": "principles",
  "categories": [
    {
      "id": "service-principles",
      "name": "Service Principles",
      "types": [
        {
          "id": "java-spring-boot",
          "name": "SHOULD Use Java & spring boot stack",
          "required": false,
          "link": "https://example.com/architecture-principles/latest/service_principles.html#java-spring-boot"
        }
      ]
    }
  ]
}
The source is an ID identifying the nature of this list.
Each category must have an id (unique in Ontrack) and a display name.
Each type must have:
-
an
id(unique in Ontrack) -
a display
name -
a
requiredflag - as of now, only "Yes/No" value types are supported -
an optional
linkto some external documentation
Upon import:
-
new existing & types are created
-
existing categories & types are updated and associated indicators are left untouched
-
removed categories & types are marked as deprecated, and associated indicators are kept
|
Instead of marking obsolete categories & types as deprecated, those can be deleted using the |
| Imported categories & types cannot be edited. |
8.7.7. Exporting categories and types
The list of indicators for a category or a type can be visualized and exported as CSV for all projects or for a selection of projects.
In the list of categories or types, click on the eye icon to access a report about the indicators for this category or type:

The indicator category report page displays a matrix of all indicator values for the selected projects and the types which are in this category. For the indicator type page, it’s the same layout, but only one column for the selected type.
By default, only projects having at least one indicator filled in for the selected types are displayed. You can unselect the Only projects with values to display all projects.
In both the category and type report page, you can select the CSV Export link to download this list as a CSV file.
8.7.8. Computing indicators
It is possible to define some types whose value is not entered manually but is computed by Ontrack itself.
You do so by registering an extension which implements the IndicatorComputer interface, or the AbstractBranchIndicatorComputer class when the value must be computed from the "main branch" of a project.
See the documentation of those two types for more information.
The SonarQubeIndicatorComputer extension is an example of such an implementation.
| Computed categories & types cannot be edited, and their values cannot be edited manually. |
8.7.9. Configurable indicators
Some indicators, provided by Ontrack, are configurable:
-
they are disabled by default, and an administrator must enable them
-
optionally, these indicators take some parameters
Once enabled, these configurable behave like any other computed indicator:
-
they are computed in the background
-
they cannot be edited
As an administrator, you can access the list of configurable indicators through Indicators > Configuration:
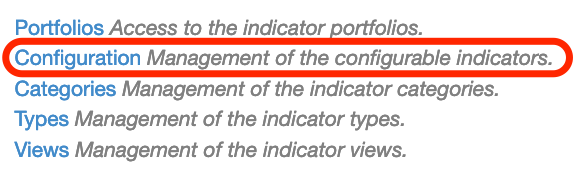
In the following page, the list of configurable indicators is shown, with their current status (enabled / disabled), their parameters, etc.
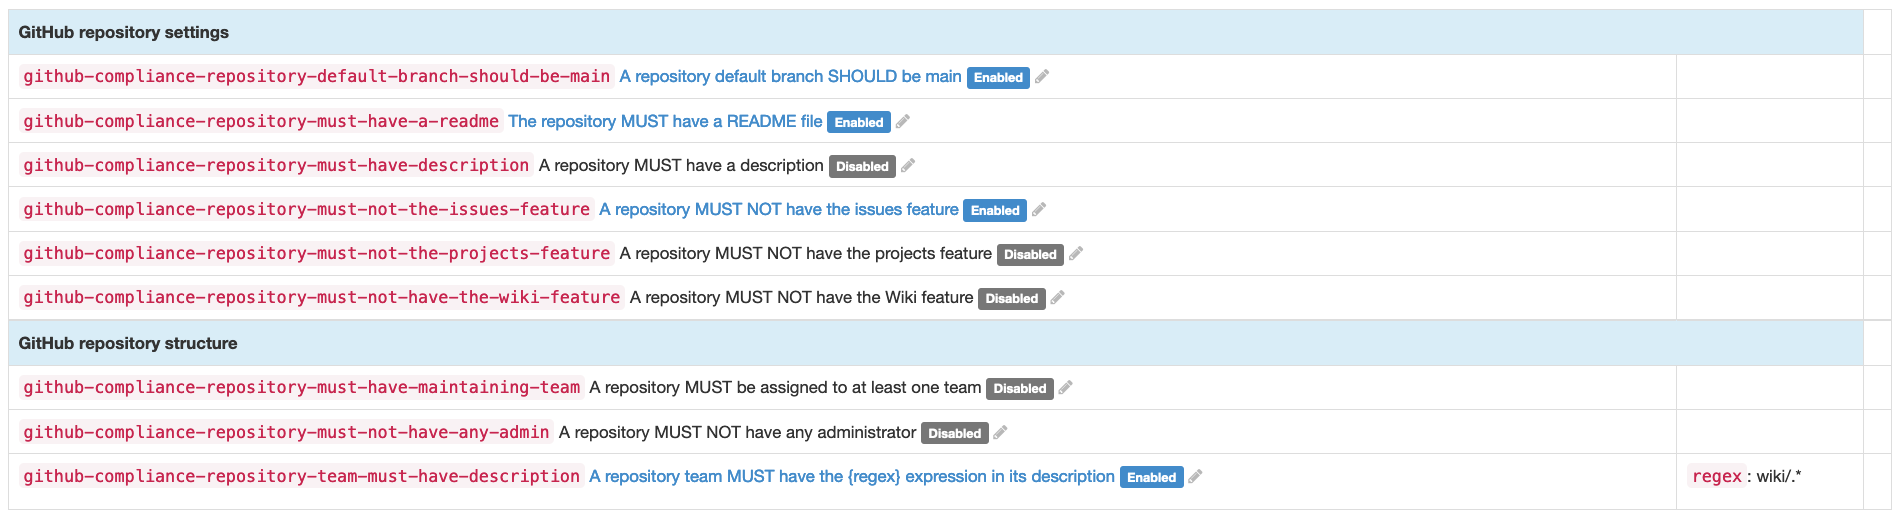
The administrator can use the edit button (pencil icon) to edit a given indicator and fill:
-
its status: enabled or disabled
-
an optional link (to some additional and specific documentation for example)
-
some parameters specific to this indicator

9. Integrations
Ontrack interfaces with several systems, both for its own functioning and for collecting data.
9.1. Working with GitHub
GitHub is an enterprise Git repository manager on the cloud or hosted in the premises.
When working with Git in Ontrack, one can configure a project to connect to a GitHub repository.
9.1.1. General configuration
The access to a GitHub instance must be configured.
-
as administrator, go to the GitHub configurations menu
-
click on Create a configuration
-
in the configuration dialog, enter the following parameters:
-
Name - unique name for the configuration
-
URL - URL to the GitHub instance. If left blank, it defaults to the https://github.com location
-
Several authentication modes are supported:
-
User & Password - credentials used to access GitHub
-
OAuth2 token - authentication can also be performed using a Personal Access Token instead of using a user/password pair
-
GitHub App - see below for more information
The existing configurations can be updated and deleted.
| Although it is possible to work with an anonymous user when accessing GitHub, this is not recommended. The rate of the API call will be limited and can lead to some errors. |
9.1.2. GitHub App authentication
In large Ontrack setup, with hundreds of GitHub repositories, using a GitHub Personal Access Token might not be enough any longer since we can very fast hit the 5000 API rate limit of GitHub.
Using a GitHub App extends this limit a bit more.
Creating a GitHub app
In your personal settings, go to Developer settings > GitHub Apps and click New GitHub App:
-
GitHub App name - any name
-
Homepage URL - your Ontrack URL (for example, not used, but required)
-
Uncheck Webhook > Active
-
Repository permissions:
-
Actions / Read-only (optional)
-
Contents / Read-only
-
Issues / Read-only
-
Pull requests / Read-only
-
Organization permissions
-
Members / Read-only
-
-
Select the Any account option
-
Select Create GitHub App
Then Generate a private key and save the generated PEM file.
This PEM file must be converted in order to be used in Ontrack. Given the app.pem file downloaded from GitHub in the previous step, generate a new PEM file (ontrack.pem for example, it does not matter):
openssl pkcs8 -topk8 -inform PEM -outform PEM \
  -nocrypt \
  -in app.pem \
  -out ontrack.pem
The content of the generated PEM file will be used for the GitHub configuration in Ontrack.
Installing the GitHub app
Still on the GitHub app page:
-
Note down the ID of the app
-
Select the Install App menu
-
Select the organization/user you want to use this app into
-
Select its scope
-
Select Install
Configuring authentication
When creating a GitHub configuration, the following parameters must be set to use a GitHub App for the connection from Ontrack:
-
App ID - the ID that you noted in the previous step
-
App Private Key - the content of the PEM that you generated previously. It must start with
----- BEGIN PRIVATE KEY -----
The App Installation Account Name is needed whenever you have installed this app in more than one organization. In this case, specify the organization name in this field.
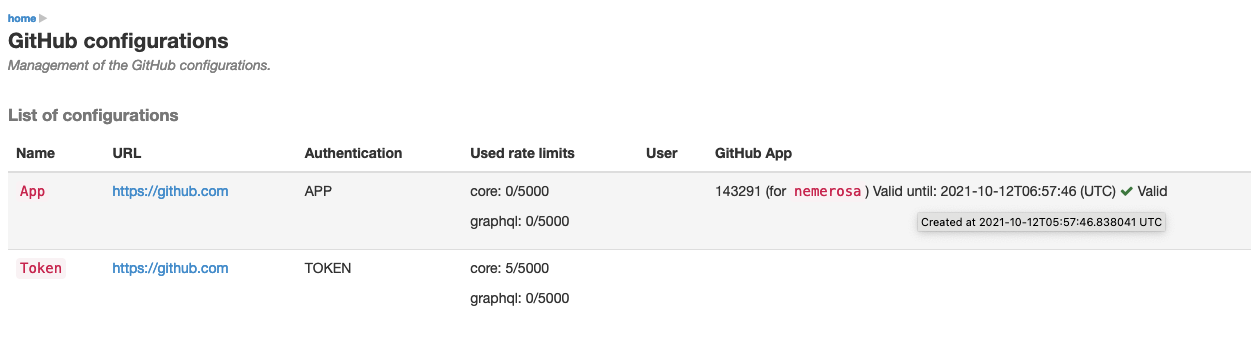
9.1.3. Project configuration
The link between a project and a GitHub repository is defined by the GitHub configuration property:
-
Configuration - selection of the GitHub configuration created before - this is used for the accesses
-
Repository - GitHub repository, like
nemerosa/ontrack -
Indexation interval - interval (in minutes) between each synchronisation (Ontrack maintains internally a clone of the GitHub repositories)
-
Issue configuration - issue service. If not set or set to "GitHub issues", the issues of the repository will be used
Branches can be configured for Git independently.
SCM Catalog configuration
The SCM Catalog feature requires some additional configuration for GitHub. See the specific section for more information.
9.1.4. GitHub metrics
When Ontrack contains at least one GitHub configuration, the following metrics are exposed to signal how the rate limit currently is:
-
ontrack_extension_github_ratelimit_core_limit -
ontrack_extension_github_ratelimit_core_remaining -
ontrack_extension_github_ratelimit_core_used -
ontrack_extension_github_ratelimit_graphql_limit -
ontrack_extension_github_ratelimit_graphql_remaining -
ontrack_extension_github_ratelimit_graphql_used
All these metrics are tagged with configuration. The value of the tag is the name of the configuration in Ontrack.
These metrics are enabled by default but can be disabled by setting the ontrack.extension.github.metrics.enabled configuration property to false.
9.2. GitHub Ingestion
In addition to Ontrack being able to interact with GitHub, it is also possible to set up a webhook in GitHub so that data from GitHub Actions workflows is automatically ingested by Ontrack, without having the workflows being adapted in any way. This allows for a seamless integration between GitHub Actions workflows and Ontrack.
9.2.1. GitHub ingestion features
When a workflow runs, the following items are created or updates in Ontrack.
The project in Ontrack will be called like the repository, adjusted for Ontrack naming conventions for entities. It’ll be associated with the first matching GitHub configuration. Optionally, the organization name can be set as a prefix to the project names using the global settings.
The branch is Ontrack will be called according the head branch (or the PR name) and its Git branch will also be set.
The build is created by aggregating the workflow name and the run number. Additionally, the following properties are set:
-
the Git commit property
-
the run info
Validation stamps are created using <job>-<step>, adjusted for the Ontrack naming convventions.
Builds and validation runs are associated with properties & decorations linking to the source workflow run in GitHub.
The creation of the validation runs occurs as the workflow run is in progress, allowing Ontrack to collect information as it goes.
Release property on tag
If a tag is pushed, Ontrack will look for all builds being associated with tag’s commit, and the release property will be set on these builds using the shortened tag name.
For example:
-
a build has been created with commit property set to
1abcdef -
a tag
1.2.1is pushed for the1abcdefcommit -
the build is "tagged" (its release property is set) to
1.2.1
9.2.2. Ontrack setup
At least one GitHub configuration must be created.
The communication between GitHub and Ontrack is secured through a specific token, outside the Ontrack normal authentication mechanisms.
This secret can be generated by using:
ruby -rsecurerandom -e 'puts SecureRandom.hex(20)'but other ways are also acceptable.
In the Settings, go to the GitHub workflow ingestion section and set the token as previously generated.
9.2.3. GitHub setup
In GitHub, the Ontrack ingestion hook can be setup at repository or at organization level.
Go to the Settings > Webhooks section and add a new webhook:
-
URL -
<ontrack>/hook/secured/github/ingestion -
Content type -
application/json -
Secret - the secret you generated in the Ontrack setup
-
Permissions:
-
Workflow jobs
-
Workflow runs
-
Pushes (for autoconfiguration, see later)
-
9.2.4. Link to the GitHub configuration
Upon reception of hook events by Ontrack, the created projects will be associated with a GitHub configuration using the following order of priority:
-
the
configurationparameter of the hook request (see below) is used to get an existing GitHub configuration by name -
if there is one and only one existing GitHub configuration, it’s used
-
if there are more than one GitHub configuration, we get the list of configurations whose URL matches the incoming event. If there one and only one matching configuration, it is used
-
in all other cases, the payload is marked as being failed.
When configuring the hook in GitHub, the configuration parameter may be added to explicitly select an existing GitHub configuration:
<ontrack>/hook/secured/github/ingestion?configuration=<name>|
If you have only one configuration in Ontrack, this parameter is not needed. Use it only when dealing with several configurations using the same root URL (for example, when having several organizations using a GitHub App for authentication). |
9.2.5. Customization
The default behaviour of the ingestion can be customized by putting a .github/ontrack/ingestion.yml file in the repository.
All fields are optional and when omitted, default values are used.
This file is taken into account automatically, on push or when the ingestion configuration has not been loaded yet.
# Version of the configuration (required)
version: v2
# Optional: Configuration for the ingestion of the workflows
# workflows:
  # Optional: Filter on the workflow names
  # filter:
  #   includes: ".*"
  #   excludes: ""
  # Optional: Creation of validation runs at the workflow level
  # validations:
    # Optional: Is the creation of validation runs for workflows enabled?
    # enabled: true
    # Optional: Filter on workflows to select the ones for which a validation must be created
    # filter:
    #     includes: ".*"
    #     excludes: ""
    # Optional: Prefix to use for the validation stamp
    # prefix: "workflow-"
    # Optional: Suffix to use for the validation stamp
    # suffix: ""
  # Optional: List of events to accept for the processing of a workflow
  # Default value: `push` event only
  # events:
  #   - push
  # Optional: Filter on the Git branch names
  # branchFilter:
  #     includes: ".*"
  #     excludes: ""
  # Optional: Filtering the pull requests
  # includePRs: true
# Optional: Configuration for the ingestion of the jobs
# jobs:
    # Optional: Filter on the jobs names
    # filter:
    #   includes: ".*"
    #   excludes: ""
    # Optional: Using the job name as a prefix for the validation stamps
    # validationPrefix: true
    # Optional: Mappings between job names and validation stamps
    # mappings:
      # Required: Name of the job
      # - name: ...
      # Optional: Name of the validation stamp
      # Default value: Name of the job
      #   validation: ...
      # Optional: Must we use the job name as a prefix to the validation stamp?
      # Default value: same than "jobs.validationPrefix"
      #   validationPrefix:
      # Optional: Description of the validation stamp
      # Default value: Name of the job
      #   description: ...
# Optional: Configuration for the ingestion of the steps
# steps:
    # Optional: Filter on the steps names
    # By default, no step is ingested
    # filter:
    #   includes: ""
    #   excludes: ".*"
    # Optional: Mapping between step names and validation stamps
    # mappings:
      # Required: Name of the step
      # - name: ...
      # Optional: Name of the validation stamp
      # Default value: Name of the step
      #   validation: ...
      # Optional: Description of the validation stamp
      # Default value: Name of the steo
      #   description: ...
# Optional: Setup of Ontrack resources
# setup:
    # Optional: Configuration of the validation stamps
    # validations:
      # Required: Unique name for the validation stamp in the branch
      # - name: ...
      # Optional: Description of the validation stamp
      #   description: ...
      # Optional: Data type for the validation stamp
      #   dataType:
            # Required: FQCN or shortcut for the data type
            # type: ...
            # Optional: JSON data type configuration
            # config: ...
      # Optional: Reference to the image to set
      #   image: ...
    # Optional: Configuration of the promotion levels
    # promotions:
      # Required: Unique name for the promotion in the branch
      # - name: ...
      # Optional: Description of the promotion
      #   description: String
      # Optional: List of validations triggering this promotion. Important: these names are the names of the validations after step name resolution.
      #   validations: []
      # Optional: List of promotions triggering this promotion
      #   promotions: []
      # Optional: Regular expression to include validation stamps by name
      #   include: ""
      # Optional: Regular expression to exclude validation stamps by name
      # exclude: ""
      # Optional: Reference to the image to set
      #   image: ...
    # Optional: Casc for the project
    # project:
      # Optional: Regular expression for the branches which can setup the entity
      #   includes: "main"
      # Optional: Regular expression to exclude branches
      #   excludes: ""
      # Optional: JSON Casc configuration for the entity
      #   casc: {}
    # Optional: Casc for the branch
    # branch:
      # Optional: Regular expression for the branches which can setup the entity
      #   includes: "main"
      # Optional: Regular expression to exclude branches
      #   excludes: ""
      # Optional: JSON Casc configuration for the entity
      #   casc: {}
# Optional: Configuration for the tag ingestion
# tagging:
  # Optional: If the commit property strategy must be applied. True by default.
  # commitProperty: true
  # Optional: List of tagging strategies to apply
  # strategies: []
    # Required: ID of the tagging strategy
    # type: ...
    # Required: JSON configuration of the tagging strategy
    # config: {}
# Optional: configuration of the validation stamp names normalization
# Choices: DEFAULT, LEGACY
# vs-name-normalization: DEFAULT
For example, if we want to associate the validation stamp unit-tests to the step Runs unit tests in the build job, we can use:
steps:
  filter:
    # Steps are excluded by default
    includes: ".*"
    excludes: ""
  mappings:
  - name: Runs unit tests
    validation: unit-tests
    validationJobPrefix: false
The ingestion configuration is saved together with the branch and is visible in the UI as extra information:
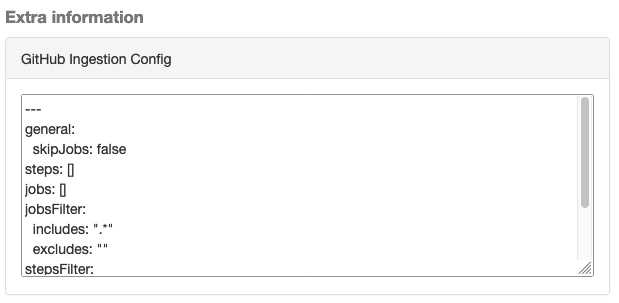
This information is also available programmatically using a GraphQL query:
{
  branches(id: 589) {
    gitHubIngestionConfig {
      steps {
        filter {
          includes
          excludes
        }
      }
      # ...
    }
  }
}
Customization examples
To configure auto-promotions:
setup:
  validations:
    - name: unit-tests
      description: Running all unit tests
      dataType:
        type: test-summary
        config:
          warningIfSkipped: true
  promotions:
    - name: BRONZE
      description: Basic build is OK.
      validations:
        - build
        - unit-tests
    - name: SILVER
      description: End to end tests are OK.
      validations:
        - ui-acceptance
        - api-acceptance
      promotions:
        - BRONZE
Validation stamps
Validation stamps can be defined using the validations list.
Each validation stamp can be associated with a name and an optional description.
Additionally, a data type can be set. The FQCN of the data type can be used but most common types have also shortcuts. Therefore, the following declarations are equivalent:
setup:
  validations:
    - name: unit-tests
      description: Running all unit tests
      dataType:
        type: test-summary
        config:
          warningIfSkipped: true
and
setup:
  validations:
    - name: unit-tests
      description: Running all unit tests
      dataType:
        type: net.nemerosa.ontrack.extension.general.validation.TestSummaryValidationDataType
        config:
          warningIfSkipped: true
The following shortcuts are supported:
-
test-summary -
metrics -
percentage -
chml
See [validation-runs-data] for more information.
Configuration as code for projects and branches
The ingestion.yml file can be used to configure the projects and the branches.
|
The support for CasC of the projects and branches is currently experimental. While the feature would probably stay, it’s possible that some syntax may change. Also, not many configuration aspects are supported at the moment. |
Example - configuring the stale property at project level from the main branch:
setup:
  project:
    properties:
      staleProperty:
        disablingDuration: 30
        deletingDuration: 0
        promotionsToKeep:
          - GOLD
        includes: main
        excluded: ""
Whenever the ingestion.yml is pushed on the main branch, the stale property will be set on the project.
Change log
v1
-
added a
vs-name-normalizationoptional field withLEGACYas the default value - see Validation stamp names for more information
v2
-
added a
vs-name-normalizationoptional field withDEFAULTas the default value - see Validation stamp names for more information
9.2.6. General settings
In the Settings > GitHub workflow ingestion section, you can configure the following features:
-
if the ingestion of GitHub hooks is enabled or not
-
the secret token used by the GitHub hook
-
the number of days GitHub hook payloads are kept by Ontrack
-
if the organization name must be used as a prefix for the generated project names
-
the default Git indexation interval to use for the projects
-
inclusion/exclusion rules for the repositories to be ingested
-
the identifier of the issue service to use by default. For example
selffor GitHub issues orjira//config.
9.2.7. Validation stamp names
By default, a step My step running in the My job job will be associated with the following name: My job-My step. This can be configured in many ways.
The validation stamp name can be specified in the step configuration using the validation field. For example, we can force the My step to be named my-job-unit-tests by using the following configuration:
steps:
  mappings:
    - name: My step
      validation: unit-tests
The job prefix (my-job in our example) is added by default, and is computed from the job name, and can also be configured using the validation field in the job configuration.
Configuring the addition or not of the job as a prefix to the general validation stamp can be done at several levels:
-
at the step ingestion configuration level
-
at the job ingestion configuration level
When facing the naming of a step, how to decide if the job prefix must be used or not?
-
if defined at step level, use this value
-
if defined at job level, use this value
There is a vs-name-normalization which can be set at the root of the configuration with one of the following values:
-
DEFAULT- a "My job" job and a step "My step" are rendered asMy job-My step -
LEGACY- lowercase & escaping the whitespaces:my-job-my-step.
9.2.8. Support for pull requests
Ingestion of events for the pull requests is supported.
|
The support for the ingestion of pull request events is in |
From an Ontrack point of view, the following lifecycle is supported:
-
a PR is
opened- a corresponding branch is opened -
a PR is built or is
synchronized- if a workflow is run for this PR, a build and its validation stamps will be created the same way as for regular branches. Note that the ingestion configuration for a PR is always fetched from the head branch of the pull request. -
a PR is
closed(merged or not) - the corresponding branch is disabled
9.2.9. Management
The Ontrack hook receives all registered GitHub event payloads. The latter are processed in a queue and then kept for investigation and inspection.
|
The payloads whose signature cannot be be checked or is not OK are not stored. |
The number of days these payloads are kept is configured in the global settings.
An Ontrack administrator can access the list of payloads using the GitHub Ingestion Hook Payloads user menu:

The Auto refresh button allows the content of the payload list to be automatically refreshed every 10 seconds. The settings are saved in the browser local storage.
The list can be filtered using the following arguments:
-
the processing statuses:
-
SCHEDULED- the payload has been received and queued for later processing. -
PROCESSING- the payload is currently being processed. Some Ontrack elements may have already been created. -
ERRORED- the processing failed. The payload entry in the list will have an explanation. -
COMPLETED- the processing of the payload completed successfully.
-
-
the GitHub Delivery ID - each event payload sent by GitHub is associated with a unique delivery ID.
-
the GitHub event - the event which sent the payload
By clicking on the internal Ontrack ID (leftmost column), you can display for information about the payload, including its complete JSON content:
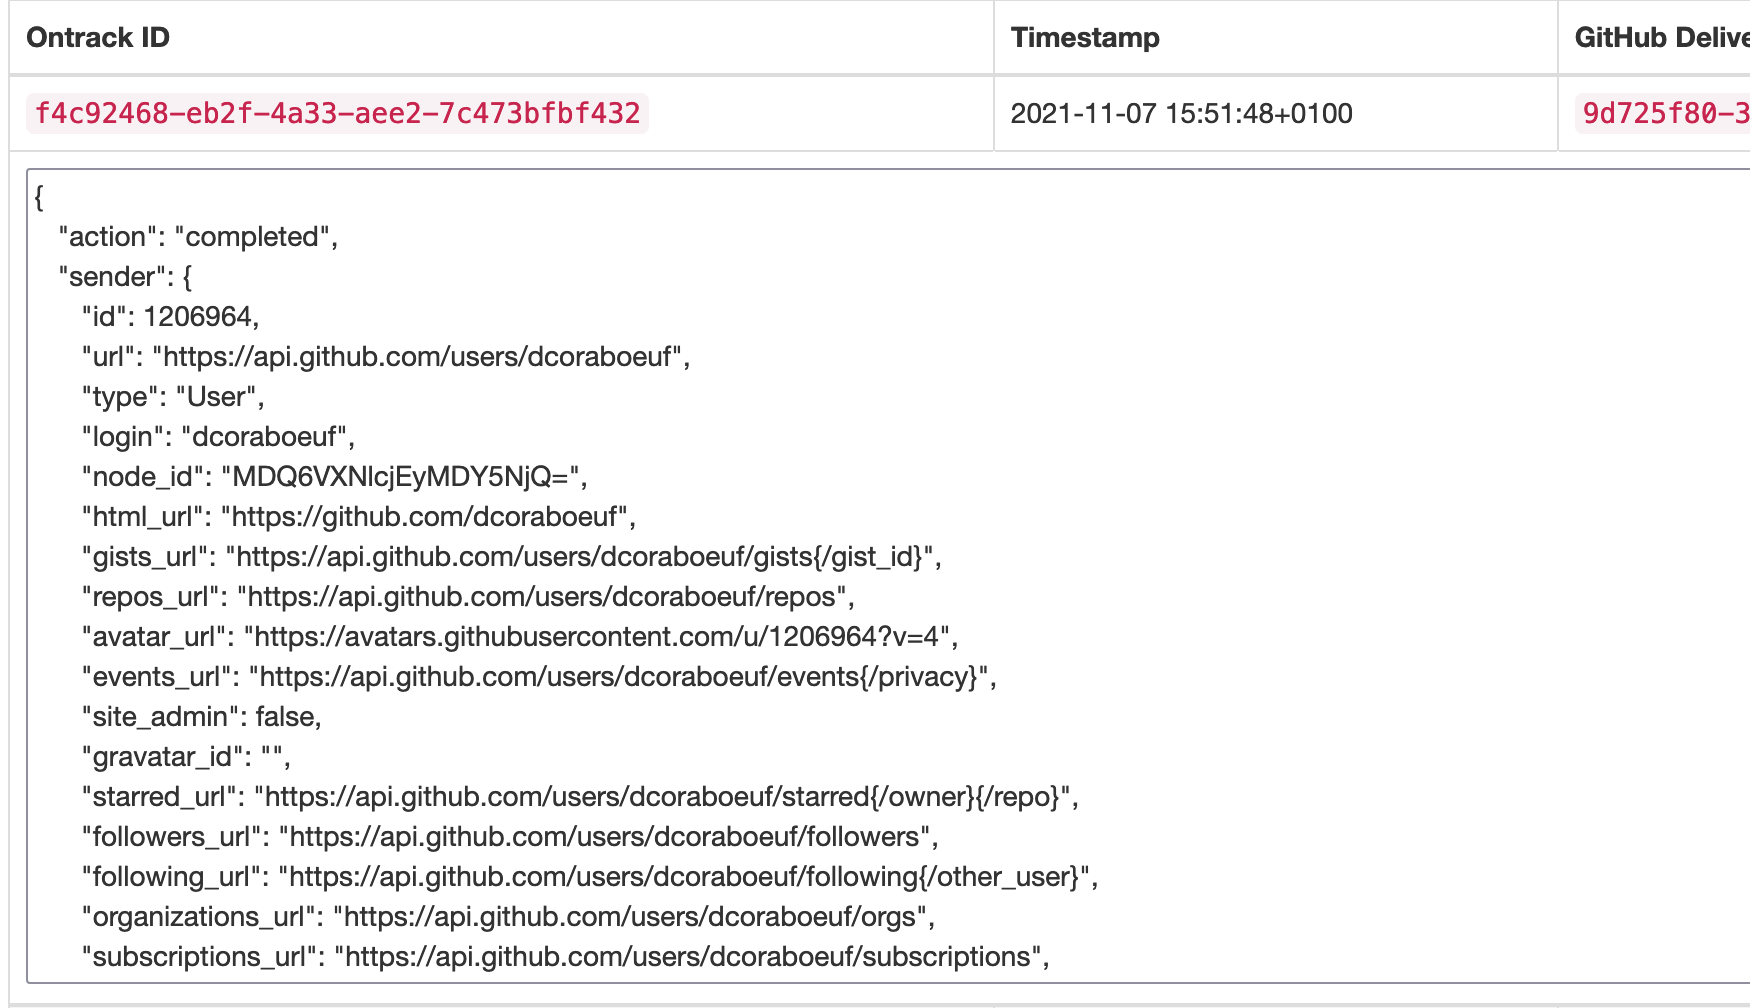
9.2.10. Metrics
The metrics are grouped in the following categories:
-
hook reception level
-
ingestion queing
-
ingestion processing
Hook metrics
| Metric | Type | Tags | Description |
|---|---|---|---|
ontrack_extension_github_ingestion_hook_signature_error_count |
Counter |
event |
Number of rejections because of signature mismatch |
ontrack_extension_github_ingestion_hook_repository_rejected_count |
Counter |
event,owner,repository |
Number of repository-based events rejected because the repository was rejected |
ontrack_extension_github_ingestion_hook_repository_accepted_count |
Counter |
event,owner,repository |
Number of accepted repository-based events |
ontrack_extension_github_ingestion_hook_accepted_count |
Counter |
event,owner?,repository? |
Number of events which are scheduled for processing |
ontrack_extension_github_ingestion_hook_ignored_count |
Counter |
event,owner?,repository? |
Number of events which were accepted but won’t be processed |
Queue metrics
| Metric | Type | Tags | Description |
|---|---|---|---|
ontrack_extension_github_ingestion_queue_produced_count |
Counter |
event,owner?,repository?,routing |
Number of payloads sent to the queues |
ontrack_extension_github_ingestion_queue_consumed_count |
Counter |
event,owner?,repository?,queue |
Number of payloads received by the queues |
Processing metrics
| Metric | Type | Tags | Description |
|---|---|---|---|
ontrack_extension_github_ingestion_process_started_count |
Counter |
event,owner?,repository? |
Number of payloads whose processing has started |
ontrack_extension_github_ingestion_process_success_count |
Counter |
event,owner?,repository? |
Number of payloads whose processing has succeeded |
ontrack_extension_github_ingestion_process_ignored_count |
Counter |
event,owner?,repository? |
Number of payloads whose processing has been ignored |
ontrack_extension_github_ingestion_process_error_count |
Counter |
event,owner?,repository? |
Number of payloads whose processing has finished with an error |
ontrack_extension_github_ingestion_process_finished_count |
Counter |
event,owner?,repository? |
Number of payloads whose processing has finished |
ontrack_extension_github_ingestion_process_time |
Timer |
event,owner?,repository? |
Time it took to process this payload |
9.2.11. Configuration
See Configuration properties for the list of all available properties.
Routing
By default, Ontrack uses one unique RabbitMQ queue to process all incoming payloads, with a maximum concurrency of 10.
In some cases, when some repositories are more active than others, it may be useful to create other queues in order to prioritize the work.
You can define routing configurations based on regular expressions matching the repository owner & names. For example:
ontrack:
  extension:
    github:
      ingestion:
        processing:
          repositories:
            very-active:
              repository: my-very-active-repository
This will create an additional queue, called github.ingestion.very-active where all the processing for the my-very-active-repository repository will be sent to.
Queues configurations
Both the default queue and the repository specific queues can have their number of consumers being configured:
ontrack:
  extension:
    github:
      ingestion:
        processing:
          repositories:
            very-active:
              repository: my-very-active-repository
              config:
                concurrency: 20
          default:
            concurrency: 10
See Configuration properties for the list of all available properties.
9.3. Working with Bitbucket Cloud
Bitbucket Cloud is an enterprise SaaS Git repository manager by Atlassian.
When working with Git in Ontrack, one can configure a project to connect to a Git repository defined in Bitbucket Cloud.
9.3.1. General configuration
The access to a Bitbucket Cloud workspace must be configured.
|
The access to Bitbucket Cloud from Ontrack is configured at Bitbucket Cloud workspace level. If your Ontrack instance uses several workspaces, you can define several Bitbucket Cloud configurations, one per workspace. |
-
as administrator, go to the Bitbucket Cloud configurations menu
-
click on Create a configuration
-
in the configuration dialog, enter the following parameters:
-
Name - unique name for the configuration
-
Workspace - name of the Bitbucket Cloud workspace to use
-
User & Password - credentials used to access Bitbucket Cloud. The password must be a Bitbucket Cloud app password.
-
|
The app password must be granted at least the following rights:
|
The existing configurations can be updated and deleted.
Configuration as Code
You can use configuration as code to configure the Bitbucket Cloud configurations. For example:
ontrack:
  config:
    bitbucket-cloud:
      - name: my-config
        workspace: my-workspace
        user: my-user
        password: <app password>
9.3.2. Project configuration
The link between a project and a Bitbucket Cloud repository is defined by the Bitbucket Cloud configuration property:
-
Configuration - selection of the Bitbucket Cloud configuration created before
-
Repository - name of the Bitbucket Cloud repository
-
Indexation interval - interval (in minutes) between each synchronization (Ontrack maintains internally a clone of the Bitbucket Cloud repositories)
-
Issue configuration - configured issue service to use when looking for issues in commits.
-
Branches can be configured for Git independently.
9.6. SonarQube integration
It’s possible to configure projects so that any build which has been scanned by SonarQube gets some measures registered in Ontrack and those same measures can then be exported as metrics.

9.6.1. General configuration
One configuration must be created per SonarQube server you want to integrate.
As an administrator, you need to select "SonarQube configurations" in your user menu and create SonarQube configurations by setting three parameters:
-
Name - name for this configuration
-
URL - the root URL of the SonarQube server
-
Token - an authentication token to get information from SonarQube
9.6.2. Global settings
As an administrator, go to the Settings menu. In the SonarQube section, click on Edit and fill the following parameters:
| Name | Default value | Description |
|---|---|---|
Measures |
|
List of SonarQube metric names to collect. They can be completed or overridden at project level. |
Disabled |
|
Global flag to disable the collection of SonarQube measures |
9.6.3. Project configuration
In order to enable the collection of SonarQube measures for a project, it must be associated with the "SonarQube" property.
The property needs the following parameters:
| Name | Default value | Description |
|---|---|---|
Configuration |
Required |
|
Key |
Required |
Key of the project in SonarQube (typically |
Validation stamp |
|
Name of the validation stamp, which, when granted to a build, triggers the collection of SonarQube measures. |
Measures |
Empty |
List of SonarQube metric names to collect for this project, additionally to those defined globally. |
Override |
|
If set to |
Branch model |
|
If set to |
Branch pattern |
Empty |
If set, it defines a regular expression to use against the branch name (or Git path) |
|
The Branch model and Branch pattern can be combined together. |
9.6.4. Identifying measures in SonarQube
Ontrack looks for the measures in SonarQube using the following approach.
It looks first for analyses in SonarQube for the corresponding:
-
project as defined in the SonarQube property of the Ontrack project, typically
group:artifact -
branch - either the Git branch associated with the Ontrack branch if any or the Ontrack branch name
|
This implies that your SonarQube analysis parameters must include the corresponding branch name. If you use the Git branch name for your SonarQube analysis, make sure that the same Git branch is associated with your Ontrack branch. |
Once the analyses have been collected, the specific analysis for the Ontrack build will be looked for based on the:
-
version - set to either the release label associated to the Ontrack build if any or the Ontrack build name
Once the analysis for the Ontrack build has been found, its measures are collected and filtered based on the measures property.
9.6.5. Build measures
Once SonarQube measures have been collected for a build, they are available in the Information section of the build page.
9.6.6. Export of measures
Once SonarQube measures have been collected for a build, they are automatically exported as metrics if enabled.
See Metrics for more information.
The list of metrics are the following.
Collection metrics
All metrics linked to the collection of the measures are associated with the following tags:
-
project- name of the build’s project -
branch- name of the build’s branch -
uri- SonarQube URL
Following metrics are collected:
-
ontrack_sonarqube_collection_started_count- counter - number of times a collection is started -
ontrack_sonarqube_collection_success_count- counter - number of times a collection is a success -
ontrack_sonarqube_collection_error_count- counter - number of times a collection is a failure -
ontrack_sonarqube_collection_time- timer - histogram of times for the collections
Missing measures
-
ontrack_sonarqube_collection_none- counter - number of times a measure is collected but none such measure was available in SonarQube
This metric is associated with following tags:
-
project- name of the build’s project -
branch- name of the build’s branch -
uri- SonarQube URL -
measure- name of the measure
Measures
Measures associated to builds are exported to metrics using:
-
metric name -
ontrack_sonarqube_measure -
tags:
-
project- name of the build’s project -
branch- name of the build’s branch -
build- name of the build for which measures are collected -
version- display name of the build -
status- the validation run status reported for the stamp -
measure- name of the measure
-
-
value - value of the measure
-
timestamp of the metric is the creation time of the build
9.7. Integration with Jenkins
Jenkins can inject data into Ontrack - see Jenkins plug-in for this purpose. But Ontrack can also link builds to Jenkins by:
-
defining a Jenkins configuration
-
setting a link to a Jenkins folder at project or branch level
-
setting a link to a Jenkins build at build level
-
triggering Jenkins builds on Notifications
9.7.1. Triggering Jenkins builds on notifications
Upon a notification, one may want to trigger a Jenkins build. For example, given a build being promoted to a certain level ("BRONZE" for example), one may want to trigger a Jenkins build to complete additional validations. This is a pretty good way to perform long-running deployment pipelines (security scans, performance tests, etc.) while avoiding coupling pipelines together.
To do this, a subscription can be created at the promotion level, to listen to "new promotion runs" events and to trigger a Jenkins pipeline.
Using the UI, the subscription looks like:
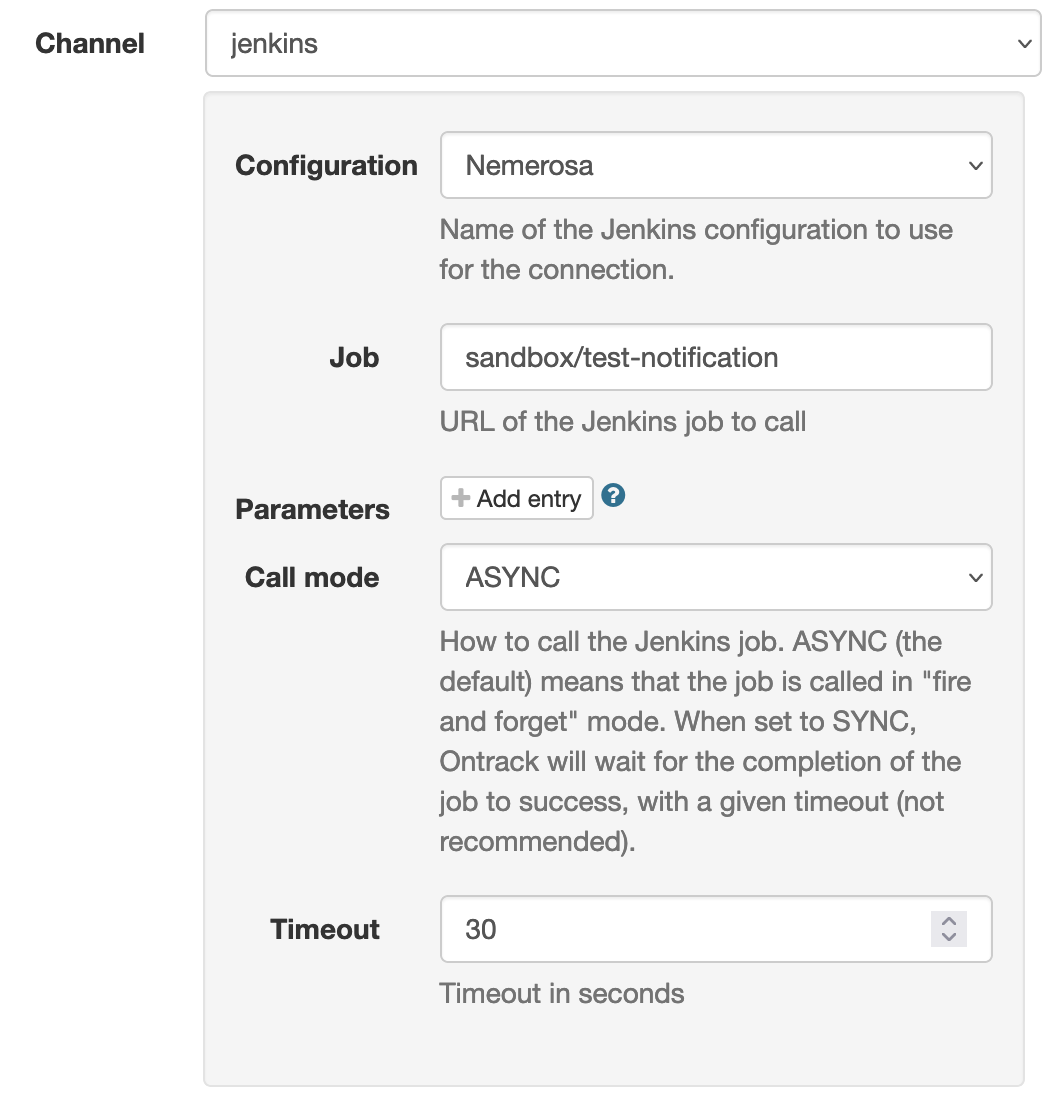
-
Configuration - the Jenkins configuration to use (it defines the URL to connect to, the credentials to use)
-
Job - the relative path to the job to launch.
-
Parameters - a list of name/value pairs to pass to the Jenkins job as parameters
-
Call mode - defines if the job must be called asynchronously (the default) or synchronously. In the former case, Ontrack fires the job and then returns immediately. In the later case, Ontrack will wait for the job to complete and check its result before considering the notification successful. Note that this can have impacts on performances.
-
Timeout - in case the synchronous call mode is used, defines the amount of seconds to wait for the completion of the Jenkins build
Several remarks:
-
for the job, a reduced path, without the
/job/separator can be used. Keeping the/job/separator is fine as well. So thejob/sandbox/job/test-notificationandsandbox/test-notificationare in this regard equivalent. -
the job and parameters values are using the templating engine
For example, a parameter value may contain ${project} as a value, indicating that the project name linked to the event the notification is about will be used as a value.
Other placeholders, like branch, promotionLevel, etc., are available, depending on the type of event. Their values can also be updated and encoded. See Templating engine for a list of options.
Using the API
The GraphQL API can be used to setup the promotion:
mutation {
    subscribePromotionLevelToEvents(input: {
        project: "my-project",
        branch: "my-branch",
        promotion: "BRONZE",
        channel: "jenkins",
        channelConfig: {
            config: "my-jenkins-config-name",
            job: "my-folder/my-pipeline/${branch.scmBranch|urlencode}",
            parameters: [
                {
                    name: "PROMOTION",
                    value: "${promotionLevel}"
                }
            ],
            callMode: "ASYNC"
        },
        events: [
            "new_promotion_run"
        ]
    }) {
        errors {
            message
        }
        subscription {
            id
        }
    }
}
Definition as code
Like all other subscriptions, the Jenkins notifications can be defined as code. For example, to define a trigger for a promotion level:
ontrack:
  extensions:
    notifications:
      entity-subscriptions:
        - entity:
            project: my-project
            branch: my-branch
            promotion: GOLD
          subscriptions:
            - channel: jenkins
              channel-config:
                config: my-jenkins-config-name
                job: "my-folder/my-pipeline/${branch.scmBranch|urlencode}",
                parameters:
                  - name: PROMOTION
                    value: "${promotionLevel}"
                callMode: ASYNC
              events:
                - new_promotion_run
9.8. Notifications
Ontrack has the possibility to send notifications to different backends like some webhooks, email, Slack messages, etc.
|
By default, notifications are not enabled. You need to activate them by setting the |
A notification is the association between an event occurring on an entity and sent to a given channel using some configuration.
For example, a notification can be:
-
event: a build has been promoted
-
entity: the branch the build belongs to
-
channel: email
-
channel configuration: the subject & the email addresses
-
an optional custom template
In this example, the body of the email would be a text like "Build B of branch R in project P has been promoted to P", which various links to Ontrack.
|
By default, the notifications use the default templates of the events but a custom template can be provided. |
Administrators of Ontrack can create and configure the different backends.
They can also configure the notifications at entity level to respond to some events using notification configurations (subscriptions).
Subscriptions can be either local (subscribing to the events on a given branch) or global (subscribing to the events in all Ontrack, regardless of the entity).
9.8.1. Notification backends
See Notifications for a complete list of the existing notification backends and their configurations.
9.8.2. Subscriptions
Subscriptions can be done at entity level (project, branch, promotion, etc.) or globally.
Local subscriptions
On an entity page (like the page for a project, a branch, etc.), go to the Tools menu and select _ Subscriptions_:

On the subsequent, you can manage the list of subscriptions at this entity level.

To create a subscription, select the New subscription command and enter the fields for the subscription:

-
events - list of events to listen to
-
keywords - space-separated list of words which will be used to restrict the events being listened to
-
channel - destination for the notification. Depending on the channel being selected, additional fields are needed (for example, for a Slack notification, the Slack channel is required)
-
custom template - if provided, it’ll override the default template associated with the event. See Templating engine for its syntax.
On the subscription list, you can:
-
enable/disable each subscription
-
delete a subscription
Global subscriptions
The management of the global subscriptions is exactly the same as for the local ones, but for the fact that the global subscriptions are accessible through the Global subscriptions menu.
|
Global subscriptions can be configured using CasC. For example: |
9.8.3. Recordings
For audit and troubleshooting purposes, all notifications are recorded and administrators can have access to them using the Notification recordings user menu:

Each recording has the following columns:
-
timestamp (UTC) - when was the notification actually sent
-
channel - which channel was used by the notification
-
result - outcome of the notification
-
OK - notification was sent successfully
-
NOT_CONFIGURED - the notification channel not configured
-
INVALID_CONFIGURATION - the notification channel is wrongly configured
-
DISABLED - the notification channel has been disabled
-
ERROR - there was an error
-
By clicking on the eye icon left of the timestamp, you can see more details about the notification:

-
Channel config - the JSON representation of the configuration of the notification channel
-
Event - the JSON representation of the event being sent
Finally, the administrator can filter recordings on their results and the Delete ALL records can be used to clear out all recordings.
9.8.4. Examples
This section shows a number of custom templates for some events.
To send a change log on a promotion, subscribe to the new_promotion_run event and use for example:
Change log:

${promotionRun.changelog}
If the project builds have linked to a dependency project’s builds, it may be interesting to follow the links recursively:
Change log for ${build.release}:

${promotionRun.changelog}

Change log for the dependency:

${promotionRun.changelog?project=dependency}
9.8.5. Metrics
Following metrics are sent by Ontrack about the notifications:
| Metric | Tags | Description |
|---|---|---|
|
|
Count of events being received |
|
|
Count of events being actually queued |
|
|
Count of events being removed from the queue for dispatching |
|
None |
Count of uncaught errors when listening to events |
|
|
Count of events whose dispatching starts |
|
|
Count of events whose dispatching starts (pushed into the dispatching queue) |
|
|
Count of events whose dispatching starts (pulled from the dispatching queue) |
|
|
Count of events whose dispatching is finished |
|
|
Count of events whose processing is started |
|
|
Count of events whose processing is started on an actual channel |
|
|
Count of events whose processing is stopped because the channel is unknown |
|
|
Count of events whose processing is stopped because the channel or its configuration is invalid |
|
|
Count of events whose publication into a channel has started |
|
|
Count of events whose publication into a channel has finished |
|
|
Count of events whose publication into a channel has failed |
The overall processing of events looks like this:
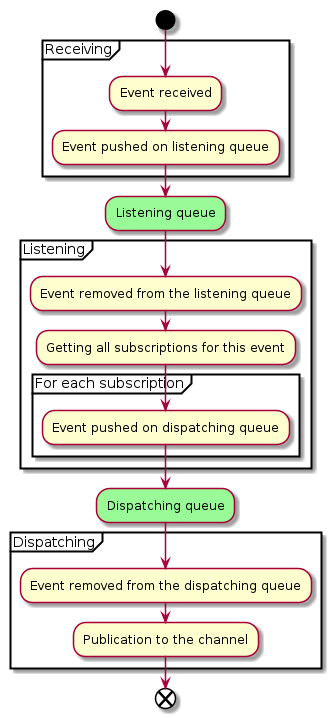
9.9. Integration with Slack
Ontrack can be configured to send notifications to Slack.
Slack settings are available in Settings > Slack settings:
-
Enabled - if Slack integration is enabled or not
-
Token - Slack token
-
Emoji - optional, a string like
:ontrack:to set as icon for the Slack messages sent by Ontrack -
Endpoint - optional, a URL for the Slack API (if custom)
|
The logo from Ontrack can be find in the source code at https://github.com/nemerosa/ontrack/blob/master/ontrack-web/src/assets/logo-128.png (other sizes are available). |
This configuration can also be set as code:
ontrack:
   config:
      settings:
         slack:
            enabled: true
            token: some-secret-token
            emoji: ":ontrack:"
9.9.1. Slack setup
This section explains how to setup your workspace for Ontrack to be able to send messages in some channels.
First, you need to create a Slack app by following the instructions at https://api.slack.com/authentication/basics:
-
create the Slack App
-
the
chat:writescope is enough for Ontrack -
add also
chat:write.publicif you want to allow all public channels to be writable by Ontrack -
install the App into your workspace and copy the Bot token value for the setup above
For public channels, unless the chat:write.public scope has been granted, and for private channels, you need to invite the App into the channel:
/invite @<App>9.10. Webhooks
Ontrack can be configured to send notifications to some webhooks using HTTP.
|
Webhooks are disabled by default and must be enabled explicitly. See global settings. |
9.10.1. Definitions
Ontrack administrators can create webhooks using the Webhooks entry in their user menu.
Webhooks can be created and deleted.
A webhook is defined by the following fields:
-
name - a unique name for the webhook, which will be referred to when used in a subscription
-
enabled - a flag to disable or enable the webhook
-
url - a HTTP URL for the webhook. HTTPS is recommended but not required.
-
timeout - number of seconds to wait before the connection to the webhook url is abandoned (see also timeouts below)
-
authentication - the way to authenticate to the webhook (see below)
9.10.2. Authentication
Three types of authentication are supported:
-
basic authentication - a username and a password must be provided
-
bearer authentication - a token must be provided and will be sent in the
Authorizationheader with its value set toBearer <provided token> -
header authentication - a header name and value must be provided
|
Authentication of webhooks is required. |
9.10.3. Timeouts
Timeouts for the execution of the webhooks are defined at two levels:
The actual timeout is the maximum value between these two values.
9.10.4. Global settings
The Webhooks section in the global settings allows the configuration of the following:
-
enabled - global flag used for all webhooks - set to No by default
-
timeout - number of minutes for the global timeout - set to 5 minutes by default
-
retention days for the deliveries - number of days to keep the webhooks deliveries records - set to 30 days by default
|
Webhooks are disabled by default and must be enabled explicitly. |
9.10.5. Webhooks deliveries
Additionally to the notification recordings, deliveries to the webhooks are also registered by Ontrack and accessible by an administrator.
The deliveries for a given webhook are accessible through the Deliveries button on the list of webhooks.

The following columns are displayed:
-
unique ID for the delivery
-
name of the webhook
-
timestamp of the request
-
type of payload
-
HTTP status sent by the remote webhook
You can get more details by clicking on the UUID or the eye icon:

-
request payload - the JSON actually sent to the webhook
-
response payload - the payload returned by the webhook (interpreted as text)
-
response timestamp - when the response was received
-
stack - the error stacktrace in case of error
|
Webhooks deliveries are kept only a given number of days before being deleted. See global settings. |
9.10.6. Payloads
Several types of payloads can be sent by Ontrack but they all share the same structure:
-
type:
application/json -
schema:
{
  "uuid" : "<uuid>",
  "type" : "<payload type>",
  "data" : {}
}
The data node type and content depends on the payload type.
event payload
The event payload is sent upon a notification.
A typical payload looks like:
{
  "uuid" : "fcf07059-6158-4acc-a965-9cbf30c8bdd7",
  "type" : "event",
  "data" : {
    "eventType" : {
      "id" : "new_branch",
      "template" : "New branch ${BRANCH} for project ${PROJECT}."
    },
    "signature" : null,
    "entities" : {
      "PROJECT" : {
        "id" : 260,
        "name" : "p42127192",
        "description" : "",
        "disabled" : false,
        "signature" : {
          "time" : "2022-05-02T07:42:12.751100Z",
          "user" : {
            "name" : "admin"
          }
        }
      },
      "BRANCH" : {
        "id" : 154,
        "name" : "b42128333",
        "description" : "",
        "disabled" : false,
        "project" : {
          "id" : 260,
          "name" : "p42127192",
          "description" : "",
          "disabled" : false,
          "signature" : {
            "time" : "2022-05-02T07:42:12.751100Z",
            "user" : {
              "name" : "admin"
            }
          }
        },
        "signature" : {
          "time" : "2022-05-02T07:42:12.862900Z",
          "user" : {
            "name" : "admin"
          }
        }
      }
    },
    "ref" : null,
    "values" : { }
  }
}
The entities, ref and values fields will vary a lot depending on the type of event.
9.10.7. Webhooks metrics
The following metrics are emitted by Ontrack for the processing of the webhooks:
| Metric | Tags | Description |
|---|---|---|
|
|
Webhook delivery is about to start |
|
|
Webhook delivery has completed with a HTTP status |
|
|
Webhook delivery has completed with an error |
|
|
Duration of the delivery duration |
9.11. Email
Ontrack can be configured to send notifications by email.
9.11.1. Configuration
Email must be configured statically before being used.
See the Spring boot documentation for the configuration parameters.
Additionally, the ontrack.config.extension.notifications.mail.from configuration property should be set for the return address.
9.12. Terraform Cloud integration
In Terraform Cloud, upon the completion of a run (success or failure) you can notify Ontrack of the result by adding a hook into the Notifications settings of a TFC workspace.
The result of this notification will be the creation of a validation in a build, with a status Passed or Failed, depending on the result of the run execution.
|
In turn, you can use this validation to trigger other events, typically a promotion. |
This feature is not enabled by default: in Ontrack, you need to go to the Settings > TFC section:
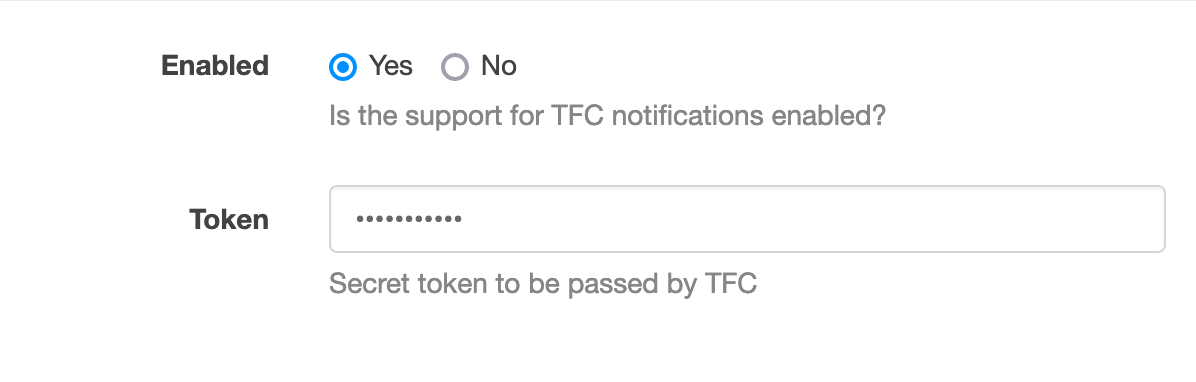
-
enabled - set this to Yes to enable the webhook at Ontrack level
-
token - set a secret value which will then be set in Terraform Cloud (see later)
|
You can define these settings as code: |
In Terraform Cloud, you can register the Ontrack webhook by going to a workspace settings and then select Notifications.
There, create a Webhook notification and enter the following values:
-
Name - not used by Ontrack, set whichever name suits you the best
-
URL - http://<ontrack-url>/hook/secured/tfc?project=&branch=&build=&validation= - see next section for the parameters
-
Token - the token you’ve set in Ontrack TFC settings before
-
Triggers - Ontrack only listens to "Completed" and "Errored" events but will just ignore any other trigger
For the parameters of the Webhook URL, there are 4 possible parameters:
| Parameter | Description |
|---|---|
|
Name of the project in Ontrack. It must exist. |
|
Name of the branch in Ontrack. If set, it must exist. If this parameter is not set, the build will be search among all the branches of the project. |
|
Name of the build in Ontrack. If set, it must exist. If the project is configured to use labels for the builds, then this parameter is considered a label. If the build is not set, the |
|
Name of a promotion in Ontrack. It’s used when |
|
Name of the validation in Ontrack. If it does not exist, it’ll be created. |
Each of these parameters can be hardcoded:
project=my-projector set by reference:
project=@variableIn this case, the value following @ represents a variable of the Terraform Cloud workspace.
|
This variable must exist and must not be sensitive. |
When using variable references, Ontrack will contact Terraform Cloud in order to get the values for the referenced variables.
To this purpose, you need to define a TFC Configuration:
-
go to the user menu, at TFC configurations
-
Create a configuration
-
Name: anything meaningful
-
URL: set to
https://app.terraform.ioby default, put something else when using Terraform Enterprise -
Token: generate a user token in Terraform Cloud
|
The mapping between the calls from the hook and the associated TFC configuration will be based on the URL. |
9.13. Monitoring
Ontrack is based on Spring Boot and exports metrics and health indicators that can be used to monitor the status of the applications.
9.13.1. Health
The /manage/health end point provides a JSON tree which indicates the status
of all connected systems: JIRA, Jenkins, Git
repositories, etc.
Note than an administrator can have access to this information as a dashboard in the Admin console (accessible through the user menu).
9.13.2. Metrics
|
Since version 2.35 / 3.35, Ontrack uses the Micrometer framework to manage metrics, in order to allow a better integration with Spring Boot 2. See [appendix-metrics-migration] for information about the migration. |
See Metrics for the different options for the metrics backends.
List of metrics
|
The list of Ontrack specific metrics and their tags and values is available
using the |
General metrics:
-
ontrack_error(counter) - number of error (thetypetag contains the type of error)
Statistics about the objects stored by Ontrack:
-
ontrack_entity_project_total(gauge) - total number of projects -
ontrack_entity_branch_total(gauge) - total number of branches -
ontrack_entity_build_total(gauge) - total number of builds -
ontrack_entity_promotionLevel_total(gauge) - total number of promotion levels -
ontrack_entity_promotionRun_total(gauge) - total number of promotion runs -
ontrack_entity_validationStamp_total(gauge) - total number of validation stamps -
ontrack_entity_validationRun_total(gauge) - total number of validation runs -
ontrack_entity_validationRunStatus_total(gauge) - total number of validation run statuses -
ontrack_entity_property_total(gauge) - total number of properties -
ontrack_entity_event_total(gauge) - total number of events
General metrics about jobs:
-
ontrack_job_count_total(gauge) - total number of jobs -
ontrack_job_running_total(gauge) - total number of running jobs -
ontrack_job_error_total(gauge) - total number of jobs in error -
ontrack_job_timeout_total(gauge) - total number of jobs in timeout -
ontrack_job_paused_total(gauge) - total number of paused jobs -
ontrack_job_disabled_total(gauge) - total number of disabled jobs -
ontrack_job_invalid_total(gauge) - total number of invalid jobs -
ontrack_job_error_count_total(gauge) - total number of errors among all the jobs -
ontrack_job_timeout_count_total(gauge) - total number of timeouts among all the jobs
Information about individual jobs:
-
ontrack_job_duration_ms(timer) - duration of the execution of the job -
ontrack_job_run_count(counter) - number of times a job has run -
ontrack_job_errors(counter) - number of errors for this job
|
Job metrics have the following tags:
|
Run information:
-
ontrack_run_build_time_seconds(timer) - duration of a run for a build. It is associated withprojectandbranchtags. -
ontrack_run_validation_run_time_seconds(timer) - duration of a run for a validation run. It is associated withproject,branch,validation_stampandstatustags.
More details at [run-info].
Information about connectors (Jenkins, JIRA, Git, etc.):
-
ontrack_connector_count(gauge) - number of connectors -
ontrack_connector_up(gauge) - number of UP connectors -
ontrack_connector_down(gauge) - number of DOWN connectors
|
Connector metrics have the following tags:
|
Information about the execution times of event listeners:
-
ontrack_event_listener_time(timer) - duration for the synchronous processing of an event on the backend. TheeventListenertag contains the FQCN of the event listener service.
Information about the connectivity of remote Git operations:
-
ontrack_git_connect_retries- Number of retries on connection errors -
ontrack_git_connect_errors-Number of terminal connection errors
Information about the delivery, see Delivery metrics.
9.14. Encryption service
Secrets used by Ontrack are encrypted using keys managed by a ConfidentialStore.
Ontrack provides three types of storage:
-
file based storage (default)
-
Vault storage
-
database storage
If needed, you can also create your own form of storage using extensions.
9.14.1. Selection of the confidential store
The selection of the confidential store is done at startup time using the ontrack.config.key-storeconfiguration property.
It defaults to file (see below).
Additional configuration properties might be needed according to the type of store.
9.14.2. File confidential store
This is the default store but its selection can be made explicit by setting the ontrack.config.key-storeconfiguration property to file.
This store will store the keys in theworking directory under the security/secrets subfolder.
A master.key file is used to encrypt the individual keys themselves, so two files will be typically present:
-
master.key -
net.nemerosa.ontrack.security.EncryptionServiceImpl.encryption
9.14.3. Secret confidential store
|
The See the Ontrack chart for more details. |
This store is read-only and provides a unique key.
The configuration of this store looks like:
ontrack.config.key-store = secret
ontrack.config.file-key-store.directory = <path>|
Alternatively, the following environment variables can be set:
|
<path> is the path to a directory which:
-
must exist
-
must contain the
net.nemerosa.ontrack.security.EncryptionServiceImpl.encryptionfile -
this file must exist and must be readable
The content of this file is the key used for the encryption of the credentials in Ontrack. It can be generated using:
openssl rand 256 > net.nemerosa.ontrack.security.EncryptionServiceImpl.encryption9.14.4. JDBC confidential store
This store manages the keys directly in the Ontrack database. It can be selected by setting the ontrack.config.key-storeconfiguration property to jdbc.
No further configuration is needed.
9.14.5. Vault confidential store
By setting the ontrack.config.key-storeconfiguration property to vault, Ontrack will use Vault to store its encryption keys.
Following configuration properties are available to configure the connection to Vault:
| Property | Default | Description |
|---|---|---|
|
URI to the Vault end point |
|
|
|
Token authentication |
|
|
Path prefix for the storage of the keys WARNING: As of now, the support for Vault storage is experimental and is subject to change in later releases. In particular, the authentication mechanism might change. |
9.14.6. Migrating encryption keys
In the event you want to migrate the encryption keys from one type of storage to another, follow this procedure.
In the procedure below, ${ONTRACK_URL} designates the Ontrack URL
and ${ONTRACK_ADMIN_USER} the name of an Ontrack user which has the
ADMINISTRATOR role.
|
Using the initial configuration for the store, start by exporting the key:
curl ${ONTRACK_URL}/admin/encryption \
   --user ${ONTRACK_ADMIN_USER} \
   --output ontrack.key
This command will export the encryption key into the local ontrack/key file.
Start Ontrack using the new configuration.
| There might be errors are startup, when some jobsstart to collect some data from the external applications. Those errors can be safely ignored for now. |
Import the key file into Ontrack:
curl ${ONTRACK_URL}/admin/encryption \
   --user ${ONTRACK_ADMIN_USER} \
   -X PUT \
   -H "Content-Type: text/plain" \
   --data @ontrack.key
Restart Ontrack.
9.14.7. Losing the encryption keys
In case you lose the encryption keys, the consequence will be that the secrets stored by Ontrack won’t be able to be decrypted. This will typically make the external applications your Ontrack instance connects to unreachable.
The only to fix this is to reenter the secrets.
| Some pages might not display correctly if some applications are not reachable. |
10. Ontrack API
10.2. Ontrack DSL
Up to version 4.5, a Groovy DSL was shipped and published with each Ontrack release.
This has changed since version 4.6:
| Version | DSL |
|---|---|
4.5 |
DSL is still published in the Maven Central and maintained |
4.6 |
DSL is no longer published, but old versions should still be compatible with 4.x |
5.x |
The DSL code is gone from Ontrack and no backward compatibility is insured any longer. |
To replace the Ontrack DSL, several alternatives are possible:
-
direct calls to the GraphQL API
-
using the Ontrack CLI
-
using the Jenkins Ontrack pipeline library
-
using GitHub ingestion
11. Administration
11.2. Management end points
The overall health of the Ontrack system can be accessed in the user menu under System health:
-
it displays the status of the components Ontrack needs to work properly
-
and all the connections that Ontrack holds for projects
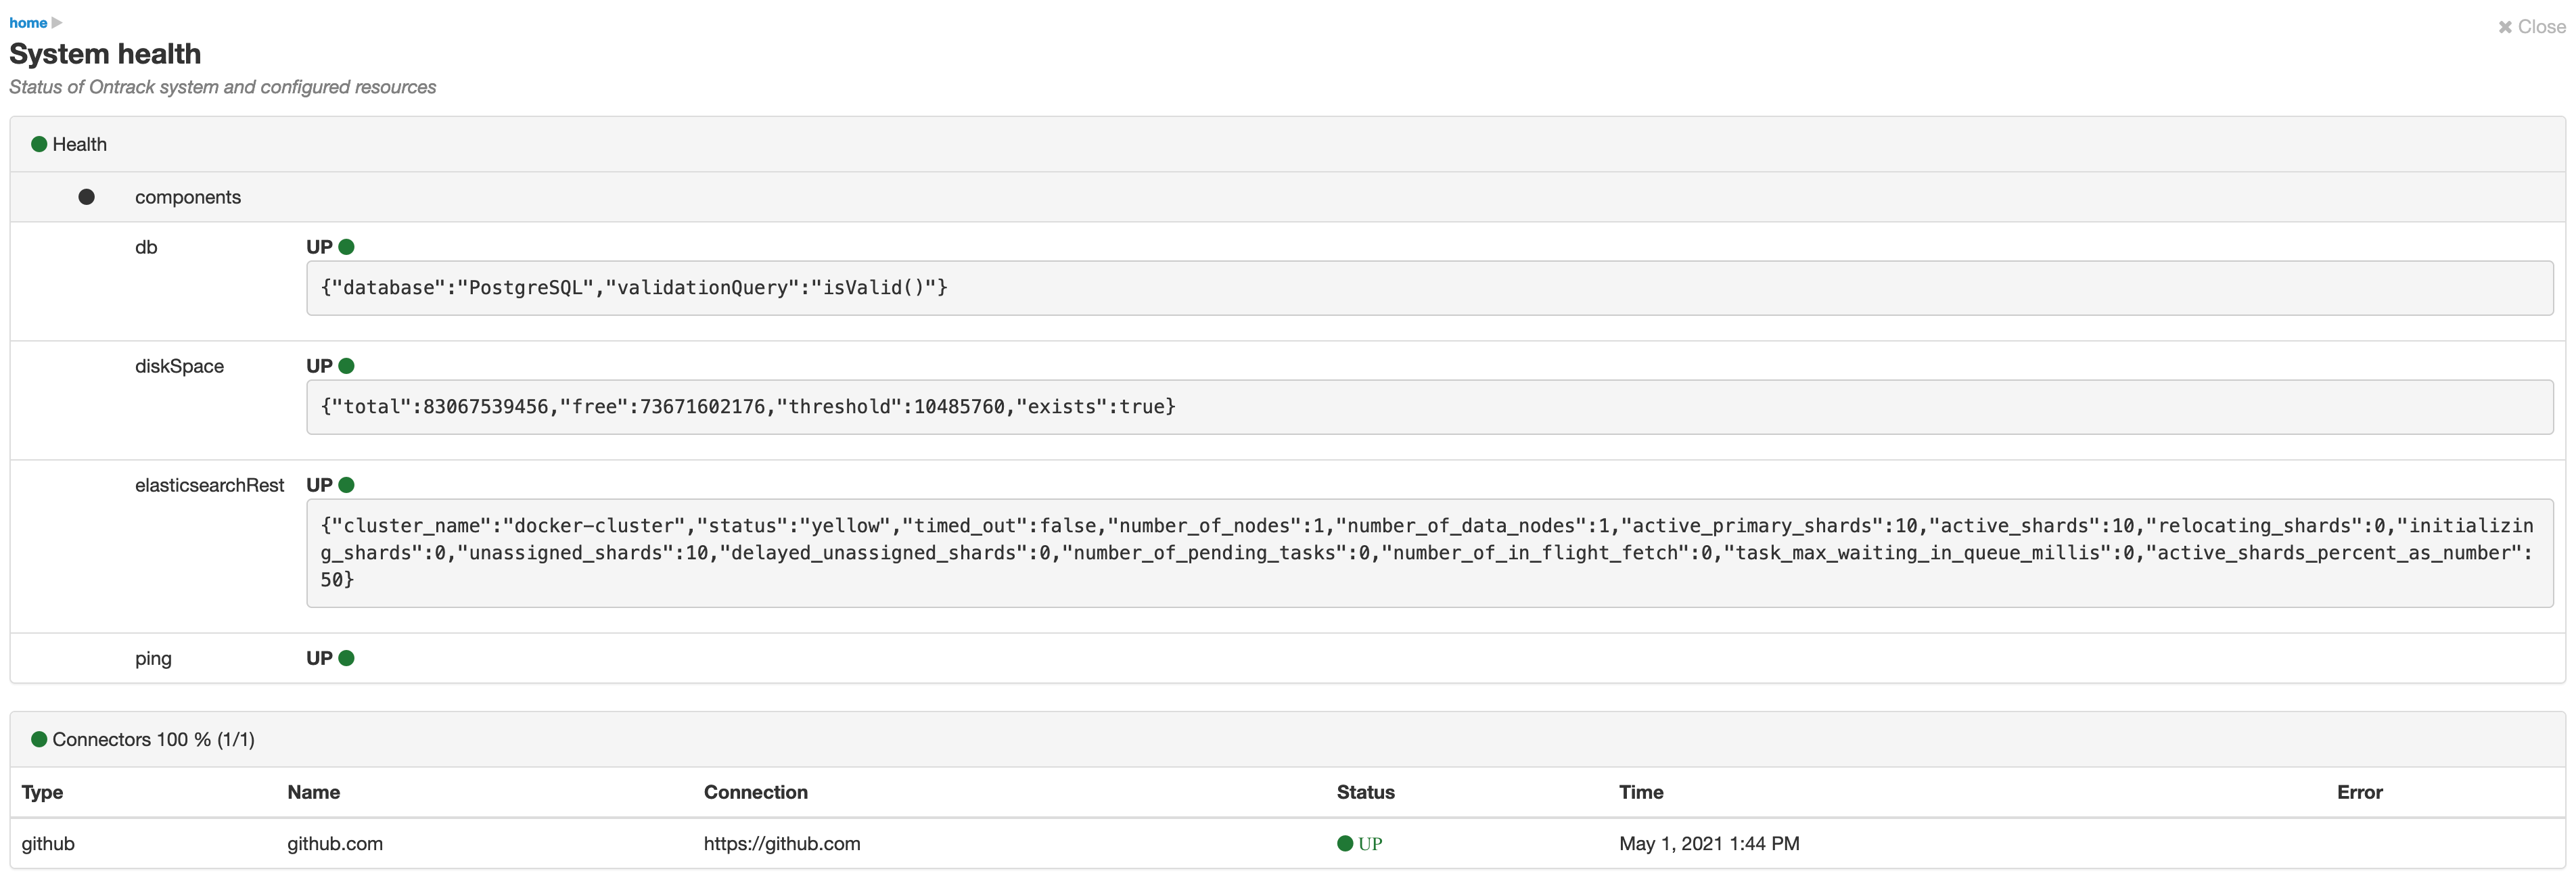
11.2.1. REST info
The /rest/info REST end point returns basic information:
{
  "_self": "/rest/info/",
  "version": {
    "date": "2021-04-29T11:15:20.271757Z",
    "display": "4.0-beta.28",
    "full": "release-4.0-beta-0062120",
    "branch": "release-4.0-beta",
    "build": "0062120",
    "commit": "006212063f9ad62bb52cb24f675f2fafeb83d12b",
    "source": "release/4.0-beta",
    "sourceType": "release"
  },
  "extensionList": {
    "extensions": [
      {
        "id": "oidc",
        "name": "OIDC",
        "description": "Support for OIDC authentication",
        "version": "4.0-beta.28",
        "options": {
          "gui": true,
          "dependencies": [
            "casc"
          ]
        }
      }
    ]
  }
}
11.2.2. Actuator end points
Ontrack exposes Spring Boot actuator end points:
-
over HTTP (JMX is disabled)
-
port
8800 -
on
/managecontext path
|
The management port can be configured using the default |
|
The management end points authentication is disabled by default in Ontrack, so make sure the chosen port ( Check the Spring Boot documentation for more information. |
The following end points are exposed by default:
-
/manage/health- health of Ontrack and its components -
/manage/info- basic information about the Ontrack instance -
/manage/prometheus- exposes environment metrics for being consumed by Prometheus
Additionally, custom management end points are available:
-
/manage/influxdb- if InfluxDB integration is enabled. TheGETmethod returns the status of the connection between Ontrack and InfluxDB, and thePOSTmethod forces a reconnection. See InfluxDB metrics for more information. -
/manage/connectors- the connectors are used to connect to external systems like Jenkins, JIRA, Git repositories, etc. Themanage/connectorsend point allows an administrator to get information about the state of those connectors. -
/manage/account-POSTmethod to reset the password of a given account by name, for example:
POST /manage/account

{
    "username": "admin",
    "password": "new-password"
}
This returns true or false to show the success of the operation.
12. Development
12.1. Developing tests
12.1.2. Database integration tests
While the vast majority of tests might never need to interact directly with the database, some tests may need a direct JDBC access to it.
For example, for a migration test, we cannot use the normal API to insert test records into the database, since the API is already up-to-date. A typical scenario would be then:
-
insert some records into the database using JDBC
-
run the migration
-
use the API to check everything is OK
For the rest, this type of test will be coded as any other integration test.
To run JDBC statements directly, use the jdbcTemplate property or the namedJdbcTemplate one, made available by the AbstractITTestJUnit4Support class or one of its subclass.
Example: GitHubConfigurationTokenMigrationIT
13. Architecture
13.1. Modules
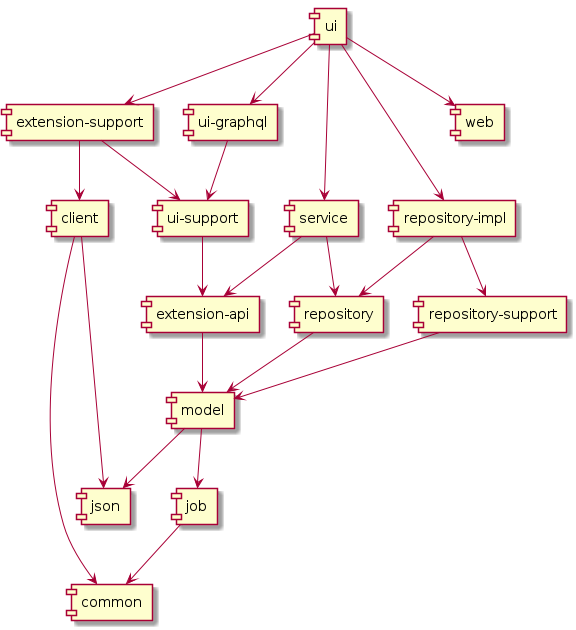
| Not all modules nor links are shown here in order to keep some clarity. The Gradle build files in the source remain the main source of authority. |
Modules are used in ontrack for two purposes:
-
isolation
-
distribution
We distinguish also between:
-
core modules
-
extension modules
Extension modules rely on the extension-support module to be compiled and
tested. The link between the core modules and the extensions is done through
the extension-api module, visible by the two worlds.
Modules like common, json, tx or client are purely utilitarian
(actually, they could be extracted from ontrack itself).
The main core module is the model one, which defines both the API of the
Ontrack services and the domain model.
13.2. UI
13.2.1. Resources
The UI is realized by REST controllers. They manipulate the model and get access to it through services.
In the end, the controllers return model objects that must be decorated by links in order to achieve Hateoas.
The controllers are not directly responsible for the decoration of the model objects as resources (model + links). This is instead the responsibility of the resource decorators.
The model objects are not returned as such, often their content needs to be filtered out. For example, when getting a list of branches for a project, we do not want each project to bring along its own copy of the project object. This is achieved using the model filtering technics.
13.3. Forms
Simple input forms do not need a lot of effort to design in Ontrack. They can be used directly in pages or in modal dialogs.
Server components (controllers, services, …) are creating instances of the
Form object and the client libraries (service.form.js) is responsible
for their rendering:
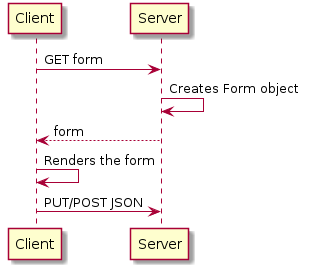
Form object
The Form object is created by adding Field`s into it using its `with method:
import net.nemerosa.ontrack.model.form.Form;
public Form getMyForm() {
   return Form.create()
      .with(field1)
      .with(field2)
      ;
}
See the next section on how to create the field objects. The Form object
contains utility methods for common fields:
Form.create()
   // `name` text field (40 chars max), with "Name" as a label
   // constrained by the `[A-Za-z0-9_\.\-]+` regular expression
   // Suitable for most name fields on the Ontrack model objects
   // (projects, branches, etc.)
   .name()
   // `password` password field (40 chars max) with "Password" as a label
   .password()
   // `description` memo field (500 chars max), optional, with "Description"
   // as a label
   .description()
   // `dateTime` date/time field (see below) with "Date/time" as a label
   .dateTime()
   // ...
   ;
In order to fill the fields with actual values, you can either use the
value(…) method on the field object (see next section) or use
the fill(…) method on the Form object.
Map<String, ?> data = ...
Form.create()
   // ...
   // Sets `value` as the value of the field with name "fieldName"
   .fill("fieldName", value)
   // Sets all values in the map using the key as the field name
   .fill(data)
Fields
Common field properties
Property |
Method |
Default value |
Description |
|
|
required |
Mapping |
|
|
none |
Display name |
|
|
|
Is the input required? |
|
|
|
Is the input read-only? |
|
|
none |
Message to display is the field content is deemed invalid |
|
|
none |
Help message to display for the field (see below for special syntax) |
|
|
none |
Expression which defines if the field is displayed or not - see below for a detailed explanation |
|
|
none |
Value to associated with the field |
text field
The text field is a single line text entry field, mapped to the HTML
<input type="test"/> form field.

| Property | Method | Default value | Description |
|---|---|---|---|
|
|
|
Maximum length for the text |
|
|
|
The text must comply with this regex in order to be valid |
Example:
Form.create()
   .with(
      Text.of("name")
         .label("Name")
         .length(40)
         .regex("[A-Za-z0-9_\\.\\-]+")
         .validation("Name is required and must contain only alpha-numeric characters, underscores, points or dashes.")
)namedEntries field
Multiple list of name/value fields:
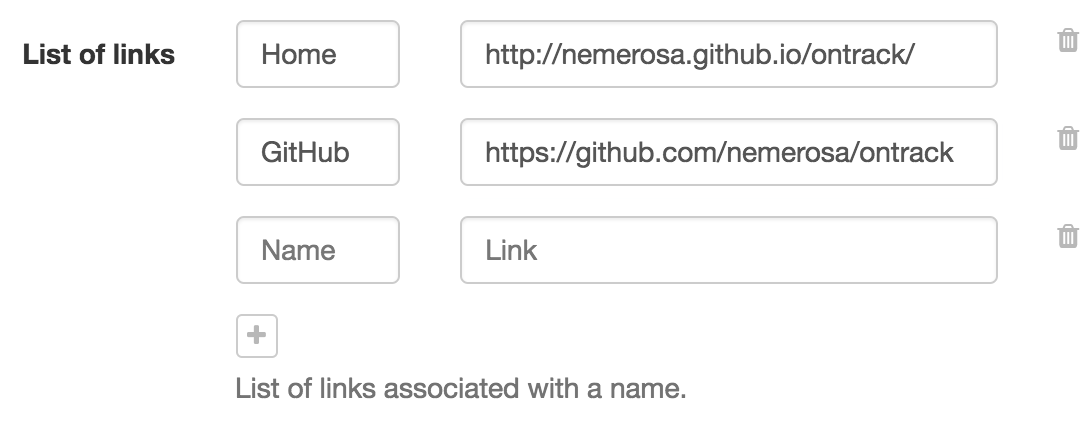
The user can:
-
add / remove entries in the list
-
set a name and a value for each item
-
the name might be optional - the value is not
| Property | Method | Default value | Description |
|---|---|---|---|
|
|
"Name" |
Label for the "name" input part of an entry. |
|
|
"Value" |
Label for the "value" input part of an entry. |
|
|
|
If the name part is required. |
|
|
"Add an entry" |
Label for the "add" button. |
Example:
Form.create()
   .with(
      NamedEntries.of("links")
         .label("List of links")
         .nameLabel("Name")
         .valueLabel("Link")
         .nameOptional()
         .addText("Add a link")
         .help("List of links associated with a name.")
         .value(value != null ? value.getLinks() : Collections.emptyList())
)14. Concepts
The root entity in Ontrack is the project.
Several branches can be attached to a project. Builds can be created within a branch and linked to other builds (same or other branches).
Promotion levels and validation stamps are attached to a branch:
-
a promotion level is used to define the promotion a given build has reached. A promotion run defines this association.
-
a validation stamp is used to qualify some tests or other validations on a build. A validation run defines this association. There can be several runs per build and per validation stamp. A run itself has a sequence of statuses attached to it: passed, failed, investigated, etc.
Builds and validation runs can be attached to some "run info" which gives additional information like the duration of the build or the validation.
Branches, promotion levels and validation stamps define the static structure of a project.
14.1. Model filtering
TODO
14.1.1. Jobs
Ontrack makes a heavy use of jobs in order to schedule regular activities, like:
-
SCM indexation (for Git repositories for example)
-
SCM/build synchronisations
-
Branch templating synchronisation
-
etc.
Services and extensions are responsible for providing Ontrack with the list of
jobs they want to be executed. They do this by implementing the
JobProvider interface that simply returns a collection of `JobRegistration`s
to register at startup.
One component can also register a JobOrchestratorSupplier, which provides
also a stream of `JobRegistration`s, but is more dynamic since the list
of jobs to register will be determined regularly.
The job scheduler is in charge to collect all registered jobs and to run them all.
Job architecture overview
This section explains the underlying concepts behind running the jobs in Ontrack.
When a job is registered, it is associated with a schedule. This schedule is dynamic and can be changed with the time. For example, the indexation of a Git repository for a project is scheduled every 30 minutes, but then, is changed to 60 minutes. The job registration schedule is then changed to every 60 minutes.
A job provides the following key elements:
-
a unique identifier: the job key
-
a task to run, provided as a
JobRuninterface:
@FunctionalInterface
public interface JobRun {
    void run(JobRunListener runListener);
}
The task defined by the job can use the provided JobRunListener to provide feedback on the execution or to
execution messages.
|
The job task is wrapped into a Runnable which is responsible to collect statistics about the job execution, like
number of runs, durations, etc.
In the end, the JobScheduler can be associated with a JobDecorator to return another Runnable layer if needed.
The job scheduler is responsible to orchestrate the jobs. The list of jobs is maintained in memory using an index
associating the job itself, its schedule and its current scheduled task (as a ScheduledFuture).
Job registration
A JobRegistration is the associated of a Job and of Schedule (run
frequency for the job).
A Schedule can be built in several ways:
// Registration only, no schedule
Schedule.NONE
// Every 15 minutes, starting now
Schedule.everyMinutes(15)
// Every minute, starting now
Schedule.EVERY_MINUTE
// Every day, starting now
Schedule.EVERY_DAY
// Every 15 minutes, starting after 5 minutes
Schedule.everyMinutes(15).after(5)
see the Schedule class for more options.
|
By enabling the scattering options, one can control the schedule by adding a startup delay at the beginning of the job.
The Job interface must define the unique for the job. A key in unique
within a type within a category.
Typically, the category and the type will be fixed (constants) while the key will depend on the job parameters and context. For example:
JobCategory CATEGORY = JobCategory.of("category").withName("My category");
JobType TYPE = CATEGORY.getType("type").withName("My type");
public JobKey getKey() {
   return TYPE.getKey("my-id")
}
The Job provides also a description, and the desired state of the job:
-
disabled or not - might depend on the job parameters and context
-
valid or not - when a job becomes invalid, it is not executed, and will be unregistered automatically. For example, a Git indexation job might become invalid if the associated repository configuration has been deleted.
Finally, of course, the job must provide the task to actually execute:
public JobRun getTask() {
   return (JobRunListener listener) -> ...
}
The task takes as parameter a JobRunListener.
| All job tasks run with administrator privileges. Job tasks can throw runtime exceptions - they will be caught by the job scheduler and displayed in the administration console. |
14.1.2. Encryption
Ontrack will store secrets, typically passwords and tokens, together with the configurations needed to connect to external applications: Git, JIRA, etc.
In order to protect the integrity of those external applications, those secrets must be protected.
Ontrack does so by encrypting those secrets in the database, using the
AES128 algorithm. The EncryptionService is used for encryption.
The key needed for the encryption is stored and retrieved using a
ConfidentialStore service.

See Encryption service for more details about using a confidential store.
14.2. Build filters
The build filters are responsible for the filtering of builds when listing them for a branch.
14.2.1. Usage
By default, only the last 10 builds are shown for a branch, but a user can choose to create filters for a branch, and to select them.
The filters he creates are saved for later use: * locally, in its local browser storage * remotely, on the server, if he is connected
For a given branch, a filter is identified by a name. The list of available filters for a branch is composed of those stored locally and of those returned by the server. The later ones have priority when there is a name conflict.
14.2.2. Implementation
The BuildFilter interface defines how to use a filter. This filter takes as
parameters:
-
the current list of filtered builds
-
the branch
-
the build to filter
It returns two boolean results:
-
is the build to be kept in the list?
-
do we need to go on with looking for other builds?
The BuildFilterService is used to manage the build filters:
-
by creating
BuildFilterinstances -
by managing
BuildFilterResourceinstances
The service determines the type of BuildFilter by using its type, and uses
injected `BuildFilterProvider`s to get an actual instance.
14.2.3. Reference services
| This is a work in progress and this list is not exhaustive yet. In the meantime, the best source of information remains the source code… |
| Service | Description |
|---|---|
|
Access to projects, branches and all entities |
|
Checks the current context for authorizations |
|
Access to the properties of the entities |
|
This service allows to store and retrieve arbitrary data with entities |
|
This service allows to store audited and indexed data with
entities. See |
EntityDataStore
The EntityDataStore is a service which allows extensions to store
some data associated with entities with the following properties:
-
data stored as JSON
-
data always associated with an entity
-
indexation by category and name, not necessarily unique
-
grouping of data using a group ID
-
unique generated numeric ID
-
audit data - creation + updates
See the Javadoc for net.nemerosa.ontrack.repository.support.store.EntityDataStore
for more details.
Example:
@Autowired
EntityDataStore store;
@Autowired
SecurityService securityService;

Branch branch = ...

store.add(branch, "Category", "Name", securityService.getCurrentSignature(), null, json);
14.3. Technology
14.3.1. Client side
One page only, pure AJAX communication between the client and the server.
-
AngularJS
-
Angular UI Router
-
Angular UI Bootstrap
-
Bootstrap
-
Less
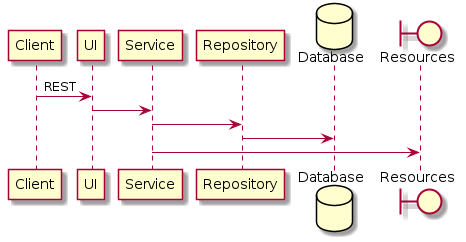
15. Extending Ontrack
Ontrack allows extensions to contribute to the application, and actually, most of the core features, like Git change logs, are indeed extensions.
This page explains how to create your own extensions and to deploy them along Ontrack. The same coding principles apply also for coding core extensions and to package them in the main application.
| Having the possibility to have external extensions in Ontrack is very new and the way to provide them is likely to change (a bit) in the next versions. In particular, the extension mechanism does not provide classpath isolation between the "plugins". |
15.1. Preparing an extension
In order to create an extension, you have to create a Java project.
| The use of Kotlin is also possible. |
Note that Ontrack needs at least a JDK 11.0.6 to run.
Your extension needs to a Gradle project and have at least this minimal
build.gradle file:
| Maven might be supported in the future. |
buildscript {
   repositories {
      mavenCentral()
   }
   dependencies {
      classpath 'net.nemerosa.ontrack:ontrack-extension-plugin:{{ontrack-version}}'
   }
}
repositories {
   mavenCentral()
}
apply plugin: 'ontrack'
The buildscript section declares the version of Ontrack you’re building your
extension for.
| The repository declaration might be simplified in later versions. |
The plug-in must declare the Maven Central as repository for the dependencies (Ontrack libraries are published in the Maven Central).
Finally, you can apply the ontrack plug-in. This one will:
-
apply the
javaplug-in. If you want to use Groovy, you’ll have to apply this plug-in yourself. Kotlin is very well supported. -
add the
ontrack-extension-supportmodule to thecompileconfiguration of your extension -
define some tasks used for running, testing and packaging your extension (see later)
15.2. Extension ID
Your extension must be associated with an identifier, which will be used throughout all the extension mechanism of Ontrack.
If the name of your extension project looks like ontrack-extension-<xxx>,
the xxx will be ID of your extension. For example, in the
settings.gradle file:
rootProject.name = 'ontrack-extension-myextension'then myextension is your extension ID.
If for any reason, you do not want to use ontrack-extension- as a prefix for
your extension name, you must specify it using the ontrack Gradle extension
in the build.gradle file:
ontrack {
   id 'myextension'
}
15.3. Coding an extension
All your code must belong to a package starting with net.nemerosa.ontrack in
order to be visible by the Ontrack application.
Typically, this should be like: net.nemerosa.ontrack.extension.<id> where
id is the ID of your extension.
| This limitation about the package name is likely to removed in future versions of Ontrack. |
You now must declare your extension to Ontrack by creating an extension feature class:
package net.nemerosa.ontrack.extension.myextension;

import net.nemerosa.ontrack.extension.support.AbstractExtensionFeature;
import net.nemerosa.ontrack.model.extension.ExtensionFeatureOptions;
import org.springframework.stereotype.Component;

@Component
public class MyExtensionFeature extends AbstractExtensionFeature {
    public MyExtensionFeature() {
        super(
            "myextension",
            "My extension",
            "Sample extension for Ontrack",
            ExtensionFeatureOptions.DEFAULT
        );
    }
}
The @Component annotation makes this extension feature visible by Ontrack.
The arguments for the extension feature constructor are:
-
the extension ID
-
the display name
-
a short description
-
the extension options (see below)
15.4. Extension options
If your extension has some web components (templates, pages, etc.), it must declare this fact:
ExtensionFeatureOptions.DEFAULT.withGui(true)If your extension depends on other extensions, it must declare them. For
example, to depend on GitHub and SCM extensions, first declare them as
dependencies in the build.gradle:
ontrack {
   uses 'github'
   uses 'scm'
}
then, in your code:
@Component
public class MyExtensionFeature extends AbstractExtensionFeature {
    @Autowired
    public MyExtensionFeature(
      GitHubExtensionFeature gitHubExtensionFeature,
      SCMExtensionFeature scmExtensionFeature
    ) {
        super(
            "myextension",
            "My extension",
            "Sample extension for Ontrack",
            ExtensionFeatureOptions.DEFAULT
               .withDependency(gitHubExtensionFeature)
               .withDependency(scmExtensionFeature)
        );
    }
}
15.5. Writing tests for your extension
Additionally to creating unit tests for your extension, you can also write integration tests, which will run with the Ontrack runtime enabled.
| This feature is only available starting from version 2.23.1. |
When the ontrack-extension-plugin is applied to your code, it makes the
ontrack-it-utils module available for the compilation of your tests.
In particular, this allows you to create integration tests which inherit from
AbstractServiceTestJUnit4Support, to inject directly the Ontrack services you need
and to use utility methods to create a test environment.
For example:
public MyTest extends AbstractServiceTestSupport {
   @Autowired
   private StructureService structureService
   @Test
   public void sample_test() {
      // Creates a project
      Project p = doCreateProject();
      // Can retrieve it by name...
      asUser().withView(p).execute(() ->
         assertTrue(structureService.findProjectByName(p.getName()).isPresent())
      );
   }
}
15.6. List of extension points
Ontrack provides the following extension points:
-
Properties - allows to attach a property to an entity
-
Decorators - allows to display a decoration for an entity
-
User menu action - allows to add an entry in the connected user menu
-
Settings - allows to add an entry in the global settings
-
Metrics - allows to contribute to the metrics exported by Ontrack
-
Event types - allows to define additional event types.
-
GraphQL - allows contributions to the GraphQL Ontrack schema.
-
Encryption key store - allows to define a custom store for the encryption keys.
-
TODO Entity action - allows to add an action for the page of an entity
-
TODO Entity information - allows to add some information into the page of an entity
-
TODO Search extension - provides a search end point for global text based searches
-
TODO Issue service - provides support for a ticketing system
-
TODO SCM service - provides support for a SCM system
-
TODO Account management action - allows to add an action into the account management
Other topics:
-
TODO Creating services
-
TODO Creating jobs
See Reference services for a list of the core Ontrack services.
15.7. Running an extension
|
A Postgres database must be available to run an extension, since it is needed by Ontrack. See the development section to see how quickly set it up. |
15.7.1. Using Gradle
To run your extension using Gradle:
./gradlew ontrackRunThis will make the application available at http://localhost:8080
The ontrackRun Gradle task can be run directly from Intellij IDEA and if
necessary in debug mode.
When running with Gradle in your IDE, if you edit some web resources and
want your changes available in the browser, just rebuild your project
(Ctrl F9 in Intellij) and refresh your browser.
|
15.8. Packaging an extension
Just run:
./gradlew clean buildThe extension is available as a JAR (together with its transitive dependencies,
see below) in build/dist.
15.9. Extension dependencies
If your extension depends on dependencies which are not brought by Ontrack, you have to collect them explicitly and put them in the same directory which contain your main JAR file.
The Ontrack plug-in provides an ontrackPrepare task which copies
all dependencies (transitively) and the main JAR in the build/dist directory.
This task is called by the main build task.
15.10. Deploying an extension
15.10.1. Using the Docker image
The Ontrack Docker image uses the
/var/ontrack/extensions volume to load extensions from. Bind this volume to
your host or to a data container to start putting extensions in it.
For example:
docker run --volume /extension/on/host:/var/ontrack/extensions ...You can also create your own image. Create the following Dockerfile:
# Base Ontrack image
FROM nemerosa/ontrack:<yourversion>
# Overrides the extension directory, as to NOT use a volume
ENV EXTENSIONS_DIR /var/ontrack/your-extension
# Copies the extensions in the target volume
COPY extensions/*.jar /var/ontrack/your-extension/
We assume here that your extensions are packaged in an extensions folder
at the same level than your Dockerfile:
/-- Dockerfile
|-- extensions/
     |-- extension1.jar
     |-- extension2.jar
When using a child Dockerfile, the extension directory has to be
customized because we cannot use the VOLUME in this case.
|
15.10.2. Using the CentOS or Debian/Ubuntu package
The RPM and Debian packages both
use the /usr/lib/ontrack/extensions directory for the location of the
extensions JAR files.
You can also create a RPM or Debian package which embeds both Ontrack and your extensions.
The means to achieve this depend on your build technology but the idea is the same in all cases:
Your package must:
-
put the extension JAR files in
/usr/lib/ontrack/extensions -
have a dependency on the
ontrackpackage
15.10.3. In standalone mode
When running Ontrack directly, you have to set the
loader.path to a directory containing the extensions JAR files:
java -Dloader.path=/path/to/extensions -jar ... <options>15.10.4. Extending properties
Any entity in Ontrack can be associated with a set of properties. Extensions can contribute to create new ones.
A property is the association some Java components and a HTML template to render it on the screen.
Java components
First, a property must be associated with some data. Just create an invariant POJO like, for example:
package net.nemerosa.ontrack.extension.myextension;

import lombok.Data;

@Data
public class MyProperty {
    private final String value;
}| Note that Ontrack extensions can take benefit of using Lombok in order to reduce the typing. But this is not mandatory as all. |
Then, you create the property type itself, by implementing the PropertyType
interface or more easily by extending the AbstractPropertyType class. The
parameter for this class is the data created above:
@Component
public class MyPropertyType extends AbstractPropertyType<MyProperty> {
}
The @Component notation registers the property type in Ontrack.
A property, or any extension is always associated with an extension feature and this one is typically injected:
@Autowired
public MyPropertyType(MyExtensionFeature extensionFeature) {
  super(extensionFeature);
}
Now, several methods need to be implemented:
-
getNameandgetDescriptionreturn respectively a display name and a short description for the property -
getSupportedEntityTypesreturns the set of entities the property can be applied to. For example, if your property can be applied only on projects, you can return:
@Override
public Set<ProjectEntityType> getSupportedEntityTypes() {
  return EnumSet.of(ProjectEntityType.PROJECT);
}-
canEditallows you to control who can create or edit the property for an entity. TheSecurityServiceallows you to test the authorizations for the current user. For example, in this sample, we authorize the edition of our property only for users being granted to the project configuration:
@Override
public boolean canEdit(ProjectEntity entity, SecurityService securityService) {
  return securityService.isProjectFunctionGranted(entity, ProjectConfig.class);
}-
canViewallows you to control who can view the property for an entity. Like forcanEdit, theSecurityServiceis passed along, but you will typically returntrue:
@Override
public boolean canView(ProjectEntity entity, SecurityService securityService) {
  return true;
}-
getEditionFormreturns the form being used to create or edit the property. Ontrack usesFormobjects to generate automatically user forms on the client. See its Javadoc for more details. In our example, we only need a text box:
@Override
public Form getEditionForm(ProjectEntity entity, MyProperty value) {
  return Form.create()
          .with(
                  Text.of("value")
                          .label("My value")
                          .length(20)
                          .value(value != null ? value.getValue() : null)
          );
}-
the
fromClientandfromStoragemethods are used to parse back and forth the JSON into a property value. Typically:
@Override
public MyProperty fromClient(JsonNode node) {
  return fromStorage(node);
}

@Override
public MyProperty fromStorage(JsonNode node) {
  return parse(node, ProjectCategoryProperty.class);
}-
the
getSearchKeyis used to provide an indexed search value for the property:
@Override
public String getSearchKey(My value) {
  return value.getValue();
}-
finally, the
replaceValuemethod is called when the property has to be cloned for another entity, using a replacement function for the text values:
@Override
public MyProperty replaceValue(MyProperty value, Function<String, String> replacementFunction) {
  return new MyProperty(
      replacementFunction.apply(value.getValue())
  );
}
Web components
A HTML fragment (or template) must be created at:
src/main/resources
  \-- static
     \-- extension
         \-- myextension
            \-- property
               \-- net.nemerosa.ontrack.extension.myextension.MyPropertyType.tpl.html
Replace myextension, the package name and the property type accordingly
of course.
|
The tpl.html will be used as a template on the client side and will have
access to the Property object. Typically, only its value field, of the
property data type, will be used.
The template is used the AngularJS template mechanism.
For example, to display the property as bold text in our sample:
<b>{{property.value.value}}</b>The property must be associated with an icon, typically PNG, 24 x 24, located at:
src/main/resources
  \-- static
     \-- extension
         \-- myextension
            \-- property
               \-- net.nemerosa.ontrack.extension.myextension.MyPropertyType.png
Property search
By default, properties are not searchable - their value cannot be used to perform search.
If the property contains some text, it might be suitable to allow this property to be used in search.
To enable this, two main methods must be provided:
-
containsValue -
getSearchArguments
The containsValue is used to check if a given string token is
present of not in an instance of a property value. Let’s take a
property data type which has a text field, we could implement
the containsValue method by checking if this field contains
the search token in a case insensitive manner:
override fun containsValue(value: MessageProperty, propertyValue: String): Boolean {
    return StringUtils.containsIgnoreCase(value.text, propertyValue)
}
The getSearchArguments method is more complex - it allows the
Ontrack search engine to plug some SQL fragment into a more
global search, for example like when searching for builds.
This method returns a PropertySearchArguments instance with three properties:
-
jsonContext- expression to join with to thePROPERTIEStable in order to contraint the JSON scope, for examplejsonb_array_elements(pp.json→'items') as item. This expression is optional. -
jsonCriteria- Criteria to act on thejsonContextdefined above, based on a search token, for example:item→>'name' = :name and item→>'value' ilike :value. This expression is optional. Variables in this expression can be mapped to actual parameters using thecriteriaParamsmap parameter below. -
criteriaParams- Map of parameters for the criteria, for example:name→"name"andvalue→"%value%". See the Spring Documentation for more information.
Most of the time, the jsonContext and jsonCriteria expressions will
rely on the json column of the PROPERTIES table, which is
a Postgres JSONB data type
containing a JSON representation of the property data type.
Refer to the Postgres JSON documentation for more information about the syntax to use in those expressions.
|
In the |
|
The |
Example, for a property data type having a links list of name/value strings,
and we want to look in the value field in a case insensitive way:
override fun getSearchArguments(token: String): PropertySearchArguments? {
    return PropertySearchArguments(
            jsonContext = "jsonb_array_elements(pp.json->'links') as link",
            jsonCriteria = "link->>'value' ilike :value",
            criteriaParams = mapOf(
                    "value" to "%$token%"
            )
    )
}
15.10.5. Extending decorators
A decorator is responsible to display a decoration (icon, text, label, etc.) close to an entity name, in the entity page itself or in a list of those entities. Extensions can contribute to create new ones.
A decorator is the association some Java components and a HTML template to render it on the screen.
Java components
First, a decorator must be associated with some data. You can use any type,
like a String, an enum or any other invariant POJO. In our sample,
we’ll take a String, which is the value of the MyProperty property
described as example in Extending properties.
Then, you create the decorator itself, by implementing the
DecorationExtension interface and extending the AbstractExtension. The
parameter type is the decorator data defined above.
@Component
public class MyDecorator extends AbstractExtension implements DecorationExtension<String> {
}
The @Component notation registers the decorator in Ontrack.
A decorator, or any extension is always associated with an
extension feature and this one is typically injected. Other services can be
injected at the same time. For example, our sample decorator needs to get a
property on an entity so we inject the PropertyService:
private final PropertyService propertyService;
@Autowired
public MyDecorator(MyExtensionFeature extensionFeature, PropertyService propertyService) {
   super(extensionFeature);
   this.propertyService = propertyService;
}
Now, several methods need to be implemented:
-
getScopereturns the set of entities the decorator can be applied to. For example, if your property can be applied only on projects, you can return:
@Override
public EnumSet<ProjectEntityType> getScope() {
   return EnumSet.of(ProjectEntityType.PROJECT);
}-
getDecorationsreturns the list of decorations for an entity. In our case, we want to return a decoration only if the project is associated with theMyPropertyproperty and return its value as decoration data.
@Override
public List<Decoration<String>> getDecorations(ProjectEntity entity) {
  return propertyService.getProperty(entity, MyPropertyType.class).option()
          .map(p -> Collections.singletonList(
                  Decoration.of(
                          MyDecorator.this,
                          p.getValue()
                  )
          ))
          .orElse(Collections.emptyList());
}
Web components
A HTML fragment (or template) must be created at:
src/main/resources
  \-- static
     \-- extension
         \-- myextension
            \-- decoration
               \-- net.nemerosa.ontrack.extension.myextension.MyDecorator.tpl.html
Replace myextension, the package name and the decorator type
accordingly of course.
|
The tpl.html will be used as a template on the client side and will have
access to the Decoration object. Typically, only its data field, of the
decoration data type, will be used.
The template is used the AngularJS template mechanism.
For example, to display the decoration data as bold text in our sample:
<!-- In this sample, `data` is a string -->
<b>{{decoration.data}}</b>
15.10.6. Extending the user menu
An extension can add a entry in the connected user menu, in order to point to an extension page.
Extension component
Define a component which extends AbstractExtension and implements
UserMenuExtension:
package net.nemerosa.ontrack.extension.myextension;

@Component
public class MyUserMenuExtension extends AbstractExtension implements UserMenuExtension {

    @Autowired
    public MyUserMenuExtension(MyExtensionFeature extensionFeature) {
        super(extensionFeature);
    }

    @Override
    public Action getAction() {
        return Action.of("my-user-menu", "My User Menu", "my-user-menu-page");
    }

    @Override
    public Class<? extends GlobalFunction> getGlobalFunction() {
        return ProjectList.class;
    }
}
In this sample, my-user-menu-page is the relative routing path to the
page the user action must point to.
The getGlobalFunction method returns the function needed for authorizing
the user menu to appear.
15.10.7. Extending pages
Extensions can also contribute to pages.
Extension menus
Extension pages must be accessible from a location:
-
the global user menu
-
an entity page
From an entity page
In order for an extension to contribute to the menu of an entity page, you have
to implement the ProjectEntityActionExtension interface and extend the
AbstractExtension.
@Component
public class MyProjectActionExtension extends AbstractExtension implements ProjectEntityActionExtension {
}
The @Component notation registers the extension in Ontrack.
An action extension, or any extension is always associated with
an extension feature and this one is typically injected. Other services can be
injected at the same time. For example, our sample extension needs to get a
property on an entity so we inject the PropertyService:
private final PropertyService propertyService;
@Autowired
public MyProjectActionExtension(MyExtensionFeature extensionFeature, PropertyService propertyService) {
   super(extensionFeature);
   this.propertyService ==== propertyService;
}
The getAction method returns an optional Action for the entity. In our
sample, we want to associate an action with entity if it is a project and if it
has the MyProperty property being set:
@Override
public Optional<Action> getAction(ProjectEntity entity) {
   if (entity instanceof Project) {
       return propertyService.getProperty(entity, MyPropertyType.class).option()
               .map(p ->
                       Action.of(
                               "my-action",
                               "My action",
                               String.format("my-action/%d", entity.id())
                       )
               );
   } else {
       return Optional.empty();
   }
}
The returned Action object has the following properties:
-
an
id, uniquely identifying the target page in the extension -
a
name, which will be used as display name for the menu entry -
a URI fragment, which will be used for getting to the extension end point (see later). Note that this URI fragment will be prepended by the extension path. So in our example, the final path for the
SAMPLEproject with id12would be:extension/myextension/my-action/12.
Extension page
Before an extension can serve some web components, it must be declared as
being GUI related. See the documentation to enable this
(ExtensionFeatureOptions.DEFAULT.withGui(true)).
|
The extension must define an AngularJS module file at:
src/main/resources
  \-- static
     \-- extension
         \-- myextension
            \-- module.js
The module.js file name is fixed and is used by Ontrack to load the web
components of your extension at startup.
This is an AngularJS (1.2.x) module file and can declare its configuration, its
services, its controllers, etc. Ontrack uses
UI Router(), version 0.2.11 for
the routing of the pages, allowing a routing declaration as module level.
For our example, we want to declare a page for displaying information for
extension/myextension/my-action/{project} where {project} is the ID of
one project:
angular.module('ontrack.extension.myextension', [
        'ot.service.core',
        'ot.service.structure'
    ])
    // Routing
    .config(function ($stateProvider) {
        $stateProvider.state('my-action', {
            url: '/extension/myextension/my-action/{project}',
            templateUrl: 'extension/myextension/my-action.tpl.html',
            controller: 'MyExtensionMyActionCtrl'
        });
    })
    // Controller
    .controller('MyExtensionMyActionCtrl', function ($scope, $stateParams, ot, otStructureService) {
        var projectId ==== $stateParams.project;

        // View definition
        var view ==== ot.view();
        view.commands ==== [
            // Closing to the project
            ot.viewCloseCommand('/project/' + projectId)
        ];

        // Loads the project
        otStructureService.getProject(projectId).then(function (project) {
            // Breadcrumbs
            view.breadcrumbs ==== ot.projectBreadcrumbs(project);
            // Title
            view.title ==== "Project action for " + project.name;
            // Scope
            $scope.project ==== project;
        });
    })
;
The routing configuration declares that the end point at
/extension/myextension/my-action/{project} will use the
extension/myextension/my-action.tpl.html view and the
MyExtensionMyActionCtrl controller defined below.
The ot and otStructureService are Ontrack Angular services, defined
respectively by the ot.service.core and ot.service.structure modules.
The MyExtensionMyActionCtrl controller:
-
gets the project ID from the state (URI) definition
-
it defines an Ontrack view, and defines a close command to go back to the project page
-
it then loads the project using the
otStructureServiceservice and upon loading completes some information into the view
Finally, we define a template at:
src/main/resources
  \-- static
     \-- extension
         \-- myextension
            \-- extension/myextension/my-action.tpl.html
which contains:
<ot-view>
    Action page for {{project.name}}.
</ot-view>
The ot-view is an Ontrack directive which does all the layout magic for you.
You just have to provide the content.
Ontrack is using Bootstrap 3.x for the layout and basic styling, so you can start structuring your HTML with columns, rows, tables, etc. For example:
<ot-view>
   <div class="row">
      <div class="col-md-12">
         Action page for {{project.name}}.
      </div>
   </div>
</ot-view>15.10.8. Extending event types
Extensions can define additional event types which can then be used to add custom events to entities.
To register a custom event type:
@Autowired
public static final EventType CUSTOM_TYPE = SimpleEventType.of("custom-type", "My custom event");
public MyExtension(..., EventFactory eventFactory) {
   super(extensionFeature);
   eventFactory.register(CUSTOM_TYPE);
}
Then, you can use it this way when you want to attach an event to, let’s say, a build:
EventPostService eventPostService;
Build build;
...
eventPostService.post(
    Event.of(MyExtension.CUSTOM_TYPE).withBuild(build).get()
);
15.10.9. Extending validation data
If built-in validation data types are not enough, additional ones can be created using the extension mechanism.
To register a custom validation data type:
-
implement a component implementing the
ValidationDataTypeinterface or preferably theAbstractValidationDataTypeclass (which provides some utility validation methods) -
looks at the Javadoc of the
ValidationDataTypeinterface to get the list of methods to implement and some guides
The main choice to consider is about the configuration data type (C) and the data type (T).
The data type is the type of the data you actually associate with a validation run. For
example, for some code coverage, it would be a percentage, and therefore represented as an Int. It could
be any other type, either complex or simple.
The configuration data type is responsible for the configuration of the validation stamp, how the actual data will be interpreted when it comes to computing a status. It could be one or several thresholds for example.
| The best thing to get started would be to copy the code of existing built-in data types. |
15.10.10. Extending GraphQL
Extensions can contribute to the Ontrack GraphQL core schema:
-
custom types
-
root queries
-
additional fields in project entities
Preparing the extension
In your extension module, import the ontrack-ui-graphql module:
dependencies {
   compile "net.nemerosa.ontrack:ontrack-ui-graphql:${ontrackVersion}"
}
If you want to write integration tests for your GraphQL extension, you have to include the GraphQL testing utilities:
dependencies {
   testCompile "net.nemerosa.ontrack:ontrack-ui-graphql:${ontrackVersion}:tests"
}
Custom types
To define an extra type, you create a component which implements the
GQLType interface:
@Component
public class PersonType implements GQLType {
    @Override
    public GraphQLObjectType getType() {
        return GraphQLObjectType.newObject()
                .name("Person")
                .field(f -> f.name("name")
                        .description("Name of the person")
                        .type(GraphQLString)
                )
                .build();
    }
}| See the graphql-java documentation for the description of the type construction. |
You can use this component in other ones, like in queries, field definitions or other types, like shown below:
@Component
public class AccountType implements GQLType {

    private final PersonType personType;

    @Autowired
    public AccountType (PersonType personType) {
        this.personType = personType;
    }

    @Override
    public GraphQLObjectType getType() {
        return GraphQLObjectType.newObject()
                .name("Account")
                .field(f -> f.name("username")
                        .description("Account name")
                        .type(GraphQLString)
                )
                .field(f -> f.name("identity")
                        .description("Identity")
                        .type(personType.getType())
                )
                .build();
    }
}
You can also create GraphQL types dynamically by using introspection of your model classes.
Given the following model:
@Data
public class Person {
   private final String name;
}
@Data
public class Account {
   private final String username;
   private final Person identity;
}
You can generate the Account type by using:
@Override
public GraphQLObjectType getType() {
   return GraphQLBeanConverter.asObjectType(Account.class);
}
The GraphQLBeanConverter.asObjectType is still very
experimental and its implementation is likely to change in the next versions
of Ontrack. For example, Map and Collection types are not supported.
|
Root queries
Your extension can contribute to the root query by creating a component
implementing the GQLRootQuery interface:
@Component
public class AccountGraphQLRootQuery implements GQLRootQuery {

    private final AccountType accountType;

    @Autowired
    public AccountGraphQLRootQuery(AccountType accountType) {
        this.accountType = accountType;
    }

    @Override
    public GraphQLFieldDefinition getFieldDefinition() {
        return GraphQLFieldDefinition.newFieldDefinition()
                .name("accounts")
                .argument(a -> a.name("username")
                        .description("User name pattern")
                        .type(GraphQLString)
                )
                .type(accountType.getType())
                .dataFetcher(...)
                .build();
    }
}
This root query can then be used into your GraphQL queries:
{
   accounts(username: "admin*") {
      username
      identity {
         name
      }
   }
}
Extra fields
The Ontrack GraphQL extension mechanism allows contributions to the project entities like the projects, builds, etc.
For example, to contribute a owner field of type Account on the Branch
project entity:
@Component
public class BranchOwnerGraphQLFieldContributor
   implements GQLProjectEntityFieldContributor {

   private final AccountType accountType;

   @Autowired
   public BranchOwnerGraphQLFieldContributor(AccountType accountType) {
      this.accountType = accountType;
   }

   @Override
   public List<GraphQLFieldDefinition> getFields(
         Class<? extends ProjectEntity> projectEntityClass,
         ProjectEntityType projectEntityType) {
     return Collections.singletonList(
             GraphQLFieldDefinition.newFieldDefinition()
                     .name("owner")
                     .type(accountType.getType())
                     .dataFetcher(GraphqlUtils.fetcher(
                        Branch.class,
                        (environment, branch) -> return ...
                     ))
                     .build()
     );
}
You can now use the owner field in your queries:
{
   branches(id: 1) {
      name
      project {
         name
      }
      owner {
         username
         identity {
            name
         }
      }
   }
}
Built-in scalar fields
The Ontrack GraphQL module adds the following scalar types, which you can use in your field or type definitions:
-
GQLScalarJSON.INSTANCE- maps to aJsonNode -
GQLScalarLocalDateTime.INSTANCE- maps to aLocalDateTime
You can use them directly in your definitions:
...
.field(f -> f.name("content").type(GQLScalarJSON.INSTANCE))
.field(f -> f.name("timestamp").type(GQLScalarLocalDateTime.INSTANCE))
...
Testing GraphQL
In your tests, create a test class which extends AbstractQLITSupport and
use the run method to execute a GraphQL query:
MyTestIT extends AbstractQLITSupport {
   @Test
   void my_test() {
     def p = doCreateProject()
     def data = run("""{
      projects(id: ${p.id}) {
         name
      }
     }""")
     assert data.projects.first().name == p.name
   }
}| While it is possible to run GraphQL tests in Java, it’s easier to do using Groovy. |
15.10.11. Extending cache
Ontrack uses Caffeine to cache some data in memory to avoid reloading it from the database. The cache behaviour can be configured using properties.
Extensions can also use the Ontrack cache and make it configurable.
In order to declare one or several caches, just a declare a Component which
implements CacheConfigExtension and set the
Caffeine spec
string for each cache.
@Component
class MyCacheConfigExtension : CacheConfigExtension {
    override val caches: Map<String, String>
        get() = mapOf(
                "myCache" to "maximumSize=1000,expireAfterWrite=1h,recordStats"
        )
}
The cache statistics are available as
metrics
if the recordStats flag is set.
|
The cache thus declared become configurable through external configuration. For example:
ontrack:
    config:
        cache:
            specs:
                myCache: "maximumSize=2000,expireAfterWrite=1d,recordStats"
In order to use the cache in the code, you can just use the Spring cache annotations. For example:
@Service
class MyServiceImpl: MyService {
    @Cacheable(cacheNames = "myCache")
    fun getValue(id: Int): MyObject = ...
}
15.10.12. Extending metrics
There are several ways to contribute to metrics in Ontrack:
Meter registry direct usage
|
Starting from version 2.35/3.35, the metrics framework used by Ontrack has been migrated to Micrometer. This is a breaking change - and the way metrics can be contributed to by extensions is totally different and some effort must be done in the migration. |
In order for extensions to add their own metrics, they can
interact directly with an inject MeterRegistry and then
get gauges, timers, counters, etc.
Or they can create some MeterBinder beans to register
some gauges at startup time.
Usually, migrating (monotonic) counters and timers will be straightforward:
val meterRegistry: MeterRegistry
meterRegistry.counter("...", tags).increment()
meterRegistry.timer("...", tags).record {
    // Action to time
}
For gauge, you have to register them so that they can be call at any time by the meter registry:
val meterRegistry: MeterRegistry
meterRegistry.gauge("...", tags,
    sourceObject,
    { obj -> /* Gets the gauge value from the object */ }
)
See the Micrometer documentation for more information on how to register metrics.
Validation run metrics
Every time a validation run is created, an event is sent
to all instances of ValidationRunMetricsExtension.
You can register an extension to react to this creation:
class InfluxDBValidationRunMetricsExtension(myExtensionFeature: MyExtensionFeature) : AbstractExtension(myExtensionFeature), ValidationRunMetricsExtension {
    override fun onValidationRun(validationRun: ValidationRun) {
        // Does something with the created validation run
    }
}
Run info listeners
Builds and validation runs can be associated with some run info, which contain information about the execution time, source and author.
Every time a run info is created, an event is sent to all instances of
RunInfoListener. To react to those run info events, you can also declare
a @Component implementing RunInfoListener. For example:
@Component
class MyRunInfoListener : RunInfoListener {
    override fun onRunInfoCreated(runnableEntity: RunnableEntity, runInfo: RunInfo) {
        // Exports the run info to an external metrics system
    }
}
Metrics export service
The MetricsExportService can be used to export any set of metrics, to any registered
metrics system.
|
See Metrics for a list of supported metric backends for this feature. |
To export a metric, just call the exportMetrics method on the service:
metricsExportService.exportMetrics(
        "my-metric-name",
        tags = mapOf(
                "tag1" to "name1",
                "tag2" to "name2"
        ),
        fields = mapOf(
                "value1" to value1,
                "value2" to value2
        ),
        timestamp = Time.now()
)|
Metrics exporters must declared an extension of type |
15.10.13. Using Kotlin in extensions
Just mention kotlin() in the Ontrack configuration in your
build.gradle file:
ontrack {
    kotlin()
    ...
}
The Kotlin Gradle plug-in will be automatically applied and the Kotlin
JVM for JRE8, with the same version than for Ontrack, will be added
in compileOnly mode to your dependencies. Enjoy!
15.10.14. Extending the settings
An extension can add a entry in the list of global settings.
Start by creating an invariant class which contains the data to manage in the new settings.
| in the sample below, we use some PuppetDB connection settings, which need a URL, a user name and a password. |
@Data
public class PuppetDBSettings {
    private final String url;
    private final String username;
    private final String password;
}
The settings are managed in Ontrack by two distinct services:
-
a manager - responsible for the edition of the settings
-
a provider - responsible for retrieving the settings
| as-of today, the service cannot be the same class. |
To define the manager, extend the AbstractSettingsManager class and use your settings class as a parameter:
@Component
public class PuppetDBSettingsManager extends AbstractSettingsManager<PuppetDBSettings> {

    private final SettingsRepository settingsRepository;
    private final EncryptionService encryptionService;

    @Autowired
    public PuppetDBSettingsManager(CachedSettingsService cachedSettingsService, SecurityService securityService, SettingsRepository settingsRepository, EncryptionService encryptionService) {
        super(PuppetDBSettings.class, cachedSettingsService, securityService);
        this.settingsRepository = settingsRepository;
        this.encryptionService = encryptionService;
    }

    @Override
    protected void doSaveSettings(PuppetDBSettings settings) {
        settingsRepository.setString(PuppetDBSettings.class, "url", settings.getUrl());
        settingsRepository.setString(PuppetDBSettings.class, "username", settings.getUsername());
        settingsRepository.setPassword(PuppetDBSettings.class, "password", settings.getPassword(), false, encryptionService::encrypt);
    }

    @Override
    protected Form getSettingsForm(PuppetDBSettings settings) {
        return Form.create()
                .with(
                        Text.of("url")
                                .label("URL")
                                .help("URL to the PuppetDB server. For example: http://puppetdb")
                                .value(settings.getUrl())
                )
                .with(
                        Text.of("username")
                                .label("User")
                                .help("Name of the user used to connect to the PuppetDB server.")
                                .optional()
                                .value(settings.getUsername())
                )
                .with(
                        Password.of("password")
                                .label("Password")
                                .help("Password of the user used to connect to the PuppetDB server.")
                                .optional()
                                .value("") // Password never sent to the client
                );
    }

    @Override
    public String getId() {
        return "puppetdb";
    }

    @Override
    public String getTitle() {
        return "PuppetDB settings";
    }
}
To define the provided, implement the AbstractSettingsManager and use your settings class as a parameter:
@Component
public class PuppetDBSettingsProvider implements SettingsProvider<PuppetDBSettings> {

    private final SettingsRepository settingsRepository;
    private final EncryptionService encryptionService;

    @Autowired
    public PuppetDBSettingsProvider(SettingsRepository settingsRepository, EncryptionService encryptionService) {
        this.settingsRepository = settingsRepository;
        this.encryptionService = encryptionService;
    }

    @Override
    public PuppetDBSettings getSettings() {
        return new PuppetDBSettings(
                settingsRepository.getString(PuppetDBSettings.class, "url", ""),
                settingsRepository.getString(PuppetDBSettings.class, "username", ""),
                settingsRepository.getPassword(PuppetDBSettings.class, "password", "", encryptionService::decrypt)
        );
    }

    @Override
    public Class<PuppetDBSettings> getSettingsClass() {
        return PuppetDBSettings.class;
    }
}
That’s all there is to do. Now, the new settings will automatically appear in the Settings page:
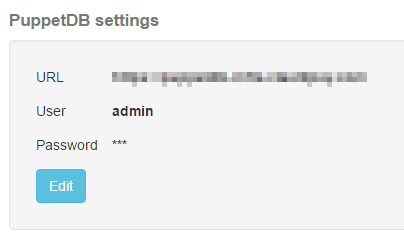
and can be edited using the form defined above:
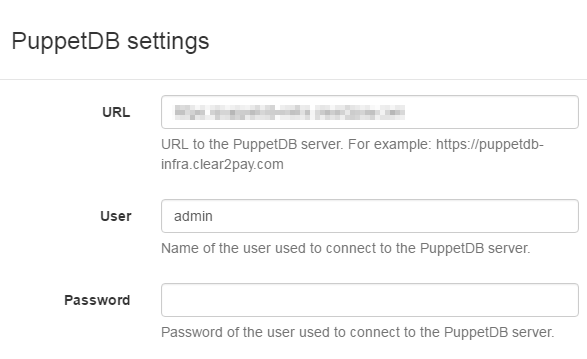
15.10.15. Extending the security
The security model of Ontrack can be extended to fit for specific needs in extensions.
Adding functions
All authorizations in the code are granted through functions. We distinguish between:
-
global functions about Ontrack in general
-
project functions linked to a given project
Global roles are then linked to a number of global functions and project functions.
On the other hand, project roles can only be linked to project functions.
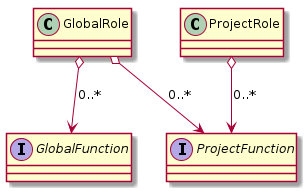
The association of core functions and core roles is fixed in the Ontrack core, but extensions can:
-
define new global and project functions
-
assign them to existing roles
| For security reasons, extensions cannot associate existing core functions to roles. |
In order to define a global function, just define an interface
which extends GlobalFunction:
public interface MyGlobalFunction extends GlobalFunction {}Almost the same thing for a project function:
public interface MyProjectFunction extends ProjectFunction {}| No method is to be implemented. |
Now, you can link those functions to existing roles by providing
a RoleContributor component. In our example, we want to grant
the global function and the project function to the AUTOMATION
global role and the project
function to the PROJECT_OWNER project role.
@Component
public MyRoleContributor implements RoleContributor {
    @Override
    public Map<String, List<Class<? extends GlobalFunction>>> getGlobalFunctionContributionsForGlobalRoles() {
        return Collections.singletonMap(
            Roles.GLOBAL_AUTOMATION,
            Collections.singletonList(
                MyGlobalFunction.class
            )
        );
    }
    @Override
    public Map<String, List<Class<? extends ProjectFunction>>> getProjectFunctionContributionsForGlobalRoles() {
        return Collections.singletonMap(
            Roles.GLOBAL_AUTOMATION,
            Collections.singletonList(
                MyProjectFunction.class
            )
        );
    }
    @Override
    public Map<String, List<Class<? extends ProjectFunction>>> getProjectFunctionContributionsForProjectRoles() {
        return Collections.singletonMap(
            Roles.PROJECT_OWNER,
            Collections.singletonList(
                MyProjectFunction.class
            )
        );
    }
}
All available roles are listed in the Roles interface.
|
You can now check for those functions in your code by injecting
the SecurityService:
private final SecurityService securityService;
...
if (securityService.isGlobalFunctionGranted(MyGlobalFunction.class)) {
   ...
}
if (securityService.isProjectFunctionGranted(project, MyProjectFunction.class)) {
   ...
}
or:
private final SecurityService securityService;
...
securityService.checkGlobalFunction(MyGlobalFunction.class)) {
securityService.checkProjectFunction(project, MyProjectFunction.class))
The project functions can be tested on a Project or any other
entity which belongs to a project (branches, builds, etc.).
|
Adding roles
Both global and project roles can be added
using the same RoleContributor extension class, by
overriding the following methods:
@Component
public MyRoleContributor implements RoleContributor {
    @Override
    public List<RoleDefinition> getGlobalRoles() {
        return Collections.singletonList(
            new RoleDefinition(
                "MY_GLOBAL_ROLE",
                "My Global Role",
                "This is a new global role"
            )
        );
    }
    @Override
    public List<RoleDefinition> getProjectRoles() {
        return Collections.singletonList(
            new RoleDefinition(
                "MY_PROJECT_ROLE",
                "My Project Role",
                "This is a new project role"
            )
        );
    }
}|
A new role can inherit from a built-in role: In the previous example, the Same principle applies for global roles. |
Those roles becomes eligible for selection when managing accounts and groups.
Note that functions (built-in or contributed) can be associated to those new roles - see Adding functions. By default, no function is associated to a contributed role.
15.10.16. Extending confidential stores
Extensions can define a custom confidential store used to store encryption keys.
Create a component which extends the AbstractConfidentialStore class:
@Component
@ConditionalOnProperty(name = OntrackConfigProperties.KEY_STORE, havingValue = "custom")
public class CustomConfidentialStore extends AbstractConfidentialStore {

    public CustomConfidentialStore() {
        LoggerFactory.getLogger(CustomConfidentialStore.class).info(
                "[key-store] Using custom store"
        );
    }

    @Override
    public void store(String key, byte[] payload) throws IOException {
      // ...
      // Stores the key
    }

    @Override
    public byte[] load(String key) throws IOException {
      // ...
      // Retrives the key or ...
      return null;
    }
}
Note the use of the ConditionalOnProperty, which allows to select this store when the ontrack.config.key-storeproperty is set to custom.
15.10.17. Free text annotations
Some free text can be entered as description for some elements of the model and can be automatically extended with hyperlinks.
See [validation-run-status-hyperlink] for this feature in the validation run statuses.
Using extensions, it is possible to extend this hyperlinked to other elements.
For example, let’s imagine that we have a system
where all references like [1234] can be replaced
to a link to http://reference/1234 with 1234
as a text.
For this, you have to create a @Component bean which
implements the FreeTextAnnotatorContributor interface.
The getMessageAnnotators returns a list
of `MessageAnnotator`s used to transform the text
into a tree of nodes (typically some HTML).
In our example, this can give something like:
@Component
class RefFreeTextAnnotatorContributor : FreeTextAnnotatorContributor {
    override fun getMessageAnnotators(entity: ProjectEntity): List<MessageAnnotator> {
        val regex = "\\[(d+)\\]".toRegex()
        return listOf(
                RegexMessageAnnotator(
                        "\\[d+]\\"
                ) { match ->
                    val result = regex.matchEntire(match)
                    result
                            ?.let {
                                val id = it.groups[1].value.toInt(10)
                                MessageAnnotation.of("a")
                                        .attr("href", "http://reference/$id")
                                        .text(id.toString())
                            }
                            ?: match
                }
        )
    }
}
This component returns a single RegexMessageAnnotator (other implementations are of course possible,
but this one is very convenient) which, given a regular expression, uses any match to transform
into something else.
In our example, we extract the ID from the expression and return a link.
15.10.18. Label providers
Labels can be created and associated manually with projects.
Ontrack allows also some automation of this process using the concept of a label provider.
|
Labels created and associated to projects by label providers cannot be managed manually: they cannot be edited, deleted or unselected. |
Implementation
A label provider is a Service which extends
the LabelProvider class and returns a list of
labels for a project.
For example, we could have a label provider which associates a "quality" label according to the "health" of the validation stamps in all "main" branches of the project. The label category would be "quality" and different names could be "high", "medium" and "low".
The code would look like:
@Service
class QualityLabelProvider : LabelProvider {

    override val name: String = "Quality"

    override val isEnabled: Boolean = true

    override fun getLabelsForProject(project: Project): List<LabelForm> {
      // Computes quality of the project
      val quality: String = ...
      // Returns a label
      return listOf(
         LabelForm(
            category = "quality",
            name = quality,
            description = "",
            color = ... // Computes color according to quality
         )
      )
   }
}
Activation
Even if you code such a label provider, nothing will happen until you activate the collection of labels.
Ontrack disables this collection by default, because there is no default label provider and that would be a useless job.
To activate the label collection job, just set the
ontrack.config.job-label-provider-enabled
configuration property
to true.
Additionally, the label collection can be configured by administrators in the Settings:
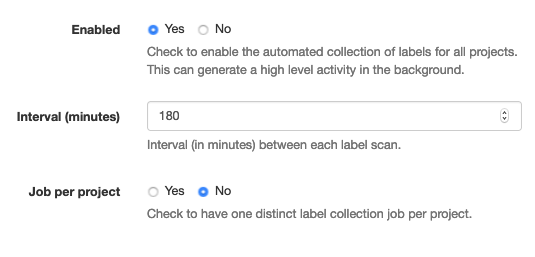
-
Enabled - Check to enable the automated collection of labels for all projects. This can generate a high level activity in the background.
-
Interval - Interval (in minutes) between each label scan.
-
Per project - Check to have one distinct label collection job per project.
15.10.19. Extending promotion checks
Promotion checks like "checking if the previous promotion is granted"
are built-in in Ontrack but one can create its own by creating instances
of the PromotionRunCheckExtension extension.
For example, to create a check on the name of the promotion level, that it should be uppercase only:
@Component
class UppercasePromotionRunCheckExtension(
    extensionFeature: YourExtensionFeature
): AbstractExtension(extensionFeature), PromotionRunCheckExtension {
    override fun checkPromotionRunCreation(promotionRun: PromotionRun) {
        if (promotionRun.promotionLevel.name != promotionRun.promotionLevel.name.toUpperCase()) {
            throw UppercasePromotionRunCheckException(/* ... */)
        }
    }
}
15.10.20. Extending the search
The Search capabilities of Ontrack can be extended through extensions and the core capabilities are also coded through extensions.
A Search extension is a component which implements the SearchIndexer interface.
|
In versions 3.40 and before, search extensions were done using The |
Search indexer overview
A SearchIndexer is responsible for two things:
-
feeding a search index
-
transforming found index entries into displayable search results
The SearchIndexer must be parameterized by a SearchItem class -
see
The indexerName is the display name for the indexer, used to log
information or to name the indexation jobs.
Indexation jobs can be totally disabled by setting true as
the isIndexationDisabled property. They cannot even be triggered
manually - set isIndexationDisabled to true when search indexes
are not applicable. For example, some SearchIndexer instances
might be fed by other indexers.
The indexerSchedule is used to set a schedule to the
indexation job. It defaults to Schedule.NONE
meaning that the job can be run only manually. Set another
schedule for an automated job.
The indexName defines the name of the technical index used
by this SearchIndexer - when using ElasticSearch, it corresponds
to the name of ElasticSearch index to use. The index can be configured
by setting the indexMapping property - see Search indexation mapping
for more information on this subject.
|
At Ontrack startup time, all indexes are created (in ElasticSearch) and their mapping updated. |
The searchResultType defines the type of result returned by an index
search capability. It’s used:
-
to provide a user a way to filter on the types of results
-
a way for the front-end to associate an icon to the type of result
For example:
@Component
class MySearchIndexer: SearchIndexer<MySearchItem> {
    override val searchResultType = SearchResultType(
            feature = feature.featureDescription,
            id = "my-result",
            name = "My result",
            description = "Use a comma-separated list of tokens"
    )
}
The feature is the ExtensionFeature associated with this
SearchIndexer (see Coding an extension).
The description property is used to describe the type of search
token one should use to find this type of result (when
applicable).
Search indexation
The indexAll method is called by the system when indexation
job for this indexer is enabled (it is by default, unless
isIndexationDisabled returns true).
It must:
-
loop over all items to be indexed for a search (for example: all projects for the project indexer)
-
transform all those items into instances of the
SearchItemclass associaed with this indexer (for example: keeping only the project ID, its name and description) -
call the the provided
processorfunction
|
The |
For example:
override fun indexAll(processor: (ProjectSearchItem) -> Unit) {
    structureService.projectList.forEach { project ->
        processor(ProjectSearchItem(project))
    }
}
Behind the scene, the indexation job will send the items to index to an index service in batches (which makes the indexation quite performant).
The batch size is set by default to 1000 but can be:
-
configured using the
ontrack.config.search.index.batchproperty -
set explicitly using the
indexBatchproperty of theSearchIndexer(this takes precedence)
Search results
When a search is performed, the SearchService will call
the toSearchResult method of the SearchIndexer in order
to transform an indexed item into a result which can be displayed
to the user.
|
See the documentation of the |
Usually, the indexer will:
-
load the actual Ontrack object or extract information from the indexed item (this latter method is preferred for performance reasons)
-
in particular, it’ll check if the target object makes sense: does it still exist? Is it authorized to the current user?
-
setup a
SearchResultinstance to describe the result
For example, for the build indexer:
override fun toSearchResult(id: String, score: Double, source: JsonNode): SearchRe
        structureService.findBuildByID(ID.of(id.toInt()))?.run {
            SearchResult(
                    title = entityDisplayName,
                    description = description ?: "",
                    uri = uriBuilder.getEntityURI(this),
                    page = uriBuilder.getEntityPage(this),
                    accuracy = score,
                    type = searchResultType
            )
        }
In this example:
-
findBuildByIDchecks both the existence of the build and if it is accessible by the current user, returningnullwhen not available -
the
titleof the result is set of the complete build name (including project and branch name) -
the
uriandpagecan be computed using an injectedURIBuilder -
the
accuracyis the score returned by ElasticSearch -
for the
typejust use thesearchResultTypeof the indexer
As of now, the accuracy is used for sorting results, but is not displayed
|
|
The |
Search index items
The SearchItem class used to parameterize the SearchIndexer
must return two values:
-
id- the unique ID of this item in the index -
fields- a map of values to store together with the index
Most of the times, you can define:
-
a primary constructor listing the properties who want to store
-
a secondary constructor using the domain model of Ontrack
Example for the Git commit indexer:
class GitCommitSearchItem(
        val projectId: Int,
        val gitType: String,
        val gitName: String,
        val commit: String,
        val commitShort: String,
        val commitAuthor: String,
        val commitMessage: String
) : SearchItem {

    constructor(project: Project, gitConfiguration: GitConfiguration, commit: GitCommit) : this(
            projectId = project.id(),
            gitType = gitConfiguration.type,
            gitName = gitConfiguration.name,
            commit = commit.id,
            commitShort = commit.shortId,
            commitAuthor = commit.author.name,
            commitMessage = commit.shortMessage
    )

    override val id: String = "$gitName::$commit"

    override val fields: Map<String, Any?> = asMap(
            this::projectId,
            this::gitType,
            this::gitName,
            this::commit,
            this::commitAuthor,
            this::commitShort,
            this::commitMessage
    )
}
For the fields of the item, try to get only simple types
or list of simple types.
The asMap utility method is optional and can be replaced by
a direct map construction. However, it avoids to hard-code
the field names and uses the property references instead.
Search indexation mapping
By default, indexes are mapped automatically to the provided fields (like in ElasticSearch) but explicit mappings can be provided to:
-
disable the indexation of some fields (like the
projectIdin the example above - while this field is needed for creating a search result, it should not be used for searches) -
set a type, like keyword or text (the search won’t work the same way)
-
boosting the search result score on some fields (a match on a key might be better than a match on a free description text)
|
While the |
In order to specify a mapping, the indexMapping of the SearchIndexer
must return an instance of SearchIndexMapping.
While it’s possible to build such an instance manually, it’s more convenient to use the provided DSL. For example, for the Git commit indexer mentioned above:
override val indexMapping: SearchIndexMapping? = indexMappings<GitCommitSearchItem> {
    +GitCommitSearchItem::projectId to id { index = false }
    +GitCommitSearchItem::gitType to keyword { index = false }
    +GitCommitSearchItem::gitName to keyword { index = false }
    +GitCommitSearchItem::commit to keyword { scoreBoost = 3.0 }
    +GitCommitSearchItem::commitShort to keyword { scoreBoost = 2.0 }
    +GitCommitSearchItem::commitAuthor to keyword()
    +GitCommitSearchItem::commitMessage to text()
}
The syntax is:
+<SearchItem::property>> [to <type>[ { <configuration> }]]*The type for the property can be set using:
-
idfor along -
keyword -
text -
any other type supported by ElasticSearch using `type("typeName")
The configuration is optional but accepts the following properties:
-
index: Boolean- unset by default - to specify if this property must be indexed or not -
scoreBoost: Double- multiplicator for the significance of a match on this field (similar to the boost indicator in ElasticSearch)
A property can be associated with two types, for example when a field can be both considered as a keyword or as plain text.
+SearchItem::myProperty to keyword { scoreBoost = 2.0 } to text()Search indexation jobs
Unless its isIndexationDisabled property returns true, every
SearchIndexer is associated with a job which
runs the indexation of all
items.
By default, those jobs must be launched manually but the indexSchedule
can be used to define a run schedule.
Additionally, there is "All re-indexations" job which launches all re-indexations ; this is useful when migrating Ontrack to a deployment using ElasticSearch or to reset all indexes.
Search result icon
The searchResultType returned by a SearchIndexer contains
a feature description and an ID. Both are used to identify the
path to an icon which is used on client side:
-
in the search box dropdown to select and restrict the type of result
-
in the list of results
The icon (PNG, square, will be rescaled at client side) must be put in
the resources at:
static/extension/<feature>/search-icon/<id>.pngwhere:
-
<feature>is the feature ID -
<id>is the search result type id
Search indexing on events
Re-indexation of a complete index is costly. While some indexes don’t have any other choice but to recompute the index regularly, it’s more efficient to have the following steps:
-
re-indexation once (when Ontrack is migrated to ElasticSearch)
-
populating the index on events
Example: the project index is updated when a project is created, updated or deleted.
The type of event to listen to depends on the type of indexed item, but most of the cases are covered by:
-
implement
EventListener- when you want to listen to events on project entities like projects, branches, validation runs, etc. -
PropertyType.onPropertyChanged/onPropertyDeletedto react on properties being created, updated or deleted -
other types of listeners, more specialized, are also available in Ontrack
In all cases, you have to inject the SearchIndexService and
call the appropriate methods, typically createSearchIndex,
updateSearchIndex and deleteSearchIndex, to update the index.
|
Don’t try to cover all the cases. For example, if your index is linked
to a build property, listen only to the property change, and not to
the events occurring to the build, its branch or its project. It’s
better to check in the |
16. Operations
16.1. Metrics
Ontrack can export operational & data metrics to different systems:
-
Prometheus
-
InfluxDB
-
Elastic
By default, only the Prometheus export is enabled.
The list of available metrics is available at Monitoring.
16.2. Elastic metrics
To enable the export of metrics into Elastic, set the ontrack.extension.elastic.metrics.enabled configuration property to true.
See [configuration-properties-elastic] for the configuration of this export to Elastic.
When this export of metrics to Elastic is enabled, Ontrack will provide operational metrics about this export, typically available in Prometheus:
-
ontrack_extension_elastic_metrics_queue- current size of the queue -
ontrack_extension_elastic_metrics_buffer- current size of the buffer
16.3. InfluxDB metrics
The InfluxDB extension is shipped by default with Ontrack but is activated only if some properties are correctly set:
| Property | Environment variable | Default | Description |
|---|---|---|---|
|
|
|
Enables the export of run info to InfluxDB |
|
|
"http://localhost:8086" |
URI of the InfluxDB database |
Optionally, the following properties can also be set:
| Property | Environment variable | Default | Description |
|---|---|---|---|
|
|
"root" |
User name to connect to the InfluxDB database |
|
|
"root" |
Password to connect to the InfluxDB database |
|
|
"ontrack" |
Name of the InfluxDB database |
|
|
|
If |
|
|
|
If |
|
|
|
Level of log when communicating with InfluxDB. Possible values are: |
When an InfluxDB connector is correctly set, some Ontrack information is automatically sent to create timed values:
16.3.1. InfluxDB management
In case the connection to InfluxDB drops, Ontrack will re-attempt to reconnect after 15 minutes by default.
|
The retry period can be configured using the |
You can force Ontrack to reconnect using several ways:
-
through the
POST /manage/influxdbmanagement end point if you have access to it (depending on your installation) -
through the
POST /extension/influxdbHTTP end point if you’re an administrator -
through the UI under the _InfluxDB status" user menu:
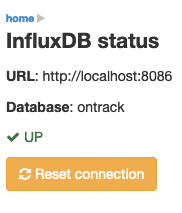
16.4. Logging
Ontrack is using Spring Boot default logging settings.
16.4.1. Enabling JSON logging
To enable JSON logging, just add the logging-json profile to Ontrack.
For example:
-
spring.profiles.active=prod,logging-jsonwhen using system properties -
or
SPRING.PROFILES.ACTIVE=prod,logging-jsonwhen using environment variables -
PROFILE=prod,logging-jsonwhen using the Docker image
17. Appendixes
17.1. Configuration properties
Ontrack uses the Spring Boot mechanism for its configuration. See the documentation on how to set those properties in your Ontrack installation.
All Spring Boot properties are available for configuration.
Additionally, Ontrack defines the following ones.
The names of the configuration properties are given for a .properties
file format but you can configure them in YAML of course.
They can also be provided as system properties or environment variables.
See the
Spring Boot documentation
for more details.
|
| This sample file is meant as a guide only. Do not copy/paste the entire content into your application; rather pick only the properties that you need. |
| When applicable, the default value is mentioned. |
17.1.1. Notifications configuration
General configuration for the notifications.
| Name | Environment | Description | Default value | Notes |
|---|---|---|---|---|
|
|
Are the notifications enabled? |
|
|
|
|
Is the in-memory notification channel enabled? Used for testing only. |
|
|
|
|
From address for the email notifications |
|
|
|
|
Maximum parallel processing of queues |
|
|
|
|
Is asynchronous processing of notifications enabled? |
|
|
|
|
Are internal webhooks enabled? |
|
17.1.2. WorkflowConfigurationProperties
| Name | Environment | Description | Default value | Notes |
|---|---|---|---|---|
|
|
Time to wait for the completion of the parents of a node in a workflow |
|
17.1.3. General configuration
General configuration of Ontrack.
| Name | Environment | Description | Default value | Notes |
|---|---|---|---|---|
|
|
Disabling the collection of log entries in the application |
|
|
|
|
Maximum number of errors to display as notifications in the GUI |
|
|
|
|
Maximum number of days to keep the log entries |
|
|
|
|
Directory which contains all the working files of Ontrack. It is usually set by the installation. |
|
|
|
|
# Maximum number of builds which can be returned by a build filter. Any number above is truncated down to this value |
|
|
|
|
Testing the configurations of external configurations. Used only for internal testing, to disable the checks when creating external configurations. |
|
|
|
|
engine field |
|
|
|
|
directory field |
`` |
|
|
|
Activation of the provided labels collection job |
|
|
|
|
Interval (in minutes) between each refresh of the job list |
|
|
|
|
Set to true to not start any job at application startup. The administrator can restore the scheduling jobs manually |
|
|
|
|
Number of threads to use to run the background jobs |
|
|
|
|
Enabling the scattering of jobs. When several jobs have the same schedule, this can create a peak of activity, potentially harmful for the performances of the application. Enabling scattering allows jobs to be scheduled with an additional delay, computed as a fraction of the period. |
|
|
|
|
Scattering ratio. Maximum fraction of the period to take into account for the scattering. For example, setting 0.5 would not add a period greater than half the period of the job. Setting 0 would actually disable the scattering altogether. |
|
|
|
|
# Global timeout for all jobs. Any job running longer than this time will be forcibly stopped (expressed by default in hours) |
|
|
|
|
Amount of time to wait between two controls of the job timeouts (expressed by default in minutes) |
|
|
|
|
Key store type to use to store encryption keys |
|
|
|
|
When performing full indexation, the indexation is performed by batch. The parameter below allows to set the size of this batch processing. Note: this is a default batch size. Custom indexers can override it. |
|
|
|
|
Option to ignore errors when creating indexes. For test only, allowing for concurrent testing. |
|
|
|
|
By default, indexation is ElasticSearch is done after some time after the index has been requested. The flag below forces the index to be refreshed immediately. This SHOULD NOT be used in production but is very useful when testing Ontrack search capabilities |
|
|
|
|
When performing full indexation, the indexation is performed by batch. The parameter below allows to generate additional logging when indexing actions are actually taken. |
|
|
|
|
When performing full indexation, the indexation is performed by batch. The parameter below allows to generate additional deep level logging for all actions on Git issues. Note: if set to |
|
|
|
|
enabled field |
|
Deprecated: Will be removed in V5 |
|
|
maxCount field |
|
Deprecated: Will be removed in V5 |
|
|
validity field |
|
Deprecated: Will be removed in V5 |
|
|
password field |
|
|
|
|
transientValidity field |
|
|
|
|
validity field |
|
|
|
|
errors field |
|
|
|
|
HTML tags to accept on top of the default ones |
|
|
|
|
enabled field |
|
|
|
|
uri field |
||
|
|
Root URL for this Ontrack installation, used for notifications |
17.1.4. GitHub configuration
Configuration of the GitHub extension
| Name | Environment | Description | Default value | Notes |
|---|---|---|---|---|
|
|
Set to |
|
17.1.5. GitHub Ingestion configuration
Configuration of the ingestion of GitHub workflows
| Name | Environment | Description | Default value | Notes |
|---|---|---|---|---|
|
|
Set to |
|
|
|
|
By default, true, using a RabbitMQ engine. Set to false to use a direct processing (synchronous) |
|
|
|
|
List of specific bindings. Each entry is indexed by the name of the configuration (just a key). |
Empty |
|
|
|
Regex for the repository owner, null for match all |
`` |
|
|
|
Regex for the repository name, null for match all |
`` |
|
|
|
Extending the number of default queues to spread the load |
|
17.1.6. Jenkins configuration
Configuration of the connection to Jenkins
| Name | Environment | Description | Default value | Notes |
|---|---|---|---|---|
|
|
Default timeout to connect to Jenkins, in seconds |
|
17.1.7. Auto-versioning configuration
Configuration of the auto-versioning
| Name | Environment | Description | Default value | Notes |
|---|---|---|---|---|
|
|
By default, Ontrack uses RabbitMQ queue to manage the auto versioning processes. Disabling this mechanism is not recommended and is used only for internal testing. |
|
|
|
|
Cancelling the previous orders for the same source and same target if a new order comes in |
|
|
|
|
List of projects which must have dedicated queues |
|
|
|
|
Default number of RabbitMQ queues to use |
|
17.1.8. Terraform Cloud configuration
Configuration of the TFC hooks.
| Name | Environment | Description | Default value | Notes |
|---|---|---|---|---|
|
|
Set to |
|
17.1.9. Time since event metrics configuration
Configuration of the export of the metrics of the "Time since events" (TSE).
| Name | Environment | Description | Default value | Notes |
|---|---|---|---|---|
|
|
Is the "time since event" metric enabled? |
|
|
|
|
Interval between two scans for "time since events" (expressed by default in minutes) |
|
17.1.10. Git configuration
Configuration of the connections to Git.
| Name | Environment | Description | Default value | Notes |
|---|---|---|---|---|
|
|
Cron for the job (empty to let it run manually) |
`` |
|
|
|
Cleanup of Git indexations working directories |
|
|
|
|
Timeout for the Git indexations (expressed by default in minutes) |
|
|
|
|
Caching duration for pull requests. Time before a new connection is needed to get information about the PR from the SCM. |
|
|
|
|
Is the cache for pull requests enabled? |
|
|
|
|
Days before deleting a PR branch after it’s been closed or merged |
|
|
|
|
Days before disabling a PR branch after it’s been closed or merged |
|
|
|
|
Auto cleanup of pull requests |
|
|
|
|
Is the support for pull requests enabled? |
|
Deprecated: Will be removed in V5. Support for pull requests will be transformed in V5. |
|
|
Timeout before giving up on PR check |
|
Deprecated: Will be removed in V5. Support for pull requests will be transformed in V5. |
|
|
Interval between retries (by default in seconds and set to 30 seconds by default). |
|
Deprecated: Will be removed in V5. No fetch nor clone of Git repository will be done by Ontrack any longer. |
|
|
Number of times we accept a "no remote" exception is thrown before deactivating the project in Ontrack. If ⇐ 0, we always retry and never disable the project. |
|
Deprecated: Will be removed in V5. No fetch nor clone of Git repository will be done by Ontrack any longer. |
|
|
Timeout (by default in minutes) for a given remote operation to complete (like fetch & clone) Set to 10 minutes by default. |
|
Deprecated: Will be removed in V5. No fetch nor clone of Git repository will be done by Ontrack any longer. |
|
|
Timeout (by default in seconds) for a given remote operation to start (like fetch & clone). Leave 0 to use the default system value. Set to 60 seconds by default. This timeout is used for the connection part, not the total duration of the operation. |
|
Deprecated: Will be removed in V5. No fetch nor clone of Git repository will be done by Ontrack any longer. |
17.1.11. Git Search configuration
Configuration of the search for Git objects.
| Name | Environment | Description | Default value | Notes |
|---|---|---|---|---|
|
|
Interval between two indexations, in minutes. |
|
|
|
|
Enabling auto indexation |
|
17.1.12. Queues configuration
General configuration for the RabbitMQ queues.
| Name | Environment | Description | Default value | Notes |
|---|---|---|---|---|
|
|
Emits a warning if the queues are not asynchronous (careful: the property name is a misnomer and will be renamed at one point into warnIfSync |
|
|
|
|
async field |
|
|
|
|
specific field |
Empty |
|
|
|
Number of queues |
|
|
|
|
async field |
|
17.1.13. Recordings configuration
| Name | Environment | Description | Default value | Notes |
|---|---|---|---|---|
|
|
cleanup field |
Empty |
|
|
|
How much more time after the retention must all the records be kept |
|
|
|
|
How much time must the closed records be kept |
|
17.1.14. CasC configuration
Configuration of the "Configuration as Code".
| Name | Environment | Description | Default value | Notes |
|---|---|---|---|---|
|
|
Is the configuration as code enabled? |
|
|
|
|
List of resources to load and to monitor for changes |
|
|
|
|
Cron schedule for the reloading. Leave blank or empty to disable the automated reloading. |
`` |
|
|
|
Enables the creation of a job to reload the CasC. |
|
|
|
|
Directory used to store the secret files (used only when type == "file" |
`` |
|
|
|
Source for the secrets. Either "env" (default) or "file" |
|
|
|
|
Is the upload of Casc YAML file enabeld? |
|
17.1.15. Indicators configuration
Configuration of the indicators
| Name | Environment | Description | Default value | Notes |
|---|---|---|---|---|
|
|
When a category/type does not exist any longer for a given import ID, must it be deleted? |
|
|
|
|
Cron for the scheduled export of metrics |
|
|
|
|
Enabling the scheduled export of metrics (a manual job is always available) |
|
17.1.16. License configuration
| Name | Environment | Description | Default value | Notes |
|---|---|---|---|---|
|
|
License provider |
|
|
|
|
Duration before the expiry date, when to emit a warning (expressed by defaults in days) |
|
17.1.17. Embedded license configuration
| Name | Environment | Description | Default value | Notes |
|---|---|---|---|---|
|
|
License key |
`` |
17.1.18. Fixed license configuration
| Name | Environment | Description | Default value | Notes |
|---|---|---|---|---|
|
|
Is the license active? |
|
|
|
|
Assignee of the license |
|
|
|
|
Maximum number of projects |
|
|
|
|
Name of the license |
|
|
|
|
Validity of the license |
`` |
17.1.19. StripeLicenseConfigurationProperties
| Name | Environment | Description | Default value | Notes |
|---|---|---|---|---|
|
|
subscription field |
`` |
|
|
|
token field |
`` |
17.1.20. Artifactory configuration
Configuration of the Artifactory extension
| Name | Environment | Description | Default value | Notes |
|---|---|---|---|---|
|
|
Disabling the build sync jobs? |
|
17.1.21. Vault configuration
Ontrack can be configured to use Vault to store the encryption keys.
| Name | Environment | Description | Default value | Notes |
|---|---|---|---|---|
|
|
Prefix to be used to store the keys |
|
|
|
|
Token for the authentication |
|
|
|
|
URI to the Vault end point |
17.1.22. InfluxDB configuration
Configuration of the connection to InfluxDB for the export of metrics.
| Name | Environment | Description | Default value | Notes |
|---|---|---|---|---|
|
|
If the database must be created automatically |
|
|
|
|
Name of the InfluxDB database where to send the metrics |
|
|
|
|
Enabling the export of metrics to InfluxDB |
|
|
|
|
Log level of the InfluxDB commands |
|
|
|
|
Password used to connect to InfluxDB |
|
|
|
|
Prefix to add before the metric name. For example, if prefix = * For example, if prefix = * For example, if prefix = * |
|
|
|
|
If the SSL connection must be valid |
|
|
|
|
URL of the InfluxDB instance |
||
|
|
Username used to connect to InfluxDB |
|
|
|
|
Duration after which the connection to InfluxDB is checked for validity and renewed if necessary. |
|
17.1.23. ElasticSearch metrics configuration
Configuration of the export of metrics into ElasticSearch
| Name | Environment | Description | Default value | Notes |
|---|---|---|---|---|
|
|
Set to false to disable the deletion of the index when performing a re-indexation |
|
|
|
|
Set to true to enable the API Compatibility mode when accessing a 8.x ES server. |
|
|
|
|
Must we trace the behaviour of the export of the metrics in the logs? |
|
|
|
|
Is the export of metrics to Elastic enabled? |
|
|
|
|
Flag to enable immediate re-indexation after items are added into the index (used mostly for testing. It should not be used in production. If set to true, this overrides the asynchronous processing of the metrics |
|
|
|
|
Name of the index to contains all Ontrack metrics |
|
|
|
|
Every such interval, the current buffer of metrics is flushed to Elastic (expressed by default in minutes) |
|
|
|
|
Defines where the Elastic metrics should be sent. Possible values are: * MAIN - When this option is selected, the ES instance used by Ontrack for the regular search will be used. * CUSTOM -When this option is selected, the ES instance defined by the metrics properties will be used. |
|
17.1.24. RabbitMQ configuration
Configuration of the client from Ontrack to Rabbit MQ. Note that basic connection parameters are handled using Spring Boot configuration.
| Name | Environment | Description | Default value | Notes |
|---|---|---|---|---|
|
|
True (default) to make the sending of messages part of the current transaction. |
|
17.2. Templating engine
The templating engine is used to render some text (plain or in some markup language).
Each template is available to refer to a context, typically linked to an event. These context items can be rendered directly, enriched through source fields, optional configured, and finally filtered for additional formatting.
The general format of a template is a string which contains expressions like:
${expression}Each expression is either a function call or a context reference.
For a function call, the general syntax is:
#.function?name1=value1&name2=value2|filter|
A function can have any number of named configuration parameters or none at all like below: |
For a context reference, the general syntax is similar:
ref(.source)?name1=value1&name2=value2|filterThe .source is optional and allows to refine the context reference.
Examples of valid context references:
project
branch.scmBranch|urlencode
promotionRun.changelog?acrossBranches=false
The list of context elements (project, branch, …) depends on the execution context for the template.
For example, when using notifications, it all depends on the event being subscribed to.
To see the list of possible events and their contexts, see Event types.
The next sections list the available sources, functions, contexts and filters.
There are also special objects, known as templating renderable, which are specific to some contexts, like Auto versioning on promotion or Workflows.
17.2.1. Execution contexts
Different root contexts are available for the template expressions, depending on the context in which the template is executed.
For a notification, the template is always executed in regard to an event. Each event provides its own list of root contexts. See the list of events.
There are several specific contexts:
Auto-versioning context
For the templates used during an auto-versioning process (post-processing parameters, pull request templates, etc.), the following root contexts are available:
| Context | Type | Description |
|---|---|---|
|
Project |
Reference to the project where the promotion was done |
|
Branch |
Branch being updated |
|
Build |
Build which has been promoted |
|
Promotion run |
Promotion object |
|
String |
Name of the promotion |
|
String |
First path being updated |
|
String |
Comma-separated list of all paths being updated |
|
String |
Target property being updated |
|
String |
Version being set |
|
Specific object for the auto-versioning |
17.2.2. List of templating sources
Build.changelog
Renders a change log for this build.
The "to build" is the one being referred to.
The "from build" is the build whose ID is set by the "from" parameter.
If project is set to a comma-separated list of strings, the change log will be rendered
for the recursive links, in the order to the projects being set (going deeper and deeper
in the links).
Applicable for:
-
build
Configuration:
-
allQualifiers - Boolean - required - Loop over all qualifiers for the last level of
dependencies, including the default one. Qualifiers atdependenciestake precedence. -
commitsOption - NONE, OPTIONAL, ALWAYS - required - Defines how to render commits for a change log
-
defaultQualifierFallback - Boolean - required - If a qualifier has no previous link, uses the default qualifier (empty) qualifier.
-
dependencies - List - required - Comma-separated list of project links to follow one by one for a get deep change log. Each item in the list is either a project name, or a project name and qualifier separated by a colon (:).
-
empty - String - required - String to use to render an empty or non existent change log
-
from - Int - required - ID to the build to get the change log from
-
title - Boolean - required - Include a title for the change log
Example:
${build.changelog?from=1}description
Getting the description for an entity.
Applicable for:
-
project
-
branch
-
promotion level
-
validation stamp
-
build
-
promotion run
-
validation run
Configuration:
-
default - String - optional - default field
Example:
${branch.description}linked
Getting a linked build and displaying its name or release name.
Applicable for:
-
build
Configuration:
-
mode - NAME, RELEASE, AUTO - required - How to the linked build must be rendered.
-
name: build name only
-
release: build release/version/label (required in this case)
-
auto: build release/version/label if available, build name otherwise
-
-
project - String - required - Name of the project to get a link to.
-
qualifier - String - optional - Qualifier of the link (optional).
Example:
${build.linked?project=dependency&mode=auto}meta
Gets some meta information from a project entity.
Applicable for:
-
project
-
branch
-
promotion level
-
validation stamp
-
build
-
promotion run
-
validation run
Configuration:
-
category - String - optional - Category of the key of the meta information to get
-
error - Boolean - required - If true, an error is raised when meta information is not found
-
link - Boolean - required - If true, the link of the meta information is rendered instead of the value
-
name - String - required - Name of the key of the meta information to get
Example:
${build.release}PromotionRun.changelog
Renders a change log for this promotion run.
The "to build" is the one being promoted.
The "from build" is the last build (before this one) having been promoted to the associated promotion level.
If no such previous build is found on the associated branch, the search will be done
across the whole project, unless the acrossBranches configuration parameter is set to false.
If project is set to a comma-separated list of strings, the change log will be rendered
for the recursive links, in the order to the projects being set (going deeper and deeper
in the links).
Applicable for:
-
promotion run
Configuration:
-
acrossBranches - Boolean - required - By default, if a previous promotion is not found on the current branch, it’ll be looked for in all branches of the projects. Set this parameter to
falseto disable this behaviour. -
allQualifiers - Boolean - required - Loop over all qualifiers for the last level of
dependencies, including the default one. Qualifiers atdependenciestake precedence. -
commitsOption - NONE, OPTIONAL, ALWAYS - required - Defines how to render commits for a change log
-
defaultQualifierFallback - Boolean - required - If a qualifier has no previous link, uses the default qualifier (empty) qualifier.
-
dependencies - List - required - Comma-separated list of project links to follow one by one for a get deep change log. Each item in the list is either a project name, or a project name and qualifier separated by a colon (:).
-
empty - String - required - String to use to render an empty or non existent change log
-
title - Boolean - required - Include a title for the change log
Example:
${promotionRun.changelog}qualifiedLongName
Getting the qualified long name for an entity. For a branch, it’d look like branch project/main.
Applicable for:
-
project
-
branch
-
promotion level
-
validation stamp
-
build
-
promotion run
-
validation run
Example:
${branch.qualifiedLongName}release
Gets the release/version/label associated to a build or renders an empty string is there is none.
Applicable for:
-
build
Example:
${build.release}17.2.3. List of templating functions
datetime
Displays the current time
Configuration:
-
days - Long - optional - days field
-
format - String - optional - format field
-
hours - Long - optional - hours field
-
minutes - Long - optional - minutes field
-
months - Long - optional - months field
-
seconds - Long - optional - seconds field
-
timezone - String - optional - timezone field
-
years - Long - optional - years field
Example:
#.datetime?format=yyyy-MM-dd&timezone=Europe/Brussels&days=1lastPromotion
Renders the last build having a given promotion in a project
Configuration:
-
branch - String - optional - Restricting the search to this branch
-
link - Boolean - optional - Renders a link to the build or only the name
-
name - String - optional - Using the release name or build name.
autofor the first available,releasefor a required release name,namefor only the name -
project - String - required - Project where to look for the build
-
promotion - String - required - Name of the promotion level to look for
Example:
#.lastPromotion?project=prj&promotion=BRONZElink
Creates a link
Configuration:
-
href - String - required - Address for the link. This must be a value which is part of the templating context.
-
text - String - required - Text of the link. This must be a value which is part of the templating context.
Example:
#.link?text=PR_TITLE&href=PR_LINKpipeline
Renders a slot pipeline using its ID
Configuration:
-
id - String - optional - ID of the slot pipeline. Defaults to PIPELINE_ID
Example:
#.pipeline

or

#.pipeline?id=workflow.pipeline.targetPipelineId
since
Renders a period of time
Configuration:
-
format - String - optional - How to render the period. Supported values are: seconds, millis. Defaults to seconds.
-
from - String - required - Origin time. Expression which must be rendered as a date/time
-
ref - String - optional - Last time. Expression which is must be rendered as a date/time. Defaults to current time
Example:
#.since?from=workflowInfo.start17.2.5. List of special templating objects
Auto-versioning context (av)
The av context can be used in templates in the PR title & body templates, in order to access information about the auto-versioning request.
Context: Auto-versioning
Available fields:
-
changelog: Changelog for the project & version being updated-
allQualifiers - Boolean - required - Loop over all qualifiers for the last level of
dependencies, including the default one. Qualifiers atdependenciestake precedence. -
commitsOption - NONE, OPTIONAL, ALWAYS - required - Defines how to render commits for a change log
-
defaultQualifierFallback - Boolean - required - If a qualifier has no previous link, uses the default qualifier (empty) qualifier.
-
dependencies - List - required - Comma-separated list of project links to follow one by one for a get deep change log. Each item in the list is either a project name, or a project name and qualifier separated by a colon (:).
-
empty - String - required - String to use to render an empty or non existent change log
-
title - Boolean - required - Include a title for the change log
-
Deployment context (deployment)
The deployment context is injected into workflows triggered by deployments being started, run or completed.
Context: Environments
Available fields:
-
changelog: Getting the changelog since a previous deployment-
allQualifiers - Boolean - required - Loop over all qualifiers for the last level of
dependencies, including the default one. Qualifiers atdependenciestake precedence. -
commitsOption - NONE, OPTIONAL, ALWAYS - required - Defines how to render commits for a change log
-
defaultQualifierFallback - Boolean - required - If a qualifier has no previous link, uses the default qualifier (empty) qualifier.
-
dependencies - List - required - Comma-separated list of project links to follow one by one for a get deep change log. Each item in the list is either a project name, or a project name and qualifier separated by a colon (:).
-
empty - String - required - String to use to render an empty or non existent change log
-
since - CANDIDATE, RUNNING, CANCELLED, DONE - required - Status to use when looking for the previous deployment
-
title - Boolean - required - Include a title for the change log
-
-
default: Displays a link to the deployment -
id: Displays the ID of the deployment -
link: Displays a link to the deployment -
name: Displays the name of the deployment -
number: Displays the number of the deployment
Information about the workflow (workflow)
The workflow context is used to access information about the nodes of the workflow, in notifications or other templates rendered in the context of the workflow execution.
Context: Workflow
Available fields:
-
<node id>: Getting information about a node in the current workflow-
path - String - required - JSON path to the data to render
-
17.3. Event types
Find below the list of all events and their context.
17.3.1. List of events
auto-versioning-error
When an auto versioning request fails because of a general error.
Context:
-
project- project - Target project -
branch- branch - Target branch -
xPromotionRun- promotion run - Source promotion run -
VERSION- string - Version being set -
MESSAGE- string - Auto versioning message -
ERROR- string - Error message
Default template:
Auto versioning of ${project}/${branch} for dependency ${xProject} version "${VERSION}" has failed.

${MESSAGE}

Error: ${ERROR}
auto-versioning-post-processing-error
When an auto versioning request fails because of the post-processing.
Context:
-
project- project - Target project -
branch- branch - Target branch -
xPromotionRun- promotion run - Source promotion run -
VERSION- string - Version being set -
MESSAGE- string - Auto versioning message -
LINK- string - Link to the post processing process
Default template:
Auto versioning post-processing of ${project}/${branch} for dependency ${xProject} version "${VERSION}" has failed.

${#.link?text=MESSAGE&href=LINK}
auto-versioning-pr-merge-timeout-error
When an auto versioning request fails because the corresponding PR could not be merged in time.
Context:
-
project- project - Target project -
branch- branch - Target branch -
xPromotionRun- promotion run - Source promotion run -
VERSION- string - Version being set -
PR_NAME- string - Title of the PR having been created -
PR_LINK- string - Link to the PR having been created
Default template:
Auto versioning of ${project}/${branch} for dependency ${xProject} version "${VERSION}" has failed.

Timeout while waiting for the PR to be ready to be merged.

Pull request ${#.link?text=PR_NAME&href=PR_LINK}
auto-versioning-success
When an auto versioning request succeeds with the creation of a PR (merged or not).
Context:
-
project- project - Target project -
branch- branch - Target branch -
xPromotionRun- promotion run - Source promotion run -
VERSION- string - Version being set -
MESSAGE- string - Auto versioning message -
PR_NAME- string - Title of the PR having been created -
PR_LINK- string - Link to the PR having been created
Default template:
Auto versioning of ${project}/${branch} for dependency ${xProject} version "${VERSION}" has been done.

${MESSAGE}

Pull request ${#.link?text=PR_NAME&href=PR_LINK}
delete_branch
When a branch is deleted.
Context:
-
project- project - Branch’s project -
BRANCH- string - Name of the deleted branch
Default template:
Branch ${BRANCH} has been deleted from ${project}.delete_build
When a build is deleted.
Context:
-
project- project - Build’s project -
branch- branch - Build’s branch -
BUILD- string - Name of the deleted build
Default template:
Build ${BUILD} for branch ${branch} in ${project} has been deleted.delete_configuration
When a configuration is deleted.
Context:
-
CONFIGURATION- string - Name of the configuration
Default template:
${CONFIGURATION} configuration has been deleted.delete_project
When a project is deleted.
Context:
-
PROJECT- string - Name of the deleted project
Default template:
Project ${PROJECT} has been deleted.delete_promotion_level
When a promotion level is deleted.
Context:
-
project- project - Promotion level’s project -
branch- branch - Promotion level’s branch -
PROMOTION_LEVEL- string - Deleted promotion level -
PROMOTION_LEVEL_ID- string - ID of the deleted promotion level
Default template:
Promotion level ${PROMOTION_LEVEL} for branch ${branch} in ${project} has been deleted.delete_promotion_run
When the promotion of a build is deleted.
Context:
-
project- project - Project -
branch- branch - Branch -
build- build - Promoted build -
promotionLevel- promotion level - Promotion level
Default template:
Promotion ${promotionLevel} of build ${build} has been deleted for branch ${branch} in ${project}.delete_validation_stamp
When a validation stamp is deleted.
Context:
-
project- project - Validation stamp’s project -
branch- branch - Validation stamp’s branch -
VALIDATION_STAMP- string - Name of the deleted validation stamp -
VALIDATION_STAMP_ID- string - ID of the deleted validation stamp
Default template:
Validation stamp ${VALIDATION_STAMP} for branch ${branch} in ${project} has been deleted.disable_branch
When a branch is disabled.
Context:
-
project- project - Branch’s project -
branch- branch - Disabled branch
Default template:
Branch ${branch} in ${project} has been disabled.disable_project
When a project is disabled.
Context:
-
project- project - Disabled project
Default template:
Project ${project} has been disabled.enable_branch
When a branch becomes enabled again.
Context:
-
project- project - Branch’s project -
branch- branch - Enabled branch
Default template:
Branch ${branch} in ${project} has been enabled.enable_project
When a project becomes enabled again.
Context:
-
project- project - Enabled project
Default template:
Project ${project} has been enabled.environment-creation
When an environment is created
Context:
-
ENVIRONMENT_ID- string - ID of the environment -
ENVIRONMENT_NAME- string - Name of the environment
Default template:
Environment ${ENVIRONMENT_NAME} has been created.environment-deleted
When an environment is deleted
Context:
-
ENVIRONMENT_NAME- string - Name of the environment
Default template:
Environment ${ENVIRONMENT_NAME} has been deleted.environment-updated
When an environment is updated
Context:
-
ENVIRONMENT_ID- string - ID of the environment -
ENVIRONMENT_NAME- string - Name of the environment
Default template:
Environment ${ENVIRONMENT_NAME} has been updated.image_promotion_level
When a promotion level’s image is updated.
Context:
-
project- project - Promotion level’s project -
branch- branch - Promotion level’s branch -
promotionLevel- promotion level - Updated promotion level
Default template:
Image for promotion level ${promotionLevel} for branch ${branch} in ${project} has changed.image_validation_stamp
When a validation stamp’s image is updated.
Context:
-
project- project - Validation stamp’s project -
branch- branch - Validation stamp’s branch -
validationStamp- validation stamp - Updated validation stamp
Default template:
Image for validation stamp ${validationStamp} for branch ${branch} in ${project} has changed.new_branch
When a branch is created.
Context:
-
project- project - Branch’s project -
branch- branch - Created branch
Default template:
New branch ${branch} for project ${project}.new_build
When a build is created.
Context:
-
project- project - Build’s project -
branch- branch - Build’s branch -
build- build - Created build
Default template:
New build ${build} for branch ${branch} in ${project}.new_configuration
When a configuration is created.
Context:
-
CONFIGURATION- string - Name of the configuration
Default template:
${CONFIGURATION} configuration has been created.new_project
When a project is created.
Context:
-
project- project - Created project
Default template:
New project ${project}.new_promotion_level
When a promotion level is created.
Context:
-
project- project - Promotion level’s project -
branch- branch - Promotion level’s branch -
promotionLevel- promotion level - Created promotion level
Default template:
New promotion level ${promotionLevel} for branch ${branch} in ${project}.new_promotion_run
When a build is promoted.
Context:
-
project- project - Project -
branch- branch - Branch -
build- build - Promoted build -
promotionLevel- promotion level - Promotion level -
promotionRun- promotion run - Promotion run
Default template:
Build ${build} has been promoted to ${promotionLevel} for branch ${branch} in ${project}.new_validation_run
When a build is validated.
Context:
-
project- project - Project -
branch- branch - Branch -
build- build - Validated build -
validationStamp- validation stamp - Validation stamp -
validationRun- validation run - Validation run -
STATUS- string - ID of the validation run status -
STATUS_NAME- string - Name of the validation run status
Default template:
Build ${build} has run for the ${validationStamp} with status ${STATUS_NAME} in branch ${branch} in ${project}.new_validation_run_status
When the status of the validation of a build is updated.
Context:
-
project- project - Project -
branch- branch - Branch -
build- build - Validated build -
validationStamp- validation stamp - Validation stamp -
validationRun- validation run - Validation run -
STATUS- string - ID of the validation run status -
STATUS_NAME- string - Name of the validation run status
Default template:
Status for the ${validationStamp} validation ${validationRun} for build ${build} in branch ${branch} of ${project} has changed to ${STATUS_NAME}.new_validation_stamp
When a validation stamp is created.
Context:
-
project- project - Validation stamp’s project -
branch- branch - Validation stamp’s branch -
validationStamp- validation stamp - Created validation stamp
Default template:
New validation stamp ${validationStamp} for branch ${branch} in ${project}.property_change
When a property is edited.
Context:
-
entity- any entity - Entity where the property has been edited -
PROPERTY- string - FQCN of the property type -
PROPERTY_NAME- string - Display name of the property
Default template:
${PROPERTY_NAME} property has changed for ${entity.qualifiedLongName}.property_delete
When a property is deleted.
Context:
-
entity- any entity - Entity where the property has been edited -
PROPERTY- string - FQCN of the property type -
PROPERTY_NAME- string - Display name of the property
Default template:
${PROPERTY_NAME} property has been removed from ${entity.qualifiedLongName}.reorder_promotion_level
When the promotion levels of a branch are reordered.
Context:
-
project- project - Promotion levels project -
branch- branch - Promotion levels branch
Default template:
Promotion levels for branch ${branch} in ${project} have been reordered.reorder_validation_stamp
When the validation stamps of a branch are reordered.
Context:
-
project- project - Validation stamps project -
branch- branch - Validation stamps branch
Default template:
Validation stamps for branch ${branch} in ${project} have been reordered.slot-creation
When a slot is created
Context:
-
ENVIRONMENT_ID- string - ID of the environment -
ENVIRONMENT_NAME- string - Name of the environment -
project- project - Project for the slot -
SLOT_ID- string - ID of the slot -
SLOT_QUALIFIER- string - Qualifier of the slot
Default template:
Slot ${#.slot} for environment ${ENVIRONMENT_NAME} has been created.slot-deleted
When a slot is updated
Context:
-
ENVIRONMENT_ID- string - ID of the environment -
ENVIRONMENT_NAME- string - Name of the environment -
project- project - Project for the slot -
SLOT_ID- string - ID of the slot -
SLOT_QUALIFIER- string - Qualifier of the slot
Default template:
Slot ${project} (qualifier = "${SLOT_QUALIFIER}") for environment ${ENVIRONMENT_NAME} has been deleted.slot-pipeline-cancelled
When a slot pipeline is cancelled
Context:
-
ENVIRONMENT_ID- string - ID of the environment -
ENVIRONMENT_NAME- string - Name of the environment -
project- project - Project of the build in the pipeline -
SLOT_ID- string - ID of the slot -
SLOT_QUALIFIER- string - Qualifier of the slot -
PIPELINE_ID- string - ID of the pipeline -
branch- branch - Branch of the build in the pipeline -
build- build - Build in the pipeline
Default template:
Pipeline ${#.pipeline} has been cancelled.slot-pipeline-creation
When a slot pipeline has started
Context:
-
ENVIRONMENT_ID- string - ID of the environment -
ENVIRONMENT_NAME- string - Name of the environment -
project- project - Project of the build in the pipeline -
SLOT_ID- string - ID of the slot -
SLOT_QUALIFIER- string - Qualifier of the slot -
PIPELINE_ID- string - ID of the pipeline -
branch- branch - Branch of the build in the pipeline -
build- build - Build in the pipeline
Default template:
Pipeline ${#.pipeline} has started.slot-pipeline-deployed
When a slot pipeline has completed its deployment
Context:
-
ENVIRONMENT_ID- string - ID of the environment -
ENVIRONMENT_NAME- string - Name of the environment -
project- project - Project of the build in the pipeline -
SLOT_ID- string - ID of the slot -
SLOT_QUALIFIER- string - Qualifier of the slot -
PIPELINE_ID- string - ID of the pipeline -
branch- branch - Branch of the build in the pipeline -
build- build - Build in the pipeline
Default template:
Pipeline ${#.pipeline} has been deployed.slot-pipeline-deploying
When a slot pipeline is starting its deployment
Context:
-
ENVIRONMENT_ID- string - ID of the environment -
ENVIRONMENT_NAME- string - Name of the environment -
project- project - Project of the build in the pipeline -
SLOT_ID- string - ID of the slot -
SLOT_QUALIFIER- string - Qualifier of the slot -
PIPELINE_ID- string - ID of the pipeline -
branch- branch - Branch of the build in the pipeline -
build- build - Build in the pipeline
Default template:
Pipeline ${#.pipeline} is starting its deployment.slot-pipeline-status-changed
When a slot pipeline status is updated
Context:
-
ENVIRONMENT_ID- string - ID of the environment -
ENVIRONMENT_NAME- string - Name of the environment -
project- project - Project of the build in the pipeline -
SLOT_ID- string - ID of the slot -
SLOT_QUALIFIER- string - Qualifier of the slot -
PIPELINE_ID- string - ID of the pipeline -
branch- branch - Branch of the build in the pipeline -
build- build - Build in the pipeline
Default template:
Pipeline ${#.pipeline} status has been updated.slot-pipeline-status-overridden
When a slot pipeline status is updated
Context:
-
ENVIRONMENT_ID- string - ID of the environment -
ENVIRONMENT_NAME- string - Name of the environment -
project- project - Project of the build in the pipeline -
SLOT_ID- string - ID of the slot -
SLOT_QUALIFIER- string - Qualifier of the slot -
PIPELINE_ID- string - ID of the pipeline -
branch- branch - Branch of the build in the pipeline -
build- build - Build in the pipeline -
PIPELINE_OVERRIDING_USER- string - User who has overridden the pipeline status
Default template:
Pipeline ${#.pipeline} status has been overridden by ${PIPELINE_OVERRIDING_USER}.slot-updated
When a slot is updated
Context:
-
ENVIRONMENT_ID- string - ID of the environment -
ENVIRONMENT_NAME- string - Name of the environment -
project- project - Project for the slot -
SLOT_ID- string - ID of the slot -
SLOT_QUALIFIER- string - Qualifier of the slot
Default template:
Slot ${#.slot} for environment ${ENVIRONMENT_NAME} has been updated.update_branch
When a branch is updated.
Context:
-
project- project - Branch’s project -
branch- branch - Updated branch
Default template:
Branch ${branch} in ${project} has been updated.update_build
When a build is updated.
Context:
-
project- project - Build’s project -
branch- branch - Build’s branch -
build- build - Updated build
Default template:
Build ${build} for branch ${branch} in ${project} has been updated.update_configuration
When a configuration is updated.
Context:
-
CONFIGURATION- string - Name of the configuration
Default template:
${CONFIGURATION} configuration has been updated.update_project
When a project is updated.
Context:
-
project- project - Updated project
Default template:
Project ${project} has been updated.update_promotion_level
When a promotion level is updated.
Context:
-
project- project - Promotion level’s project -
branch- branch - Promotion level’s branch -
promotionLevel- promotion level - Updated promotion level
Default template:
Promotion level ${promotionLevel} for branch ${branch} in ${project} has changed.update_validation_run_status_comment
When the status message of the validation of a build is updated.
Context:
-
project- project - Project -
branch- branch - Branch -
build- build - Validated build -
validationStamp- validation stamp - Validation stamp -
validationRun- validation run - Validation run
Default template:
A status message for the ${validationStamp} validation ${validationRun} for build ${build} in branch ${branch} of ${project} has changed.update_validation_stamp
When a validation stamp is updated.
Context:
-
project- project - Validation stamp’s project -
branch- branch - Validation stamp’s branch -
validationStamp- validation stamp - Updated validation stamp
Default template:
Validation stamp ${validationStamp} for branch ${branch} in ${project} has been updated.17.4. Notifications
Find below the list of all notification backends and their configurations.
17.4.2. Jenkins (jenkins)
This channel is used to trigger remote Jenkins jobs with some parameters.
This channel does not use the custom template.
Links:
Configuration:
-
callMode - ASYNC, SYNC - required - How to call the Jenkins job. ASYNC (the default) means that the job is called in "fire and forget" mode. When set to SYNC, Ontrack will wait for the completion of the job to success, with a given timeout (not recommended).
-
config - String - required - Name of the Jenkins configuration to use for the connection.
-
job - String - required - URL of the Jenkins job to call
-
parameters - List - required - Parameters to send to to the job
-
name - String - required - Name of the parameter
-
value - String - required - Value of the parameter
-
-
timeout - Int - required - Timeout in seconds
Output:
-
buildUrl - String - optional - URL to the build (only available when call mode is SYNC)
-
jobUrl - String - required - URL to the job
-
parameters - List - required - Parameters sent to the job
-
name - String - required - Name of the parameter
-
value - String - required - Value of the parameter
-
17.4.3. Jira ticket creation (jira-creation)
Creation of a Jira ticket
Configuration:
-
assignee - String - optional - Username of the assignee
-
configName - String - required - Name of the Jira configuration to use for the connection
-
customFields - List - required - List of custom fields for the ticket
-
name - String - required - Name of the field
-
value - JSON - required - Value for the field, as understood by the Jira API
-
-
fixVersion - String - optional - Name of the fix version to assign to the ticket
-
issueType - String - required - Name of the issue type to use for the ticket
-
labels - List - required - List of labels for the ticket
-
projectName - String - required - Key of the Jira project where to create the ticket
-
titleTemplate - String - required - (template) Summary of the ticket
-
useExisting - Boolean - required - If true, no ticket is created if it exists already
Output:
-
body - String - optional - Actual body for the ticket
-
customFields - List - optional - Actual custom fields of the ticket
-
name - String - required - Name of the field
-
value - JSON - required - Value for the field, as understood by the Jira API
-
-
existing - Boolean - optional - True if the ticket was already existing
-
fixVersion - String - optional - Actual fix version assigned to the ticket
-
jql - String - optional - JQL query used to identify the existing ticket
-
labels - List - optional - Actual labels of the ticket
-
ticketKey - String - optional - Ticket key
-
title - String - optional - Actual summary of the ticket
-
url - String - optional - URL to the ticket page
17.4.4. Jira link creation (jira-link)
Linking two Jira tickets together
Configuration:
-
configName - String - required - Name of the Jira configuration to use for the connection
-
linkName - String - required - Name of the link
-
sourceQuery - String - required - JQuery to get the source ticket
-
targetQuery - String - required - JQuery to get the target ticket
Output:
-
sourceTicket - String - required - Source ticket
-
targetTicket - String - required - Target ticket
17.4.5. Jira Service Desk (jira-service-desk)
This channel is used to create a Jira Service Desk ticket.
This channel does not use the custom template.
Configuration:
-
configName - String - required - Name of the Jira configuration to use for the connection
-
fields - List - required - List of fields to set into the service desk ticket
-
name - String - required - Name of the field
-
value - JSON - required - Value for the field, as understood by the Jira API
-
-
requestStatus - CLOSED, OPEN, ALL - optional - If looking for existing tickets, which type of requests to look for (ALL by default)
-
requestTypeId - Int - required - ID of the Request Type of the ticket to create
-
searchTerm - String - optional - Search token to use to identify any existing ticket. This is a template.
-
serviceDeskId - Int - required - ID of the Service Desk where to create the ticket
-
useExisting - Boolean - required - If true, no ticket is created if it exists already
Output:
-
existing - Boolean - optional - True if the ticket was already existing
-
fields - List - optional - List of actual fields which have been set
-
name - String - required - Name of the field
-
value - JSON - required - Value for the field, as understood by the Jira API
-
-
requestTypeId - Int - required - ID of the Request Type of the created ticket
-
serviceDeskId - Int - required - ID of the Service Desk where the ticket has been created
-
ticketKey - String - optional - Key of the created ticket
-
url - String - optional - URL to the created ticket
17.4.6. Mail (mail)
Sending a message by mail. The notification template is used for the body of the mail.
Configuration:
-
cc - String - optional - Comma-separated list of mail targets (cc)
-
subject - String - required - (template) Mail subject
-
to - String - required - Comma-separated list of mail targets (to)
Output:
-
body - String - required - Actual generated body for the mail
-
cc - String - optional - List of recipients in cc
-
subject - String - required - Actual generated subject for the mail
-
to - String - required - List of recipients
17.4.7. Ontrack validation (ontrack-validation)
Validates a build in Ontrack
Configuration:
-
branch - String - optional - [template] Name of the branch to validate. If not provided, looks for the event’s branch if available.
-
build - String - optional - [template] Name of the build to validate. If not provided, looks for the event’s build if available.
-
project - String - optional - [template] Name of the project to validate. If not provided, looks for the event’s project if available.
-
runTime - String - optional - Run time. Can be a template must be rendered as a number of seconds.
-
validation - String - required - Name of the validation stamp to use.
Output:
-
runId - Int - required - ID of the validation run
17.4.8. Slack (slack)
Sending messages to Slack. The notification template is used for the message.
Links:
Configuration:
-
Channel - String - required - Slack channel
-
Notification type - INFO, SUCCESS, WARNING, ERROR - required - Used for the color of the message
Output:
-
message - String - required - Actual content of the message
17.4.9. Webhook (webhook)
Calling an external webhook
This channel does not use the custom template.
Configuration:
-
name - String - required - Name of the webhook to use
Output:
-
payload - Object - required - Description of the payload sent to the webhook
-
data - JSON - required - Webhook actual payload
-
type - String - required - Webhook type
-
uuid - String - required - Unique ID for the payload
-
17.4.10. Workflow (workflow)
Launches a workflow
This channel does not use the custom template.
Configuration:
-
pauseMs - Long - required - (used for test only) Short pause before launching the workflow
-
workflow - Object - required - Workflow to run
-
name - String - required - Display name for the workflow
-
nodes - List - required - List of nodes in the workflow
-
data - JSON - required - Raw data associated with the node, to be used by the node executor.
-
description - String - optional - Description of the node in its workflow.
-
executorId - String - required - ID of the executor to use
-
id - String - required - Unique ID of the node in its workflow.
-
parents - List - required - List of the IDs of the parents for this node
-
id - String - required - ID of the parent node
-
-
timeout - Long - required - Timeout in seconds (5 minutes by default)
-
-
Output:
-
workflowInstanceId - String - required - ID of the workflow instance. Can be used to track the progress and outcome of the workflow.
17.5. Workflow nodes executors
Find below the list of all workflow node executors and their configurations.
17.5.1. List of workflow node executors
Unresolved directive in workflow-node-executors/index.adoc - include::workflow-node-executor-auto-versioning.adoc[] Unresolved directive in workflow-node-executors/index.adoc - include::workflow-node-executor-mock.adoc[] Unresolved directive in workflow-node-executors/index.adoc - include::workflow-node-executor-notification.adoc[] Unresolved directive in workflow-node-executors/index.adoc - include::workflow-node-executor-pause.adoc[] Unresolved directive in workflow-node-executors/index.adoc - include::workflow-node-executor-slot-pipeline-creation.adoc[] Unresolved directive in workflow-node-executors/index.adoc - include::workflow-node-executor-slot-pipeline-deployed.adoc[] Unresolved directive in workflow-node-executors/index.adoc - include::workflow-node-executor-slot-pipeline-deploying.adoc[]
17.6. List of properties
17.6.1. Artifactory promotion sync
ID: net.nemerosa.ontrack.extension.artifactory.property.ArtifactoryPromotionSyncPropertyType
Synchronisation of the promotions with Artifactory build statuses
Scope:
-
branch
Configuration:
-
buildName - String - required - Artifactory build name
-
buildNameFilter - String - required - Artifactory build name filter
-
configuration - String - required - Name of the Artifactory configuration
-
interval - Int - required - Interval between each synchronisation in minutes.
17.6.2. Auto-versioning
ID: net.nemerosa.ontrack.extension.av.project.AutoVersioningProjectPropertyType
Auto-versioning rules at project level
Scope:
-
project
Configuration:
-
branchExcludes - List - optional - List of regular expressions. AV requests match if no regular expression is matched by the target branch name. If empty, the target branch is considered matching.
-
branchIncludes - List - optional - List of regular expressions. AV requests match if at least one regular expression is matched by the target branch name. If empty, all target branches match (the default).
-
lastActivityDate - LocalDateTime - optional - If defined, any target branch whose last activity (last build creation) is before this date will be ignored by the auto-versioning
17.6.3. Bitbucket Cloud configuration
ID: net.nemerosa.ontrack.extension.bitbucket.cloud.property.BitbucketCloudProjectConfigurationPropertyType
Associates the project with a Bitbucket Cloud repository
Scope:
-
project
Configuration:
-
configuration - String - required - Name of the Bitbucket Cloud configuration
-
indexationInterval - Int - required - How often to index the repository, in minutes. Use 0 to disable indexation.
-
issueServiceConfigurationIdentifier - String - optional - Identifier for the issue service
-
repository - String - required - Name of the repository
17.6.4. Auto promotion levels
ID: net.nemerosa.ontrack.extension.general.AutoPromotionLevelPropertyType
If set, this property allows promotion levels to be created automatically from predefined promotion levels
Scope:
-
project
Configuration:
-
isAutoCreate - Boolean - required - isAutoCreate field
17.6.5. Auto promotion
ID: net.nemerosa.ontrack.extension.general.AutoPromotionPropertyType
Allows a promotion level to be granted on a build as soon as a list of validation stamps and/or other promotions has been passed
Scope:
-
promotion level
Configuration:
-
exclude - String - required - Regular expression to exclude validation stamps by name
-
include - String - required - Regular expression to include validation stamps by name
-
promotionLevels - List - required - List of needed promotion levels
-
validationStamps - List - required - List of needed validation stamps
17.6.6. Auto validation stamps
ID: net.nemerosa.ontrack.extension.general.AutoValidationStampPropertyType
If set, this property allows validation stamps to be created automatically from predefined validation stamps
Scope:
-
project
Configuration:
-
autoCreate - Boolean - required - If true, creates validations from predefined ones
-
autoCreateIfNotPredefined - Boolean - required - If true, creates validations even if not predefined
17.6.7. Build link display options
ID: net.nemerosa.ontrack.extension.general.BuildLinkDisplayPropertyType
Configuration of display options for the build links towards this project.
Scope:
-
project
Configuration:
-
useLabel - Boolean - required - Configuration at project label to specify that a build link decoration should use the release/label of a build when available. By default, it displays the release name if available, and then the build name as a default.
17.6.8. Links
ID: net.nemerosa.ontrack.extension.general.LinkPropertyType
List of links.
Scope:
-
project
-
branch
-
promotion level
-
validation stamp
-
build
-
promotion run
-
validation run
Configuration:
-
links - List - required - links field
17.6.9. Main build links
ID: net.nemerosa.ontrack.extension.general.MainBuildLinksProjectPropertyType
List of project labels which describes the list of build links to display in a build links decoration.
Scope:
-
project
Configuration:
-
labels - List - required - labels field
-
overrideGlobal - Boolean - required - overrideGlobal field
17.6.10. Message
ID: net.nemerosa.ontrack.extension.general.MessagePropertyType
Associates an arbitrary message (and its type) to an entity. Will be displayed as a decorator in the UI.
Scope:
-
project
-
branch
-
promotion level
-
validation stamp
-
build
-
promotion run
-
validation run
Configuration:
-
text - String - required - Content of the message
-
type - ERROR, WARNING, INFO - required - Type of message
17.6.11. Meta information
ID: net.nemerosa.ontrack.extension.general.MetaInfoPropertyType
List of meta information properties
Scope:
-
project
-
branch
-
promotion level
-
validation stamp
-
build
-
promotion run
-
validation run
Configuration:
-
items - List - required - items field
17.6.12. Previous promotion condition
ID: net.nemerosa.ontrack.extension.general.PreviousPromotionConditionPropertyType
Makes a promotion conditional based on the fact that a previous promotion has been granted.
Scope:
-
project
-
branch
-
promotion level
Configuration:
-
previousPromotionRequired - Boolean - required - previousPromotionRequired field
17.6.13. Promotion dependencies
ID: net.nemerosa.ontrack.extension.general.PromotionDependenciesPropertyType
List of promotions a promotion depends on before being applied.
Scope:
-
promotion level
Configuration:
-
dependencies - List - required - dependencies field
17.6.14. Release
ID: net.nemerosa.ontrack.extension.general.ReleasePropertyType
Release indicator on the build.
Scope:
-
build
Configuration:
-
name - String - required - name field
17.6.15. Validation on release/label
ID: net.nemerosa.ontrack.extension.general.ReleaseValidationPropertyType
When set, adding a release/label on a build will also validate this build.
Scope:
-
branch
Configuration:
-
validation - String - required - Validation to set whenever the release/label property is set.
17.6.16. Branching Model
ID: net.nemerosa.ontrack.extension.git.branching.BranchingModelPropertyType
Defines the branching model used by a project
Scope:
-
project
Configuration:
-
patterns - List - required - List of branch patterns (name & value). The name is the category of branch and the value is a regular expression on the SCM branch.
17.6.17. Git branch
ID: net.nemerosa.ontrack.extension.git.property.GitBranchConfigurationPropertyType
Git branch
Scope:
-
branch
Configuration:
-
branch - String - required - Git branch or pull request ID
-
buildCommitLink - Object - optional - How builds are linked to their Git commit
-
data - JSON - optional - Configuration of the service
-
id - String - required - ID of the service
-
-
buildTagInterval - Int - required - Interval in minutes for build/tag synchronization
-
isOverride - Boolean - required - Build overriding policy when synchronizing
17.6.18. Git commit
ID: net.nemerosa.ontrack.extension.git.property.GitCommitPropertyType
Git commit
Scope:
-
build
Configuration:
-
commit - String - required - Commit hash
17.6.19. Git configuration
Deprecated: Will be removed in V5. Pure Git configuration won’t be supported any longer.
ID: net.nemerosa.ontrack.extension.git.property.GitProjectConfigurationPropertyType
Associates the project with a Git repository
Scope:
-
project
Configuration:
-
configuration - String - required - Name of the Git configuration
17.6.20. GitHub configuration
ID: net.nemerosa.ontrack.extension.github.property.GitHubProjectConfigurationPropertyType
Associates the project with a GitHub repository
Scope:
-
project
Configuration:
-
configuration - String - required - Name of the configuration
-
indexationInterval - Int - required - How often to index the repository, in minutes. Use 0 to disable indexation.
-
issueServiceConfigurationIdentifier - String - optional - Identifier for the issue service
-
repository - String - required - GitHub repository, ie. org/name
17.6.21. GitHub Workflow Run
ID: net.nemerosa.ontrack.extension.github.workflow.BuildGitHubWorkflowRunPropertyType
Link to the GitHub Workflow Run which created this build.
Scope:
-
build
Configuration:
-
workflows - List - required - All workflows associated to a build.
-
event - String - optional - Event having led to the creation of this build
-
name - String - required - Name of the workflow
-
runId - Long - required - ID of the run
-
runNumber - Int - required - Number of the run
-
running - Boolean - required - True if the run is still flagged as running
-
url - String - required - Link to the GitHub Workflow run
-
17.6.22. GitHub Workflow Job
ID: net.nemerosa.ontrack.extension.github.workflow.ValidationRunGitHubWorkflowJobPropertyType
Link to the GitHub Workflow Job which created this validation run.
Scope:
-
validation run
Configuration:
-
event - String - optional - Event having led to the creation of this validation
-
job - String - required - Name of the workflow job which created this validation
-
name - String - required - Name of the workflow
-
runId - Long - required - ID of the run
-
runNumber - Int - required - Number of the run
-
running - Boolean - required - True if the run is still flagged as running
-
url - String - required - Link to the GitHub Workflow run
17.6.23. GitLab configuration
ID: net.nemerosa.ontrack.extension.gitlab.property.GitLabProjectConfigurationPropertyType
Associates the project with a GitLab repository
Scope:
-
project
Configuration:
-
configuration - String - required - Name of the GitLab configuration
-
indexationInterval - Int - required - How often to index the repository, in minutes. Use 0 to disable indexation.
-
issueServiceConfigurationIdentifier - String - optional - Issue service identifier
-
repository - String - required - Repository name
17.6.24. Jenkins Build
ID: net.nemerosa.ontrack.extension.jenkins.JenkinsBuildPropertyType
Link to a Jenkins Build
Scope:
-
build
-
promotion run
-
validation run
Configuration:
-
build - Int - required - Number of the build
-
configuration - String - required - Name of the Jenkins configuration
-
configuration - String - required - Name of the Jenkins configuration
-
configuration - String - required - Name of the Jenkins configuration
-
job - String - required - Path to the Jenkins job, relative to root. It may or may not include
/jobURL separators. -
job - String - required - Path to the Jenkins job, relative to root. It may or may not include
/jobURL separators.
17.6.25. Jenkins Job
ID: net.nemerosa.ontrack.extension.jenkins.JenkinsJobPropertyType
Link to a Jenkins Job
Scope:
-
project
-
branch
-
promotion level
-
validation stamp
Configuration:
-
configuration - String - required - Name of the Jenkins configuration
-
configuration - String - required - Name of the Jenkins configuration
-
job - String - required - Path to the Jenkins job, relative to root. It may or may not include
/jobURL separators.
17.6.26. JIRA Links to follow
Deprecated: Will be removed in V5. Not used any longer.
ID: net.nemerosa.ontrack.extension.jira.JIRAFollowLinksPropertyType
List of links to follow when displaying information about an issue.
Scope:
-
project
Configuration:
-
linkNames - List - required - List of links to follow when displaying information about an issue.
17.6.27. SonarQube
ID: net.nemerosa.ontrack.extension.sonarqube.property.SonarQubePropertyType
Association with a SonarQube project.
Scope:
-
project
Configuration:
-
branchModel - Boolean - required - branchModel field
-
branchPattern - String - optional - branchPattern field
-
configuration - String - required - Name of the SonarQube configuration
-
key - String - required - key field
-
measures - List - required - measures field
-
override - Boolean - required - override field
-
projectUrl - String - required - projectUrl field
-
validationMetrics - Boolean - required - If checked, collected SQ measures will be attached as metrics to the validation.
-
validationStamp - String - required - validationStamp field
17.6.28. Auto-disabling of branches based on patterns
ID: net.nemerosa.ontrack.extension.stale.AutoDisablingBranchPatternsPropertyType
Given a list of patterns and their behaviour, allows the disabling of branches based on their Ontrack names.
Scope:
-
project
Configuration:
-
items - List - required - List of patterns and their behaviour
-
size - Int - required - size field
-
17.6.29. Stale branches
ID: net.nemerosa.ontrack.extension.stale.StalePropertyType
Allows to disable or delete stale branches
Scope:
-
project
Configuration:
-
deletingDuration - Int - optional - Number of days of inactivity after a branch has been disabled after which the branch is deleted. If 0, the branches are never deleted.
-
disablingDuration - Int - required - Number of days of inactivity after which the branch is disabled
-
excludes - String - optional - Can define a regular expression for exceptions to the includes rule
-
includes - String - optional - Regular expression to identify branches which will never be disabled not deleted
-
promotionsToKeep - List - optional - List of promotions to always keep. If a branch has at least one build having one of these promotions, the branch will never be disabled not deleted.
17.6.30. Bitbucket Server configuration
ID: net.nemerosa.ontrack.extension.stash.property.StashProjectConfigurationPropertyType
Associates the project with a Bitbucket Server repository
Scope:
-
project
Configuration:
-
configuration - String - required - Name of the Bitbucket Server configuration
-
indexationInterval - Int - required - How often to index the repository, in minutes. Use 0 to disable indexation.
-
issueServiceConfigurationIdentifier - String - optional - Identifier for the issue service
-
project - String - required - Name of the project
-
repository - String - required - Name of the repository